
Introduction
This manual provides essential information for the safe and efficient operation of your Overmax MULTIPIC 3.5 Projector. Please read it thoroughly before use and retain it for future reference.
Коопсуздук маалыматы
ЭСКЕРТҮҮ: Өрт же электр тогуна урунуу коркунучун азайтуу үчүн, бул шайманды жамгырга же нымдуулукка дуушар кылбаңыз.
- Do not block any ventilation openings. Ensure adequate space around the projector for proper airflow.
- Радиаторлор, жылуулук регистрлери, мештер же башка аппараттар (анын ичинде) сыяктуу жылуулук булактарынын жанына орнотпоңуз ampкөтөргүчтөр) жылуулукту пайда кылуучу.
- Электр зымын басып же кысылып калуудан, айрыкча, сайгычтардан, ыңгайлуу идиштерден жана шаймандан чыккан жеринен сактаңыз.
- Өндүрүүчү тарабынан көрсөтүлгөн тиркемелерди/аксессуарларды гана колдонуңуз.
- Чагылган бороондо же узак убакыт бою колдонбогондо бул шайманды розеткадан ажыратыңыз.
- Бардык тейлөөлөрдү квалификациялуу тейлөө кызматкерлерине тапшырыңыз. Аппарат кандайдыр бир зыянга учураганда, мисалы, кубат берүүчү шнур же сайгыч бузулганда, суюктук төгүлгөндө же аппараттын ичине нерселер түшкөндө, аппарат жамгырга же нымдуулукка дуушар болгондо, нормалдуу иштебей калганда тейлөө талап кылынат. , же түшүрүлгөн.
- l болгондо проектордун объективине тике карабаamp күйүк.
Пакеттин мазмуну
Пакетте бардык буюмдар бар экенин текшериңиз:
- Overmax MULTIPIC 3.5 Projector
- Алыстан башкаруу
- Электр кабели
- HDMI кабели
- AV кабели (RCA)
- Колдонуучунун Колдонмосу (бул документ)
Продукт бүттүview
Проектордун компоненттери жана туташтыруу порттору менен таанышып алыңыз.

1-сүрөт: Overmax MULTIPIC 3.5 Projector and Remote Control. This image displays the projector from the front-right angle, showing the lens, the Overmax logo, ventilation grilles, and the included remote control.

2-сүрөт: Top Panel Controls. This image highlights the manual focus and keystone correction dials, along with the directional pad and function buttons on the top surface of the projector.

3-сүрөт: Rear Connection Panel. This view shows the AV input, two HDMI ports (HDMI1, HDMI2), and a USB port for connecting various devices.

4-сүрөт: Side VGA Port. This image displays the VGA (D-sub) input port located on the side of the projector, used for connecting older computers or monitors.
Жайгашуу
1. Алгачкы жайгаштыруу
Place the projector on a stable, flat surface or mount it on a tripod or ceiling. Ensure the projector is positioned at an appropriate distance from the projection surface to achieve the desired screen size.
2. Power Connection
- Электр кабелин проектордун кубат киресине туташтырыңыз.
- Электр кабелинин экинчи учун ылайыктуу электр розеткасына сайыңыз.
- Аппаратты күйгүзүү үчүн проектордун же пульттун кубат баскычын басыңыз.
3. Тышкы түзмөктөрдү туташтыруу
The MULTIPIC 3.5 supports various input sources:
- HDMI: Use an HDMI cable to connect devices like laptops, Blu-ray players, or gaming consoles to the HDMI1 or HDMI2 ports.
- USB: Медиа файлдарды ойнотуу үчүн USB дискти USB портуна салыңыз fileтүздөн-түз с.
- VGA: Connect older computers using a VGA cable to the D-sub port.
- OF: Use the included AV cable to connect devices with composite video and stereo audio outputs.
4. Wi-Fi туташуусу
To access online features like YouTube or screen mirroring, connect the projector to a Wi-Fi network.
- Navigate to the projector's settings menu.
- Select "Network" or "Wi-Fi settings".
- Тизмеден каалаган Wi-Fi тармагын тандаңыз.
- Эгер суралса, тармактын сырсөзүн киргизиңиз.

5-сүрөт: Projector Wi-Fi Connectivity. This image illustrates the projector's ability to connect wirelessly to a Wi-Fi router for internet access and streaming.
5. Screen Mirroring (Miracast / AirPlay)
The projector supports wireless display from compatible smartphones, tablets, and computers.
- Ensure both the projector and your mobile device are connected to the same Wi-Fi network.
- On the projector, select the Miracast or AirPlay input source.
- On your mobile device, activate the screen mirroring function (e.g., "Smart View" on Android, "Screen Mirroring" on iOS).
- Жеткиликтүү түзмөктөрдүн тизмесинен проекторду тандаңыз.
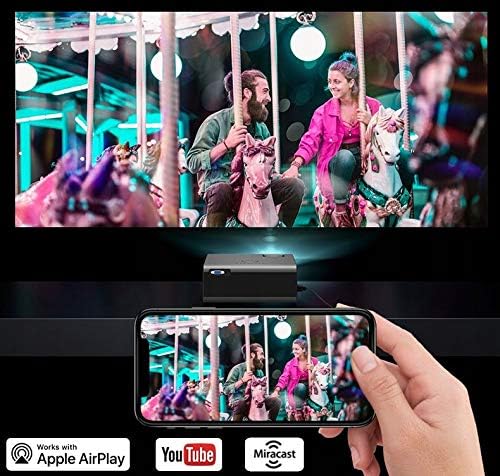
6-сүрөт: Wireless Screen Mirroring. This image demonstrates a smartphone wirelessly casting its display to the projector, utilizing Miracast or AirPlay functionality.
Иштөө нускамалары
1. Негизги башкаруу элементтери
The projector can be controlled using the on-device buttons or the included remote control.
- Кубат баскычы: Проекторду күйгүзөт же өчүрөт.
- Булак баскычы: Cycles through input sources (HDMI1, HDMI2, USB, VGA, AV, Miracast/AirPlay).
- Чабыттоо баскычтары (өйдө/төмөн/сол/оң/ОК): Менюларда багыттоо жана тандоолорду ырастоо үчүн колдонулат.
- Меню баскычы: Негизги жөндөөлөр менюсуна кирет.
- Артка/Чыгуу баскычы: Мурунку экранга кайтат же учурдагы менюдан чыгат.
2. Сүрөттү тууралоо
- Фокус: Rotate the focus ring on the projector lens (refer to Figure 2) until the image appears sharp and clear.
- Негизги ташты оңдоо: Adjust the keystone dial (refer to Figure 2) to correct trapezoidal distortion if the projector is not perfectly perpendicular to the screen.
- Аспект катышы: In the settings menu, you can change the aspect ratio between 16:9 and 4:3 to match your content. The image can also be rotated 180 degrees for ceiling mounting.

7-сүрөт: Display Resolution Example. This image illustrates the native 1280x720 resolution capability of the projector, providing clear visuals.
3. Аудио орнотуулары
The built-in speaker can be adjusted for different audio profiles:
- Access the audio settings in the main menu.
- Select from three preset modes: Music, Voice, or Movie.
- An advanced equalizer is available for fine-tuning audio parameters.
- For external audio, connect speakers or headphones to the audio output port.
4. Using Built-in Applications
The projector comes with pre-installed applications like YouTube and KoalaTV.
- Ensure the projector is connected to a Wi-Fi network.
- From the main interface, select the desired application icon.
- Use the remote control to navigate and select content within the application.
Техникалык тейлөө
1. Лamp Жашоо
Проектор лamp is designed for extended operation, with an estimated lifespan of up to 50,000 hours. No regular lamp алмаштыруу, адатта, кадимки колдонуу шарттарында талап кылынат.

8-сүрөт: Internal Optical System. This diagram illustrates the sophisticated optical components and light path within the projector, contributing to its image quality and lamp узак өмүр.
2. Тазалоо
- Объектив: Проектордун линзасын оптикалык беттер үчүн атайын жасалган жумшак, мамыксыз чүпүрөк менен акырын сүртүңүз. Абразивдүү тазалоочу каражаттарды колдонбоңуз.
- Сырткы: Clean the projector's exterior with a soft, dry cloth. For stubborn marks, a slightly damp кездеме, андан кийин кургак чүпүрөк колдонсо болот.
- Вентиляция тешиктери: Periodically check and clean the ventilation grilles to prevent dust buildup, which can affect performance and lifespan. Use a soft brush or compressed air.
Проблемаларды чечүү
| Көйгөй | Мүмкүн себеп | Чечим |
|---|---|---|
| Сүрөт көрсөтүлгөн жок | Power not connected; Incorrect input source; Cable not properly connected. | Check power cable; Select correct input source (HDMI, USB, VGA, AV); Ensure all cables are securely connected. |
| Сүрөт бүдөмүк | Фокус туураланган эмес; проектор экранга өтө жакын/алыс. | Adjust the focus ring on the lens; Reposition the projector for optimal distance. |
| Сүрөт трапеция түрүндө | Keystone оңдолгон жок. | Keystone оңдоо дөңгөлөгүн тууралаңыз. |
| Үн жок | Volume too low; Muted; Incorrect audio output selected; External device audio issue. | Increase volume; Unmute; Check audio settings; Verify audio output on connected device. |
| Wi-Fi туташуусу туруксуз | Weak signal; Incorrect password; Router issue. | Ensure projector is within Wi-Fi range; Re-enter password; Restart router and projector. |
| Пульт иштебей жатат | Батареялар түгөнгөн; Пульт менен проектордун ортосундагы тоскоолдук; Пульт сенсору бөгөттөлгөн. | Батареяларды алмаштырыңыз; тоскоолдуктарды алып салыңыз; Пульттун проектордун инфракызыл сенсоруна багытталганын текшериңиз. |
Техникалык шарттар
| Өзгөчөлүк | Деталь |
|---|---|
| Модел | MULTIPIC 3.5 |
| Бренд | Overmax |
| Дисплей технологиясы | LED |
| Native Resolution | 1280 x 720 (HD) |
| Колдоого алынган резолюция | 1920 x 1080 чейин (Full HD) |
| Жарыктык | 2200 Lumens |
| Контраст катышы | 1500:1 |
| Сүрөттүн максималдуу өлчөмү | 150 дюйм |
| Lamp Жашоо | 50,000 саатка чейин |
| Байланыш | 2x HDMI, 1x USB, 1x VGA (D-sub), 1x AV, Wi-Fi, Bluetooth, IR |
| Өзгөчөлүктөр | Built-in Wi-Fi, YouTube, Miracast, AirPlay, Keystone Correction, Advanced Equalizer |
| Колдоого алынган медиа форматтары | MPEG4, DIVX, XVID, AVI, WMA, MP3, JPEG, BMP, PNG, MOV |
| Аспект катышы | 16:9, 4:3 |
| Өлчөмдөрү (L x W x Y) | 21.5 x 18.5 x 8.7 см |
| Салмагы | 1.5 кг |
| Монтаж түрү | Tripod, Ceiling Mount |
Кепилдик жана колдоо
For warranty information and technical support, please refer to the official Overmax webсайтка же түздөн-түз кардарларды тейлөөгө кайрылыңыз. Сатып алганыңыздын далили катары сатып алуу дүмүрчөгүңүздү сактаңыз.
Кошумча жардам алуу үчүн, сураныч, баш багыңыз Overmax official webсайт.