
DORHEA ESP32 ESP-32S
DORHEA ESP32 ESP-32S WiFi Development Board User Manual
Model: ESP32 ESP-32S
1. Киришүү
This manual provides comprehensive instructions for the DORHEA ESP32 ESP-32S WiFi Development Board. This board is a versatile 2.4GHz dual-mode WiFi and Bluetooth microcontroller, featuring a dual-core processor and an integrated CP2102 chip for stable USB serial communication. It is designed for a wide range of applications, from home automation to wireless industrial control, and supports various development environments.

Figure 1.1: ашыкview of three ESP32 ESP-32S WiFi Development Boards.
2. Негизги өзгөчөлүктөрү
- Dual-Core ESP-32 Processor: Equipped with a 2.4GHz dual-mode development board, offering robust processing capabilities.
- Integrated CP2102 Chip: Utilizes the CP2102 USB serial port chip for reliable and fast data transmission, enabling direct debugging via USB.
- Flexible Development Environments: Supports Lua programming, LWIP protocol, FreeRTOS, and is compatible with NodeMCU and other development environments.
- Бир нече иштөө режимдери: Operates in AP (Access Point), STA (Station), and AP + STA modes for diverse networking applications.
- Low-Power Co-processor: Allows the main CPU to enter low-power mode while the co-processor continuously monitors peripherals or analog values, enhancing power efficiency.
- Баштапкы абалга келтирүү жана жүктөө баскычтары: Features two tactile buttons for easy reset and entering program mode.

Figure 2.1: Key features of the ESP32 ESP-32S Development Board.
3. Орнотуу колдонмосу
3.1. Аппараттык туташуу
- Компьютерге туташуу: Use a Micro USB cable to connect the ESP32 development board to your computer. The integrated CP2102 chip will facilitate the serial communication.
- Драйверди орнотуу: Ensure the necessary CP2102 drivers are installed on your operating system. These drivers are typically available from Silicon Labs or can be found through a quick online search.
- Электр камсыздоо: The board is powered via the USB connection. For stable operation, especially when connecting to Wi-Fi, ensure your USB port or hub can supply sufficient current (500-600mA instantaneously). Inadequate power can lead to reboots or connection issues.

Figure 3.1: ESP32 board connected to a breadboard and powered via USB.
3.2. Pinout диаграммасы
Understanding the pinout is crucial for connecting external components and sensors. Refer to the diagram below for a detailed layout of the GPIO pins and their functions.

Figure 3.2: ESP32 ESP-32S Pinout Diagram. Note that GPIO0 is connected to the BOOT button and is not broken out to an external pin.
3.3. Өнүктүрүү чөйрөсүн орнотуу
The ESP32 board is compatible with various Integrated Development Environments (IDEs).
- Arduino IDE: Install the ESP32 board package through the Arduino IDE's Boards Manager. This is a common and user-friendly option.
- PlatformIO (VS Code): For more advanced users, PlatformIO integrated with Visual Studio Code offers a powerful and flexible development environment.
- ESP-IDF: Espressif IoT Development Framework (ESP-IDF) is the official development framework for ESP32, providing a robust set of tools and libraries for professional development.
4. Иштөө нускамалары
4.1. Programming and Uploading Code
Once your development environment is set up, you can write and upload your code to the ESP32 board.
- Кодду иштеп чыгуу: Write your application using supported languages like C/C++ (Arduino, ESP-IDF) or Lua (NodeMCU).
- Жүктөлүүдө: Select the correct board and COM port in your IDE. For most setups, you do not need to manually press the BOOT button during upload, as the CP2102 chip handles the reset and boot sequence automatically.
- Жүктөө режими: If manual intervention is required, press and hold the "BOOT" button while pressing and releasing the "EN" (Enable/Reset) button, then release "BOOT" to enter flash mode.
4.2. Тармак режимдери
The ESP32 supports three primary Wi-Fi operating modes:
- Станция (STA) режими: The ESP32 connects to an existing Wi-Fi network (e.g., your home router) as a client device.
- Кирүү чекити (AP) режими: The ESP32 creates its own Wi-Fi network, allowing other devices to connect to it.
- AP + STA Mode: The ESP32 simultaneously acts as both an Access Point and a Station, connecting to an existing network while also hosting its own.
5. Техникалык тейлөө
To ensure the longevity and reliable operation of your ESP32 development board, follow these maintenance guidelines:
- Этияттык менен мамиле кылуу: Тактайды түшүрүп алуудан же ашыкча физикалык стресске кабылтуудан алыс болуңуз.
- Кургак кармоо: Protect the board from moisture and humidity, as water can cause short circuits and damage components.
- Тазалык: Keep the board free from dust and debris. Use a soft, dry brush or compressed air for cleaning.
- Электр камсыздоо: Always use a stable and appropriate power supply. Over-voltagе же томtage can damage the board. If using higher input voltages (e.g., 12V), consider using a switching regulator to step down to 5V before connecting to the VIN pin, as the onboard LDO regulator has limited heat dissipation.
- Сактагыч: When not in use, store the board in an anti-static bag or container to prevent electrostatic discharge (ESD) damage.
6. Кыйынчылыктарды
- Board Not Detected / Upload Failed:
- Ensure CP2102 drivers are correctly installed.
- Verify the correct COM port is selected in your IDE.
- Башка USB кабелин же USB портун колдонуп көрүңүз.
- If using PlatformIO, some users report needing to manually hold the BOOT button during upload.
- Frequent Reboots / Wi-Fi Connection Issues:
- This is often a power supply issue. The ESP32 can draw 500-600mA instantaneously, especially during Wi-Fi operations. Ensure your USB power source can provide this current.
- If powering via VIN with higher voltages (e.g., 12V), the onboard LDO regulator may overheat. Consider an external switching regulator to step down voltage чейин 5V.
- GPIO Pin Restrictions:
- Some GPIO pins have specific boot-time states (e.g., GPIO0, GPIO2, GPIO12, GPIO15). Incorrectly pulling these pins high or low during boot can prevent the chip from flashing or booting your program. Consult the ESP32 datasheet for detailed information on strapping pins.
- Note that GPIO0 is connected to the BOOT button and is not broken out to an external pin on this board, which can affect programmatic flashing in some advanced setups.
- Random Memory Loss / Bricked Board:
- Ensure stable power during flashing and operation.
- Verify the integrity of your uploaded firmware.
- In rare cases, severe power fluctuations or ESD can damage the flash memory.
- Silkscreen Error (GPIO33):
- On some boards, the GPIO pin between G25 and G32 may be incorrectly labeled as G23 instead of G33. This is a silkscreen error and does not affect the physical pin's functionality. Refer to the pinout diagram (Figure 3.2) for accurate pin assignments.
7. Техникалык шарттар
| Өзгөчөлүк | Description |
|---|---|
| Бренд | DORHEA |
| Модель аты | ESP32 ESP-32S |
| Процессор | Dual-core ESP-32 |
| Зымсыз байланыш | 2.4GHz WiFi (802.11 b/g/n), Bluetooth (v4.2 BR/EDR and BLE) |
| USB-to-Serial Chip | CP2102 |
| Операциялык системаны колдоо | Embedded operating system (LWIP and FreeRTOS) |
| Memory Speed | 2.4 ГГц |
| Эстутум сактоо сыйымдуулугу | 4 MB |
| Байланыш технологиясы | USB, Wi-Fi |
| Элемент Салмагы | 0.81 унция |
| Пакеттин өлчөмдөрү | 5.59 x 3.11 x 0.55 дюйм |
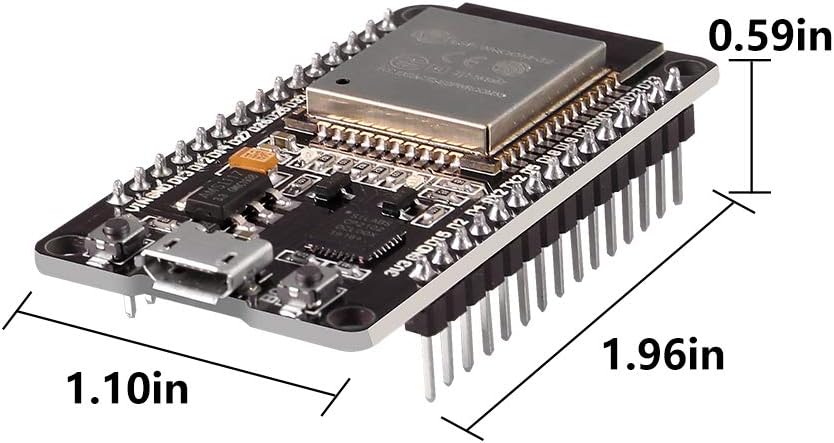
Figure 7.1: Physical dimensions of the ESP32 ESP-32S Development Board.
8. Кепилдик жана колдоо
For warranty information and technical support, please refer to the official DORHEA website or contact their customer service directly. Specific warranty terms may vary based on region and purchase date.
Өндүрүүчү: DORHEA
ASIN: B086MJGFVV
Ask a question about this manual
Ask about setup, troubleshooting, compatibility, parts, safety, or missing instructions. Manuals+ will review the question and use this page’s manual context to help answer it.