
1. Киришүү
Сатып алганыңыз үчүн рахматasing the Nedis RDIN2500WT Internet Radio. This manual provides essential information for the safe and efficient operation of your device. Please read these instructions carefully before use and retain them for future reference.
2. Коопсуздук нускамалары
- Аппаратты жамгырдын, нымдуулуктун же экстремалдык температуранын таасиринде калтырбаңыз.
- Агрегаттын айланасын туура желдетүүнү камсыз кылыңыз. Эч кандай желдетүүчү тешиктерди жаап албаңыз.
- Берилген кубат адаптерин гана колдонуңуз. Уруксат берилбеген адаптерди колдонуу түзмөккө зыян келтирип, кепилдикти жокко чыгарышы мүмкүн.
- Аппаратты ажыратууга же өзгөртүүгө аракет кылбаңыз. Бардык тейлөөлөрдү квалификациялуу кызматкерлерге тапшырыңыз.
- Аппаратты күчтүү магнит талаасынан алыс кармаңыз.
- Түзмөктү жумшак, кургак чүпүрөк менен гана тазалаңыз. Суюк тазалоочу каражаттарды же аэрозольдорду колдонбоңуз.
3. Пакеттин мазмуну
Пакетте бардык буюмдар бар экенин текшериңиз:
- Nedis RDIN2500WT Internet Radio Unit
- Алыстан башкаруу
- Кубат адаптери (DC 12V)
- 3.5 мм аудио кабель
- Колдонуучунун Колдонмосу (бул документ)

Figure 3.1: Nedis RDIN2500WT Internet Radio with included accessories: radio unit, remote control, power adapter, and 3.5mm audio cable.
4. Продукт бүтүп калдыview
4.1 Алдыңкы жана үстүнкү панелдин башкаруу элементтери

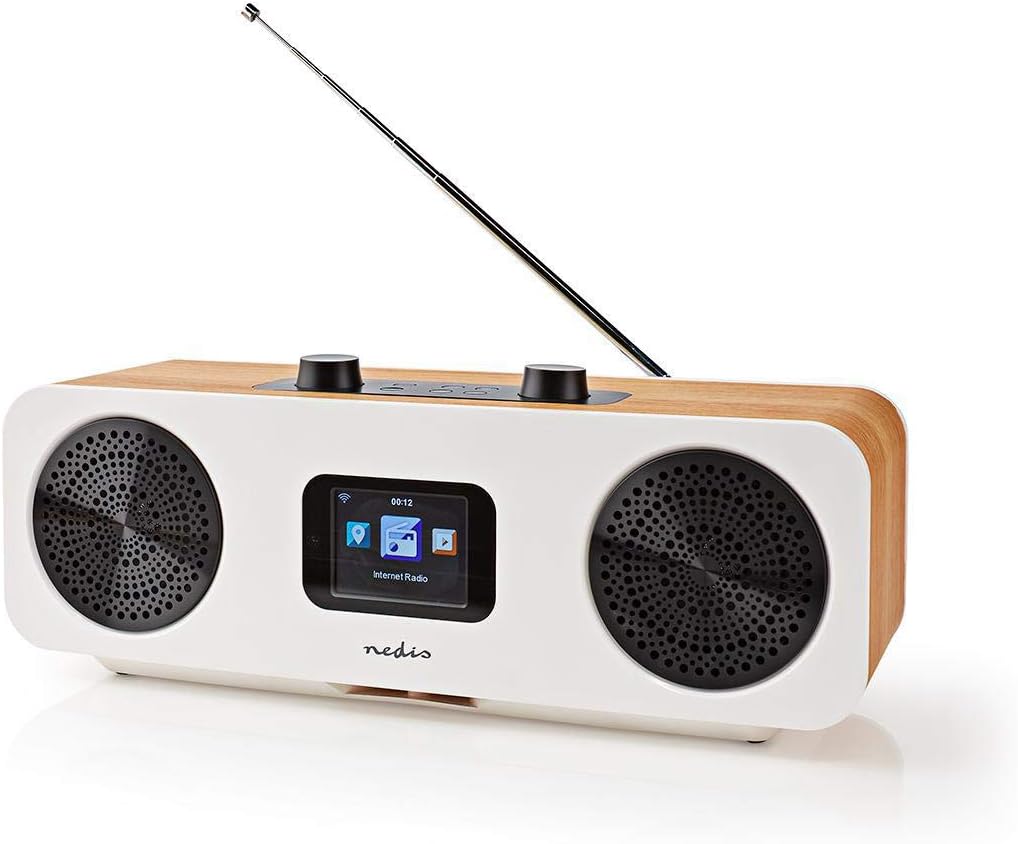
Сүрөт 4.1: Алдыңкы view of the radio with display.
The front of the radio features a 2.4-inch color LCD display and two speaker grilles. The top panel includes the main control buttons and knobs.
Сүрөт 4.2: Жогорку башкаруу панели.
- Volume - / +: Аудионун үнүн тууралайт.
- Үнсүз: Аудионун үнүн өчүрөт же ачат.
- Standby (Power button): Turns the radio on or off, or puts it into standby mode.
- Меню: Accesses the main menu or goes back to the previous screen.
- Режим: Switches between different operating modes (Internet Radio, DAB+, FM, Bluetooth, AUX).
- Алдын ала коюлган: Accesses or saves preset stations.
- Left / Right (Navigation buttons): Navigates through menus or tunes stations.
- Киргизүү: Тандоолорду ырастайт.
- Skip (Forward / Backward): Skips tracks in Bluetooth mode or navigates through lists.
4.2 Арткы панелдин туташуулары

4.3-сүрөт: Арткы панелдик байланыштар.
- Телескопиялык антенна: For DAB+ and FM reception. Extend fully for best signal.
- DC 12V киргизүү: Берилген кубат адаптерин бул жерге туташтырыңыз.
- USB порт: For firmware updates or charging external devices (check manual for specific functionality).
- AUX киргизүү: 3.5 мм аудио кабелин колдонуп, тышкы аудио түзмөктөрдү туташтырыңыз.
4.3 Алыстан башкаруу

4.4-сүрөт: Алыстан башкаруунун схемасы.
The remote control provides convenient access to all radio functions. Ensure batteries are inserted correctly (not included, typically 2x AAA).
5. Орнотуу
5.1 Кубат туташтыруу
- Connect the provided power adapter to the DC 12V input on the rear of the radio.
- Кубат адаптерин ылайыктуу розеткага сайыңыз.
5.2 Антеннаны орнотуу
For optimal DAB+ and FM reception, fully extend the telescopic antenna located on the rear of the unit.
5.3 Баштапкы орнотуу жана Wi-Fi туташуусу
Биринчи жолу күйгүзгөндө, радио сизди баштапкы орнотуу устасы аркылуу жетектейт:
- Тил тандоо: Use the navigation buttons to select your preferred language and press Кириңиз.
- Убакыт/дата: Set the current time and date. The radio can synchronize this automatically via network or DAB+ signal.
- Тармак конфигурациясы: Радио жеткиликтүү Wi-Fi тармактарын издейт.
- Тизмеден Wi-Fi тармагыңызды тандаңыз.
- Enter your Wi-Fi password using the navigation buttons and Кириңиз to confirm each character. Press Кириңиз again to connect.
- Туташкандан кийин, радио тармактын абалын тастыктайт.
6. Радиону иштетүү
6.1 Которуу режимдери
басыңыз Mode button on the radio or remote control to cycle through the available modes:
- Интернет радио
- DAB+ радиосу
- FM радиосу
- Bluetooth
- AUX киргизүү
6.2 Интернет радиосу
In Internet Radio mode, you can access thousands of stations worldwide.
- Select "Internet Radio" from the mode menu.
- Navigate through categories (e.g., Location, Genre, Popular Stations) using the Сол оң баскычтарын басып, менен ырастаңыз Кириңиз.
- Ойнотууну баштоо үчүн станцияны тандаңыз.
6.3 DAB+ радиосу
In DAB+ mode, the radio will automatically scan for available digital stations.
- Select "DAB+ Radio" from the mode menu.
- The radio will perform a scan and list available stations.
- Колдонуу Сол оң to select a station and Кириңиз Угуу.
6.4 FM радиосу
In FM mode, you can tune into analog radio stations.
- Select "FM Radio" from the mode menu.
- Колдонуу Сол оң to manually tune the frequency, or press and hold Сол оң кийинки жеткиликтүү станцияны авто-скандоо үчүн.
6.5 Bluetooth жупташтыруу
Connect your smartphone or tablet via Bluetooth to stream audio.
- Select "Bluetooth" from the mode menu. The radio will enter pairing mode.
- On your mobile device, enable Bluetooth and search for "RDIN2500WT".
- Select the radio from the list to pair. Once connected, you can play audio from your device.
6.6 AUX киргизүү
Connect external audio sources like MP3 players using the 3.5mm audio cable.
- Connect one end of the 3.5mm audio cable to the AUX input on the radio's rear panel.
- Экинчи учун тышкы аспабыңыздын гарнитура уячасына же аудио чыгышына туташтырыңыз.
- Select "AUX Input" from the mode menu.
6.7 Алдын ала орнотуулар
Тез жетүү үчүн сүйүктүү станцияларыңызды сактаңыз.
- Каалаган станцияга коюңуз.
- басып, кармап туруңуз Алдын ала коюлган button until the "Save to Preset" menu appears.
- Колдонуу Сол оң to select a preset number (1-10) and press Кириңиз сактоо үчүн.
- Алдын ала коюлган орнотууну кайра чакырып алуу үчүн, баскычын басыңыз Алдын ала коюлган баскычын кыскача басып, анан колдонуңуз Сол оң to select the desired preset and press Кириңиз.
6.8 Alarm and Sleep Functions
The radio includes an integrated alarm clock and sleep timer.
- Ойготкуч: басыңыз Ойготкуч button on the remote control or navigate through the main menu to set up alarms (time, source, volume).
- Уйку: басыңыз Уйку button on the remote control or navigate through the main menu to set a sleep timer, which will turn off the radio after a set duration.
6.9 App Control (AirMusic)
Control your radio using the AirMusic app on your smartphone or tablet.
- Download the "AirMusic" app from your device's app store.
- Смартфонуңуз/планшетиңиз жана радиоңуз бир Wi-Fi тармагына туташкандыгын текшериңиз.
- Open the AirMusic app; it should automatically detect your radio.
- You can now control the radio, browse stations, and manage presets from the app.
7. Техникалык тейлөө
7.1 Тазалоо
To clean the radio, gently wipe the surfaces with a soft, dry, lint-free cloth. Do not use abrasive cleaners, waxes, or solvents as they may damage the finish.
7.2 Сактоо
If storing the radio for an extended period, disconnect it from the power outlet and store it in a cool, dry place, away from direct sunlight and extreme temperatures.
8. Кыйынчылыктарды
If you encounter issues with your radio, refer to the following table for common problems and solutions.
| Көйгөй | Мүмкүн себеп | Чечим |
|---|---|---|
| Күч жок | Кубат адаптери туташкан эмес же туура эмес розетка. | Кубат адаптери радиого жана иштеп жаткан розеткага бекем туташтырылганын текшериңиз. |
| Үн жок | Volume too low, muted, or incorrect input mode. | Increase volume, check if muted, ensure correct mode (e.g., Internet Radio, DAB+). |
| Интернет радио туташпай жатат | Туура эмес Wi-Fi сырсөзү, начар сигнал же тармак көйгөйү. | Re-enter Wi-Fi password, move radio closer to router, restart router, check network settings. |
| DAB+/FM кабыл алуу начар | Антенна узартылган эмес, сигнал алсыз же тоскоолдук бар. | Телескопиялык антеннаны толугу менен сунуңуз. Радионун ордун башка жакка буруп көрүңүз. |
| Bluetooth жупташтыруу ишке ашпай калды | Радио жупташтыруу режиминде эмес, түзмөк өтө алыс же башка түзмөк менен мурунтан эле жупташып турат. | Ensure radio is in Bluetooth mode. Place devices closer. Disconnect from other Bluetooth devices. |
| Пульт иштебей жатат | Өлгөн батареялар же тоскоолдуктар. | Replace batteries. Ensure no obstruction between remote and radio. |
9. Техникалык шарттар
| Өзгөчөлүк | Спецификация |
|---|---|
| Бренд | NEDIS |
| Модель номери | RDIN2500WT |
| Түс | Wood / White |
| Байланыш технологиясы | Bluetooth, WiFi |
| Тюнинг технологиясы | DAB+ |
| Колдоого алынган радио тилкелери | FM, DAB+, Интернет радиосу |
| Өзгөчөлүктөр | Integrated Clock, Alarm Clock |
| Продукциянын өлчөмдөрү (L x W x Y) | 15.1 x 16 x 42.1 см |
| Power Source | AC Power Adapter (DC 12V) |
| Дисплей түрү | LCD (2.4" Color Screen) |
| Max FM Frequency | 108 МГц |
10. Кепилдик жана колдоо
This product is covered by the standard manufacturer's warranty. For detailed warranty terms and conditions, please refer to the warranty card included with your purchase or visit the official Nedis webсайт.
For technical support, troubleshooting assistance, or service inquiries, please contact Nedis customer support through their official channels. Contact information can typically be found on the Nedis webсайтында же продуктунун таңгагында.