
Introduction
This user manual provides detailed instructions for the installation, operation, maintenance, and troubleshooting of the Aruba AP-555 Wireless Access Point. Please read this manual thoroughly before using the device to ensure proper setup and optimal performance.
Продукт бүттүview
The Aruba AP-555 is an advanced 802.11ax (Wi-Fi 6) wireless access point designed for high-density environments. It supports aggregate peak data rates of up to 5.95 Gbit/s across 2.4 GHz and 5 GHz bands, leveraging MIMO and Beamforming technologies for enhanced performance. This access point is ideal for accommodating a large number of mobile and IoT devices, ensuring robust and efficient wireless connectivity.
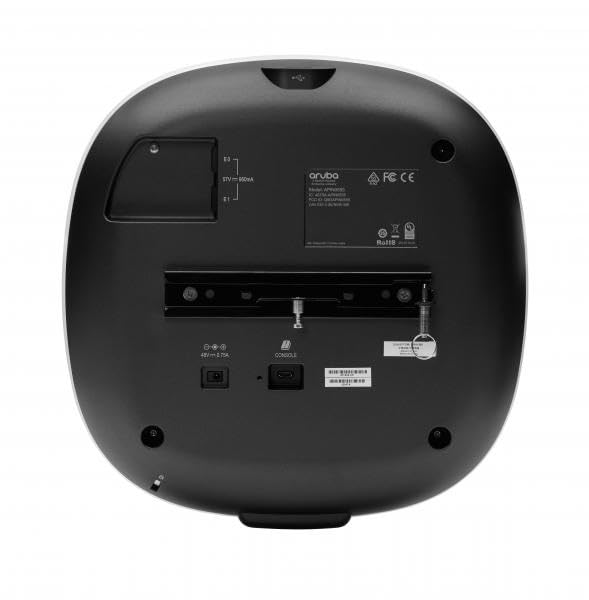
This image displays the rear panel of the Aruba AP-555 Wireless Access Point. Visible features include the mounting bracket, Ethernet ports (E0, E1), a USB port, a console port, and the power input (48V – 0.75A). Regulatory markings such as Aruba logo, FCC, CE, and RoHS are also present.
Жайгашуу
1. таңгактан чыгаруу
Carefully remove all components from the packaging. Verify that all items listed in the packing list are present and undamaged. Retain the packaging for future transport or storage.
2. Монтаждоо
The Aruba AP-555 can be mounted on a wall or ceiling. Use the provided mounting bracket and hardware. Ensure the mounting surface is sturdy enough to support the access point's weight (approximately 3.46 pounds).
- Дубалга орнотуу: Secure the bracket to the wall using appropriate screws and anchors.
- Шыпка орнотуу: Attach the bracket to a ceiling tile rail or a solid ceiling structure.
3. Электр энергиясын жана тармакты туташтыруу
Connect the power adapter to the 48V – 0.75A power input port on the rear of the access point. Connect an Ethernet cable from your network switch or router to one of the RJ-45 network ports (E0 or E1) on the AP-555. Power over Ethernet (PoE) can also be used if supported by your network infrastructure.
4. Баштапкы конфигурация
Upon powering on, the access point will initiate its boot sequence. Access the device's management interface via a web browser or a dedicated management software (e.g., Aruba Central, AirWave) to perform initial configuration, including setting up SSIDs, security protocols, and network parameters.
Иштөө нускамалары
LED көрсөткүчтөрү
The AP-555 features LED indicators that provide status information:
- Power LED: Indicates power status (e.g., solid green for normal operation, blinking for boot-up).
- Радио диоддор: Indicate activity on the 2.4 GHz and 5 GHz radios.
Түзмөктөрдү туташтыруу
Once configured, wireless clients can connect to the SSIDs broadcast by the AP-555 using the specified security credentials.
Network Configuration
Further network configurations, such as VLAN tagging, QoS settings, and guest access, can be managed through the access point's web interface or centralized management platform.
Техникалык тейлөө
Орнотулган программаны жаңыртуу
Regularly check for and apply firmware updates from the Hewlett Packard Enterprise support webсайт. Микропрограмма жаңыртуулары көбүнчө өндүрүмдүүлүктү жакшыртууларды, коопсуздук патчтарын жана жаңы функцияларды камтыйт.
Тазалоо
Clean the exterior of the access point with a soft, dry cloth. Do not use liquid cleaners or aerosols. Ensure ventilation openings are free from dust and obstructions.
Экологиялык эске алуулар
Ensure the access point is operated within its specified temperature and humidity ranges. Avoid placing it near heat sources or in direct sunlight.
Проблемаларды чечүү
Күч жок
- Verify the power adapter is securely connected to the AP and a working power outlet.
- Check if the power LED is illuminated.
Тармак байланышы жок
- Ensure the Ethernet cable is properly connected to a functional network port.
- Check the status of the network switch port.
- Verify network settings in the AP's configuration interface.
Жай аткаруу
- Check for channel interference and adjust channel settings if necessary.
- Акыркы микропрограмма орнотулганын текшериңиз.
- Review client density and network traffic.
Аппаратты баштапкы абалга келтирүү
To perform a factory reset, locate the reset button (often recessed) and press it for a specified duration (refer to the device's quick start guide or online documentation for exact timing, typically 5-10 seconds) while the device is powered on.
Техникалык шарттар
| Өзгөчөлүк | Деталь |
|---|---|
| Модель номери | JZ366A |
| Продукциянын өлчөмдөрү | 10.2 x 10.2 x 2.3 дюйм |
| Элемент Салмагы | 3.46 фунт |
| Өндүрүүчү | Hewlett Packard Enterprise |
| Зымсыз стандарт | 802.11ax (Wi-Fi 6) |
| Aggregate Data Rate | 5.95 Гбит/сек чейин |
| Жыштык тилкелери | 2.40 ГГц, 5 ГГц |
| MIMO Configuration | 8x8 MIMO (5GHz), 4x4 MIMO (2.4GHz) |
| Порттар | 2 x Network (RJ-45), 1 x USB, 1 x Console |
| Power Input | 48V – 0.75A |
| Монтаждоо параметрлери | Wall Mountable, Ceiling Mountable |
Кепилдик жана колдоо
For detailed warranty information, please refer to the warranty card included with your product or visit the official Hewlett Packard Enterprise support website. Technical support, drivers, and additional documentation can be found on the manufacturer's webсайт.
Өндүрүүчү Webсайт: www.hpe.com/aruba