
1. Киришүү
The PARANNIC OBD2 Diagnostic Scanner ELM327 V1.4 USB ELM 327 is a car code reader and diagnostic scan tool designed to interface with your vehicle's On-Board Diagnostics II (OBD-II) system. It features a PIC18F25K80 chip and a USB interface for reliable connection to Windows-based computers. This tool allows users to read and clear diagnostic trouble codes, monitor various sensor data, and access advanced vehicle features.
Негизги өзгөчөлүктөрү:
- PIC18F25K80 Chip: Ensures reliable performance and compatibility.
- USB ELM 327 Interface: Provides a stable connection to Windows 7, Windows 8, and other Windows operating systems. Drivers can be updated online from the official webсайт.
- Комплекстүү диагностикалык функциялар: Reads and clears generic and manufacturer-specific diagnostic trouble codes (DTCs), turns off the "Check Engine" light, and displays current sensor data.
- Live Sensor Data: Monitors Engine RPM, Calculated Load Value, Coolant Temperature, Fuel System Status, Vehicle Speed, Short Term Fuel Trim, Long Term Fuel Trim, Intake Manifold Pressure, Timing Advance, Intake Air Temperature, Air Flow Rate, Absolute Throttle Position, Oxygen sensor voltages/associated short term fuel trims, Fuel System status, Fuel Pressure, and many other parameters.
- FORScan Compatibility: Supports Ford, Mazda, Lincoln, and Mercury vehicles, allowing access to a comprehensive list of modifications and features such as Global Window, Bambi Mod, Secure idle, Perpendicular Park, Trailer Brake Controller, disabled Double Horn Honk, Disabled Door Ajar Chime, Reverse Tilt Mirrors, and Tire Size Correction.
2. Орнотуу нускамалары
Follow these steps to set up your PARANNIC OBD2 Diagnostic Scanner for use with your Windows computer and vehicle.
2.1. Драйвер жана программалык камсыздоону орнотуу
- Драйверлерди жүктөп алыңыз: Obtain the necessary USB drivers (e.g., CH340) from the official website or the provided instructions.
- Драйверлерди орнотуу: Install the drivers on your Windows computer (Windows 7, Windows 8, or later) as an administrator.
- Download FORScan Software: Download the FORScan software from the official FORScan webсайт (www.forscan.org) or other compatible diagnostic software.
- Install FORScan: Install the FORScan application on your computer.
- Configure COM Port Settings: Access Device Manager on your Windows computer. Locate the COM port assigned to the USB Serial Port. Right-click, go to Properties, then Port Settings, and click Advanced. Reduce the Transmit Buffer to a low value (e.g., 2 milliseconds) for optimal performance.
- Configure FORScan Connection: Open FORScan. Go to Settings > Connection. Set Connection Type to 'COM' and select the correct COM port. Ensure 'Auto-increase' is checked for enhanced performance.
- Obtain FORScan License: For advanced coding and programming functions, you may need a license. A free license can often be obtained from the FORScan official webсайт.
2.2. Унаага туташуу
- OBD-II портун табыңыз: OBD-II порту, адатта, айдоочу тарабындагы башкаруу панелинин астында жайгашкан.
- Сканерди туташтыруу: Plug the USB ELM 327 scanner into your vehicle's OBD-II port. The scanner's indicator lights should illuminate.
- Компьютерге туташуу: Plug the USB cable from the scanner into your laptop's USB port.
- От күйгүзүү: Turn your vehicle's ignition to the 'ON' position (engine off) or start the engine, as required by the diagnostic software.
- Set CAN Switch: Ensure the HS/MS CAN toggle switch on the scanner is set to the 'HS' position before initiating connection with the software.

Figure 1: PARANNIC ELM327 USB OBD2 Diagnostic Scanner connected via USB.
Video 1: Demonstrates how to connect the OBD2 USB adapter to a Windows computer and vehicle, including driver installation and software configuration.
Video 2: Provides optimization settings for FORScan software when using a USB ELM327 adapter, focusing on latency reduction.
3. Иштөө нускамалары
Once the scanner is connected and the software is running, you can perform various diagnostic tasks.
3.1. Диагностикалык көйгөй коддорун (DTC) окуу
- Унаага туташуу: Ensure the scanner is properly connected to the vehicle and computer, and the ignition is on.
- Программаны ишке киргизүү: Open your diagnostic software (e.g., FORScan).
- Байланыш түзүү: Click the 'Connect' button in the software. The software will attempt to establish communication with the vehicle.
- DTCлерди окуңуз: Navigate to the 'DTC' or 'Trouble Codes' section of the software. The scanner will read and display any stored diagnostic trouble codes, along with their descriptions.
3.2. Clearing Trouble Codes
- Read DTCs First: It is recommended to read and note down all DTCs before clearing them.
- Clear Codes Option: In the diagnostic software, select the option to 'Clear DTCs' or 'Erase Trouble Codes'.
- Confirm Action: Follow any on-screen prompts to confirm the clearing process. This will turn off the 'Check Engine' light.
3.3. Viewing Live Sensor Data
- Access Live Data: Navigate to the 'Live Data' or 'Data Stream' section in your software.
- Select PIDs: Choose the specific Parameter IDs (PIDs) you wish to monitor (e.g., Engine RPM, Coolant Temperature, Vehicle Speed).
- Мониторинг баштоо: Click the 'Play' or 'Start' button to begin real-time monitoring of the selected sensor data.
3.4. Switching CAN Modes (HS-CAN / MS-CAN)
The scanner features a physical toggle switch to alternate between High-Speed CAN (HS-CAN) and Medium-Speed CAN (MS-CAN) modes. This is crucial for accessing different modules within your vehicle, especially for Ford, Mazda, Lincoln, and Mercury models.
- Баштапкы туташуу: Start with the switch in the 'HS' position for initial vehicle connection and module scanning.
- Software Prompt: If the software requires access to MS-CAN modules (e.g., for specific PIDs or coding functions), it will prompt you to switch the toggle.
- Которуу/күйгүзүү: Physically move the switch on the scanner from 'HS' to 'MS' (or vice-versa) as instructed by the software.
- Confirm in Software: Click 'OK' or 'Continue' in the software after changing the switch position. The software will then attempt to read modules or data from the newly selected CAN bus.

Figure 2: PARANNIC ELM327 USB OBD2 Diagnostic Scanner plugged into the vehicle's OBD-II port.
Video 3: Demonstrates the use of the ELM327 adapter for diagnostic functions, including reading modules and switching between HS-CAN and MS-CAN modes.
Video 4: Unboxing and demonstration of a vLinker FS USB adapter, showing its connection and basic usage with diagnostic software.
4. Техникалык тейлөө
- Сактагыч: Сканерди күн нурунан жана экстремалдык температурадан алыс салкын, кургак жерде сактаңыз.
- Тазалоо: Түзмөктү тазалоо үчүн жумшак, кургак чүпүрөктү колдонуңуз. Катуу химиялык заттарды же абразивдүү тазалоочу каражаттарды колдонуудан алыс болуңуз.
- Кабельге кам көрүү: Do not pull on the cable to disconnect the scanner. Always grasp the connector firmly.
- Программалык камсыздоо жаңыртуулары: Расмий адамды үзгүлтүксүз текшерип туруңуз website for driver and software updates to ensure optimal performance and compatibility with newer vehicles.
5. Кыйынчылыктарды
5.1. Unable to Connect to Vehicle
- Байланыштарды текшерүү: Ensure the scanner is securely plugged into the OBD-II port and the USB cable is firmly connected to the computer.
- От алдыруу абалы: Verify that the vehicle's ignition is in the 'ON' position or the engine is running.
- CAN Switch Position: Confirm the HS/MS CAN toggle switch on the scanner is in the correct position (HS or MS) as required by the software or vehicle module.
- Драйверди орнотуу: Ensure all necessary USB drivers are correctly installed on your computer. Check Device Manager for any driver issues.
- Программалык камсыздоонун жөндөөлөрү: Verify that the correct COM port and connection type are selected in your diagnostic software settings.
5.2. Incorrect or No Data Displayed
- PID тандоо: Ensure the correct PIDs are selected for live data streaming.
- CAN режими: If monitoring specific modules, ensure the HS/MS CAN switch is in the appropriate position.
- Программалык шайкештик: Verify that your diagnostic software is compatible with your vehicle's make and model.
6. Техникалык шарттар
| Өзгөчөлүк | Спецификация |
|---|---|
| Бренд | PARANNIC |
| Модель номери | 327usb |
| Чип | PIC18F25K80 |
| Интерфейс | USB |
| Power Source | Электр зымдары |
| Операциялык системанын шайкештиги | Windows, Windows 7, Windows 8 |
| CAN Bus колдоо | HS-CAN, MS-CAN (with toggle switch) |
| Өлчөмдөрү (посылка) | 14.73 x 13.97 x 4.06 см |
| Элемент Салмагы | 295 г |
| UPC | 700961561816 |
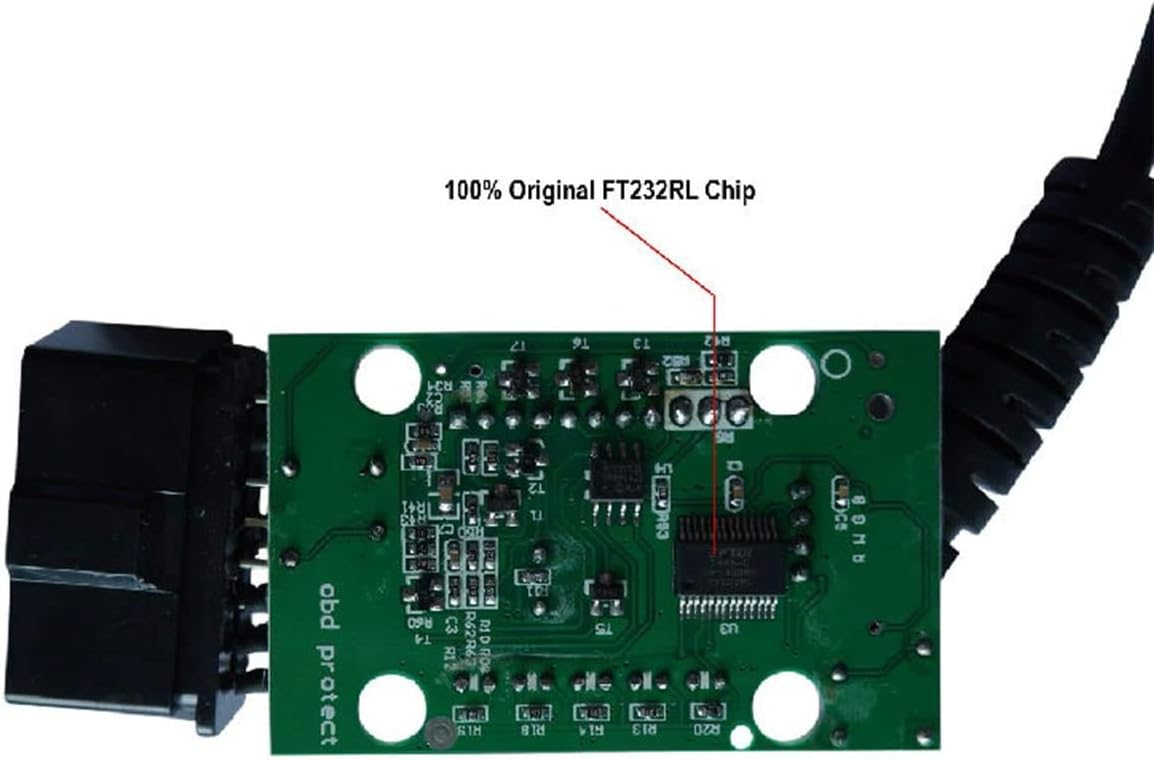
3-сүрөт: Ички view of the ELM327 USB scanner highlighting the PIC18F25K80 chip.

4-сүрөт: Дагы бир ички view of the ELM327 USB scanner, confirming the 25K80 chip.
7. Колдоо
For technical assistance, driver updates, or software information, please refer to the official product website or the FORScan community forums. The manufacturer is committed to customer satisfaction.