
1. Киришүү
This manual provides detailed instructions for the installation, operation, and maintenance of the Fafeicy TM626 DIN Rail Mount AC220V Power Timer Switch. This digital timer is designed for precise time control of electrical appliances and systems, offering programmable on/off cycles for various applications.
The TM626 is suitable for controlling street lights, factory equipment, advertising signs, production machinery, radio and television equipment, stage lighting, and other power equipment that requires regular automated switching.
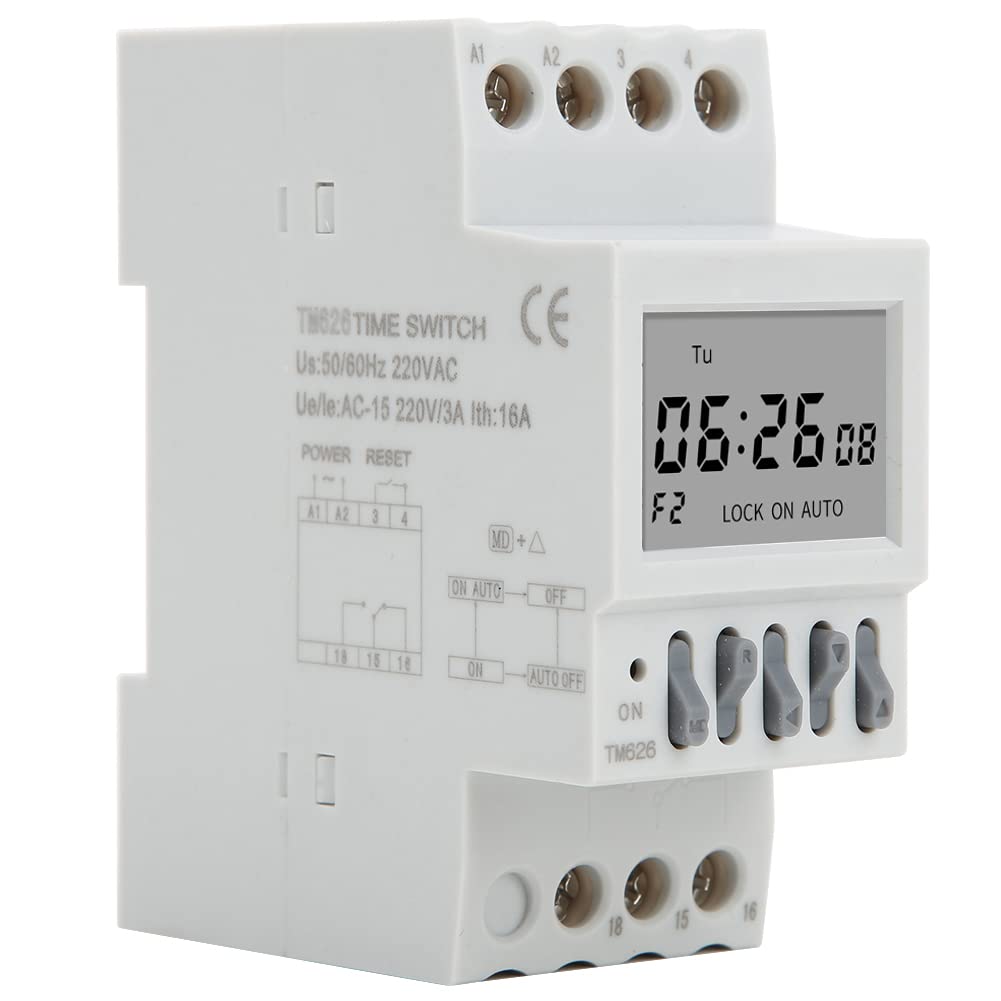
Сүрөт 1.1: Бурчтуу view of the Fafeicy TM626 Power Timer Switch, showing the display and terminal connections.

Image 1.2: The TM626 timer switch is ideal for automating various applications, including street lighting, industrial equipment, and advertising displays.
2. Коопсуздук маалыматы
Бул түзмөктү орнотуудан же иштетүүдөн мурун бардык коопсуздук көрсөтмөлөрүн окуп чыгып, түшүнүп алыңыз. Бул көрсөтмөлөрдү аткарбоо электр тогуна урунууга, өрткө же олуттуу жаракат алууга алып келиши мүмкүн.
- Кандайдыр бир орнотуу же тейлөө иштеринин алдында электр кубаты өчүрүлгөнүн текшериңиз.
- Орнотуу квалификациялуу электрик тарабынан гана жүргүзүлүшү керек.
- Көрсөтүлгөн көлөмдөн ашпаңызtage (AC220V) and current (16A) ratings.
- Түзмөктү суудан жана нымдуулугу жогору чөйрөлөрдөн алыс кармаңыз.
- Аппаратты өзүңүз ачууга же оңдоого аракет кылбаңыз. Тейлөө үчүн квалификациялуу кызматкерлерге кайрылыңыз.
3. Продукт бүтүп калдыview
The Fafeicy TM626 is a compact digital timer switch designed for DIN rail mounting. It features a clear LCD display for time and program settings, along with intuitive control buttons.
3.1 Компоненттер
- LCD дисплей: Учурдагы убакытты, күндү жана программалоонун абалын көрсөтөт.
- Башкаруу баскычтары: Used for setting time, programming, and manual override.
- Терминал блоктору: For connecting power input and load output.
- DIN Rail Clips: Стандарттуу DIN рельсине бекем орнотуу үчүн.

Сүрөт 3.1: Алдыңкы view of the TM626 timer switch, highlighting the LCD display and control buttons.

Сүрөт 3.2: Каптал view of the TM626, illustrating the integrated DIN rail mounting clips.
4. Техникалык шарттар
| Өзгөчөлүк | Спецификация |
|---|---|
| Бренд | Fafeicy |
| Модель номери | TM626 (Fafeicy txusog0m3i) |
| Operating Voltage | AC220V (50/60Гц) |
| Номиналдуу ток | 16A |
| Screen Size | 1.6 дюйм |
| Механикалык жашоо | ≥ 30,000 жолу |
| Электрдик өмүр | ≥ 10,000 жолу |
| Өлчөмдөрү (болжол менен) | Width: 35mm (1.4in), Height: 82mm (3.2in), Depth: 68mm (2.7in) |
| Монтаждоо | Темир менен |
| Келип чыккан өлкө | Кытай |

Image 4.1: Dimensional drawing of the TM626 timer switch, showing key measurements.

Image 4.2: The TM626 timer switch, illustrating its robust design for long mechanical and electrical life.
5. Орнотуу жана орнотуу
Follow these steps for proper installation and initial setup of your TM626 timer switch.
5.1 Монтаждоо
- Ensure the main power supply is OFF before mounting.
- Locate a standard 35mm DIN rail within your electrical panel.
- Align the DIN rail clips on the back of the TM626 with the DIN rail.
- Press the timer firmly onto the rail until it clicks into place.
5.2 Электр зымдары
Refer to the wiring diagram on the device and below for correct connections. Incorrect wiring can damage the device or cause electrical hazards.

Сүрөт 5.1: Каптал view of the TM626 showing the wiring terminals and a simplified internal diagram. Terminals A1 and A2 are for power input (AC220V). Terminals 15, 16, 18 are for load output (15: Common, 16: Normally Closed, 18: Normally Open).
- Connect the AC220V power supply to terminals A1 жана A2.
- Connect the common wire of your load to terminal 15.
- For normally open operation (load turns ON when timer activates), connect the load's live wire to terminal 18.
- For normally closed operation (load turns OFF when timer activates), connect the load's live wire to terminal 16.
- Бардык байланыштар коопсуз жана изоляцияланганын текшериңиз.
5.3 Баштапкы кубаттуулук
After wiring, restore power. The display should light up. If the display is blank, check power connections. The timer may require an initial charge if it has been stored for a long time; allow it to be powered for a few minutes.
6. Иштөө нускамалары
The TM626 timer switch allows you to set the current time and program multiple on/off cycles.
6.1 Учурдагы убакытты жана күндү орнотуу
- басыңыз СААТ button (if available, or a similar button for time setting).
- колдонуу D+ (Day), H+ (Hour), and M+ (Minute) buttons to adjust the current day, hour, and minute.
- Басыңыз СААТ сактоо жана чыгуу үчүн кайра.
6.2 Программалоону күйгүзүү/өчүрүү циклдери
The TM626 typically supports multiple ON/OFF programs. The exact number may vary, but common models support 8-16 programs.
- басыңыз ПРОГ баскычын басыңыз. Дисплейде "1 ON" көрсөтүлөт.
- Колдонуу D+ to select the day(s) for this ON event (e.g., Mon-Fri, Sat-Sun, every day, specific days).
- Колдонуу H+ жана M+ каалаган КҮЙГҮЗҮҮ убакытын коюу үчүн.
- Басыңыз ПРОГ кайрадан. Дисплейде "1 OFF" көрсөтүлөт.
- Колдонуу D+, H+, жана M+ to set the desired OFF time for the first program.
- Repeat steps 1-5 for additional ON/OFF programs (e.g., "2 ON", "2 OFF", etc.).
- Бардык керектүү программаларды орноткондон кийин, баскычын басыңыз СААТ button to exit programming mode and save settings.
6.3 Кол менен жокко чыгаруу
The КОЛ or ON/AUTO/OFF button allows you to manually override the programmed settings.
- Pressing this button cycles through modes: ON (ар дайым күйүк), АВТО (follows programs), ӨЧҮРҮҮ (always off).
- Тандоо АВТО for the timer to execute its programmed schedules.
6.4 Калыбына келтирүү функциясы
To clear all settings and return the timer to its factory default state, locate the small RESET button (often recessed) and press it using a pointed object (e.g., a pen tip). This will erase all time and program settings.
7. Техникалык тейлөө
The Fafeicy TM626 timer switch requires minimal maintenance to ensure long-term reliable operation.
- Тазалоо: Use a soft, dry cloth to wipe the exterior of the device. Do not use abrasive cleaners or solvents.
- Текшерүү: Зымдардын туташууларынын бекемдигин жана эскирүү же бузулуу белгилерин мезгил-мезгили менен текшерип туруңуз.
- Батареянын камдык көчүрмөсү: The device typically includes an internal battery for retaining settings during power outages. This battery is usually non-replaceable by the user and recharges when the device is powered.
8. Кыйынчылыктарды
If you encounter issues with your TM626 timer switch, refer to the following common problems and solutions:
| Көйгөй | Мүмкүн себеп | Чечим |
|---|---|---|
| Дисплей бош. | Электр менен камсыздоо жок; ички батареясы түгөндү. | Check power connections to A1/A2. Allow device to be powered for several minutes to charge the internal battery. |
| Программалангандай жүктөө күйбөйт/өчпөйт. | Incorrect programming; timer in manual ON/OFF mode; incorrect wiring; faulty load. | Verify program settings. Ensure the timer is in АВТО mode. Check wiring connections (15, 16, 18). Test the load independently. |
| Убакыт туура эмес. | Time not set correctly; power interruption (though internal battery should prevent this). | Reset and re-set the current time and day. Ensure the internal battery is charged. |
| Баскычтар жооп бербейт. | Түзмөктүн иштебей калышы; программалык камсыздоонун убактылуу мүчүлүштүгү. | Perform a full reset using the recessed RESET button. If the issue persists, contact support. |
9. Кепилдик жана колдоо
For warranty information or technical support, please refer to the documentation provided with your purchase or contact Fafeicy customer service through their official channels. Keep your purchase receipt as proof of purchase.
Жалпы суроолор үчүн, сиз иш сапары менен болот Fafeicy Brand Store.