
1. Киришүү
The Gravity 4000.1D is a high-performance Class D monoblock amplifier designed for automotive audio systems. This amplifier delivers 4000 Watts maximum power and is stable at 1 Ohm, 2 Ohm, and 4 Ohm loads, making it suitable for driving subwoofers. It features a digital design with a MOSFET power supply for efficient operation. This manual provides essential information for proper installation, operation, and maintenance of your ampөмүрлүү.
2. Коопсуздук чаралары
- Орнотууну баштоодон мурун, ар дайым унаанын аккумуляторунун терс терминалын ажыратыңыз.
- Зымдардын бузулушуна же кыска туташууларга жол бербөө үчүн бардык зымдар туура жолго коюлганын жана бекемделгенин текшериңиз.
- Орнотуу бөлүмүндө көрсөтүлгөндөй, тиешелүү өлчөөчү кубаттуулукту жана жер зымдарын колдонуңуз.
- орнотуу ampашыкча ысып кетүүнүн алдын алуу үчүн жакшы желдетилген жерде лифт.
- орнотуудан качыңыз amplifier in locations exposed to direct sunlight or excessive moisture.
- Орнотуу кадамдарына ишене албасаңыз, профессионал унаа аудио орнотуучусуна кайрылыңыз.
3. Пакеттин мазмуну
Пакетте бардык буюмдар бар экенин текшериңиз:
- Gravity 4000.1D Class D Car Ampөмүрлүү
- Remote Bass Knob with Cable
- Монтаждоочу жабдыктар (буроолор)
- Колдонуучунун колдонмосу (бул документ)
- SoundXtreme AP6 Bass Machine (Bundle Component)
4. Продукт бүтүп калдыview
менен таанышыңыз amplifier's layout and connections.

1-сүрөт: Жогорку view of the Gravity 4000.1D Class D Car Amplifier, showing the 'GRAVITY' logo and 'WARZONE' branding, along with the model number 'WZ 4000-1D'.
4.1 Киргизүү жана башкаруу панели

Сүрөт 2: Жакын пландан view -ныкы amplifier's input and control panel. This side features RCA input jacks, a remote bass knob port, and various adjustment controls.
- КОРГОО LED: болгондо жарык берет ampкөтөргүч коргоо режиминде.
- АЛЫС: Port for connecting the wired remote bass knob.
- INPUT (RCA): Audio signal input from your head unit or source.
- BRIDGE IN: Used for bridging multiple amplifiers (refer to advanced setup).
- УТУШ: Киргизүү сезгичтигин тууралайт ampөмүрлүү.
- LPF (төмөн өткөрүүчү чыпка): Adjusts the low-pass crossover frequency (40 Hz ~ 180 Hz).
- SUBSONIC: Adjusts the subsonic filter frequency (0 Hz ~ 50 Hz).
- BASS BOOST FREQ: Selects the center frequency for bass boost (30 Hz, 40 Hz, 60 Hz).
- БАС КҮЧӨТҮҮ: Adjusts the level of bass boost (0 dB ~ 12 dB).
- POWER LED: болгондо жарык берет ampкөтөргүч күйгүзүлгөн.
4.2 Power and Speaker Terminal Panel

Сүрөт 3: Жакын пландан view -ныкы amplifier's power and speaker terminal panel. This side includes connections for power, ground, remote turn-on, and speaker outputs.
- Спикер: Output terminals for connecting your subwoofer(s).
- POWER (+12V): Connects to the positive terminal of the vehicle's battery.
- REM (Алыстан): Баш блогуңуздун алыстан күйгүзүү чыгышына туташат.
- GND (жер): Унаанын ичиндеги бекем шасси жерге туташтыруучу чекитке туташат.
5. Орнотуу
5.1 Орнотуу Ampөмүрлүү
Choose a mounting location that is dry, well-ventilated, and secure. Ensure there is sufficient airflow around the amplifier to prevent overheating. The amplifier can be mounted horizontally or vertically. Use the provided mounting screws to secure the ampкөтөргүчтү унааңыздын катуу бетине көтөрүңүз.
5.2 Зымдарды туташтыруу
Proper wiring is crucial for optimal performance and safety. Refer to Figure 3 for terminal locations.
- Кубат туташуу (+12V): Run a heavy-gauge power cable (e.g., 4-gauge or larger) directly from the vehicle's positive battery terminal to the amplifier's +12V terminal. Install an in-line fuse holder with an appropriate fuse (not included) within 18 inches (45 cm) of the battery.
- Жерге туташуу (GND): жерден калың калибрдеги жерге туташтыруучу кабелди (электр кабели менен бирдей калибрдеги) өткөрүңүз ampКөтөргүчтүн GND терминалын унаанын шассисиндеги таза, боёлбогон металл бетине бекитиңиз. Боёкту же датты кырып салуу менен жакшы электрдик туташууну камсыз кылыңыз. Жерге туташтыруучу кабель мүмкүн болушунча кыска, идеалдуу түрдө 1 метрден (3 футтан) аз болушу керек.
- Remote Turn-On Connection (REM): Connect a smaller gauge wire (e.g., 18-gauge) from the amplifier's REM terminal to the remote turn-on output of your head unit. This wire tells the ampбаш бирдигиңиз активдүү болгондо күйгүзүү үчүн көтөргүч.
- RCA киргизүү туташуу: Connect RCA cables from the pre-out outputs of your head unit to the INPUT RCA jacks on the ampөмүрлүү.
- Динамик туташуу: Connect your subwoofer(s) to the SPEAKER output terminals. Ensure correct polarity (+ to + and - to -). The amplifier is stable down to 1 Ohm. Consult your subwoofer's specifications for proper wiring configurations to achieve the desired impedance.
- Алыскы басс баскычы: Plug the remote bass knob cable into the REMOTE port on the amplifier and mount the knob in a convenient location for adjustment.
6. Операция
6.1 Баштапкы кубаттуулук
After all connections are made and verified, reconnect the vehicle's battery. Turn on your head unit. The POWER LED on the amplifier should illuminate. If the PROTECT LED illuminates, refer to the Troubleshooting section.
6.2 Тууралоо Ampкөтөргүч Орнотуулар
Adjust these settings carefully to optimize sound quality and prevent damage to your speakers.
- УТУШ: Start with the GAIN control at minimum. Play a familiar piece of music at a moderate volume on your head unit. Slowly increase the GAIN until you hear distortion, then back off slightly. This sets the ampлифттин киргизүү сезгичтигин башкы блоктун чыгаруу сигналына дал келтириңиз.
- LPF (төмөн өткөрүүчү чыпка): Adjust the LPF to filter out frequencies above your desired subwoofer range. A common starting point is 80-100 Hz. This ensures only low frequencies are sent to your subwoofer.
- СУБСОНИКАЛЫК Чыпка: This filter removes extremely low frequencies that your subwoofer cannot reproduce efficiently, preventing damage and improving sound quality. Set it slightly below your subwoofer's port tuning frequency or around 25-30 Hz for sealed enclosures.
- BASS BOOST FREQ & BASS BOOST: Use these controls to enhance bass output at a specific frequency. Start with Bass Boost at 0 dB and adjust only if needed. Excessive bass boost can cause distortion and damage.
6.3 Алыстан башкаруучу басс баскычы

Figure 4: The wired remote bass knob, used for convenient adjustment of bass level from the driver's seat.
The remote bass knob allows you to adjust the subwoofer output level conveniently from your listening position. This control typically acts as a master volume for the subwoofer channel, allowing you to fine-tune bass levels without accessing the ampтүз көтөргүч.
7. Техникалык шарттар
| Өзгөчөлүк | Спецификация |
|---|---|
| Модел | 4000.1D |
| Чыгуу күчү | Максимум 4000 ватт |
| Класс | Д классы |
| Туруктуулук | 1 Ohm, 2 Ohm, 4 Ohm Stable |
| S/N катышы | > 70 дБ |
| Frequency Response | 8 Hz ~ 180 Hz |
| THD | < 0.2% |
| Bass Boost деңгээли | 0 ~ 12 дБ |
| LPF (төмөн өткөрүүчү чыпка) | 40 Hz ~ 180 Hz |
| Subsonic чыпкасы | 0 ~ 50 Гц |
| Киргизүүлөр | High and Low Level Inputs |
| Өлчөмдөрү (L×W×H) | 286 мм (11.3 дюйм) × 211 мм (8.3 дюйм) × 64.5 мм (2.5 дюйм) |
| Каналдардын саны | 1 (Моноблок) |
| Монтаж түрү | бурун |
8. Кыйынчылыктарды
Эгер сиз менен көйгөйлөр пайда болсо ampкөтөргүч, төмөнкү таблицаны караңыз:
| Көйгөй | Мүмкүн себеп | Чечим |
|---|---|---|
| Ampкөтөргүч күйбөйт (POWER LED өчүк) | No power, no ground, or no remote signal. Blown fuse. | Check +12V, GND, and REM connections. Verify in-line fuse. |
| PROTECT LED illuminates | Short circuit in speaker wiring, impedance too low, overheating, or DC offset. | Check speaker wiring for shorts. Verify speaker impedance. Ensure proper ventilation. Allow ampмуздатуу үчүн көтөргүч. |
| Үн чыгышы жок | No input signal, incorrect gain setting, or speaker wiring issue. | Check RCA input connections. Adjust GAIN. Verify speaker connections and polarity. |
| Бурмаланган үн | GAIN set too high, improper crossover settings, or damaged speakers. | Reduce GAIN. Adjust LPF and Subsonic filters. Inspect speakers for damage. |
| Мотордун ызы-чуусу/кызылы | Poor grounding, RCA cable routing, or power cable interference. | Ensure solid ground connection. Route RCA cables away from power cables. Consider a ground loop isolator. |
9. Техникалык тейлөө
To ensure the longevity and optimal performance of your Gravity 4000.1D ampөмүр берүүчү:
- сактаңыз ampКөтөргүчтү тазалап, чаңдан арылыңыз. Тазалоо үчүн жумшак, кургак чүпүрөк колдонуңуз.
- Ensure that the cooling fins are not obstructed to allow for proper heat dissipation.
- Мезгил-мезгили менен бардык зымдарды туташтыргычтын бекемдигин жана коррозиясын текшерип туруңуз.
- Суюктуктарды төгүп албаңыз ampөмүрлүү.
10. SoundXtreme AP6 Bass Machine (Bundle Component)
The Gravity 4000.1D amplifier may be bundled with a SoundXtreme AP6 Bass Machine. This component is designed to enhance bass response and provide additional control over low frequencies in your audio system.
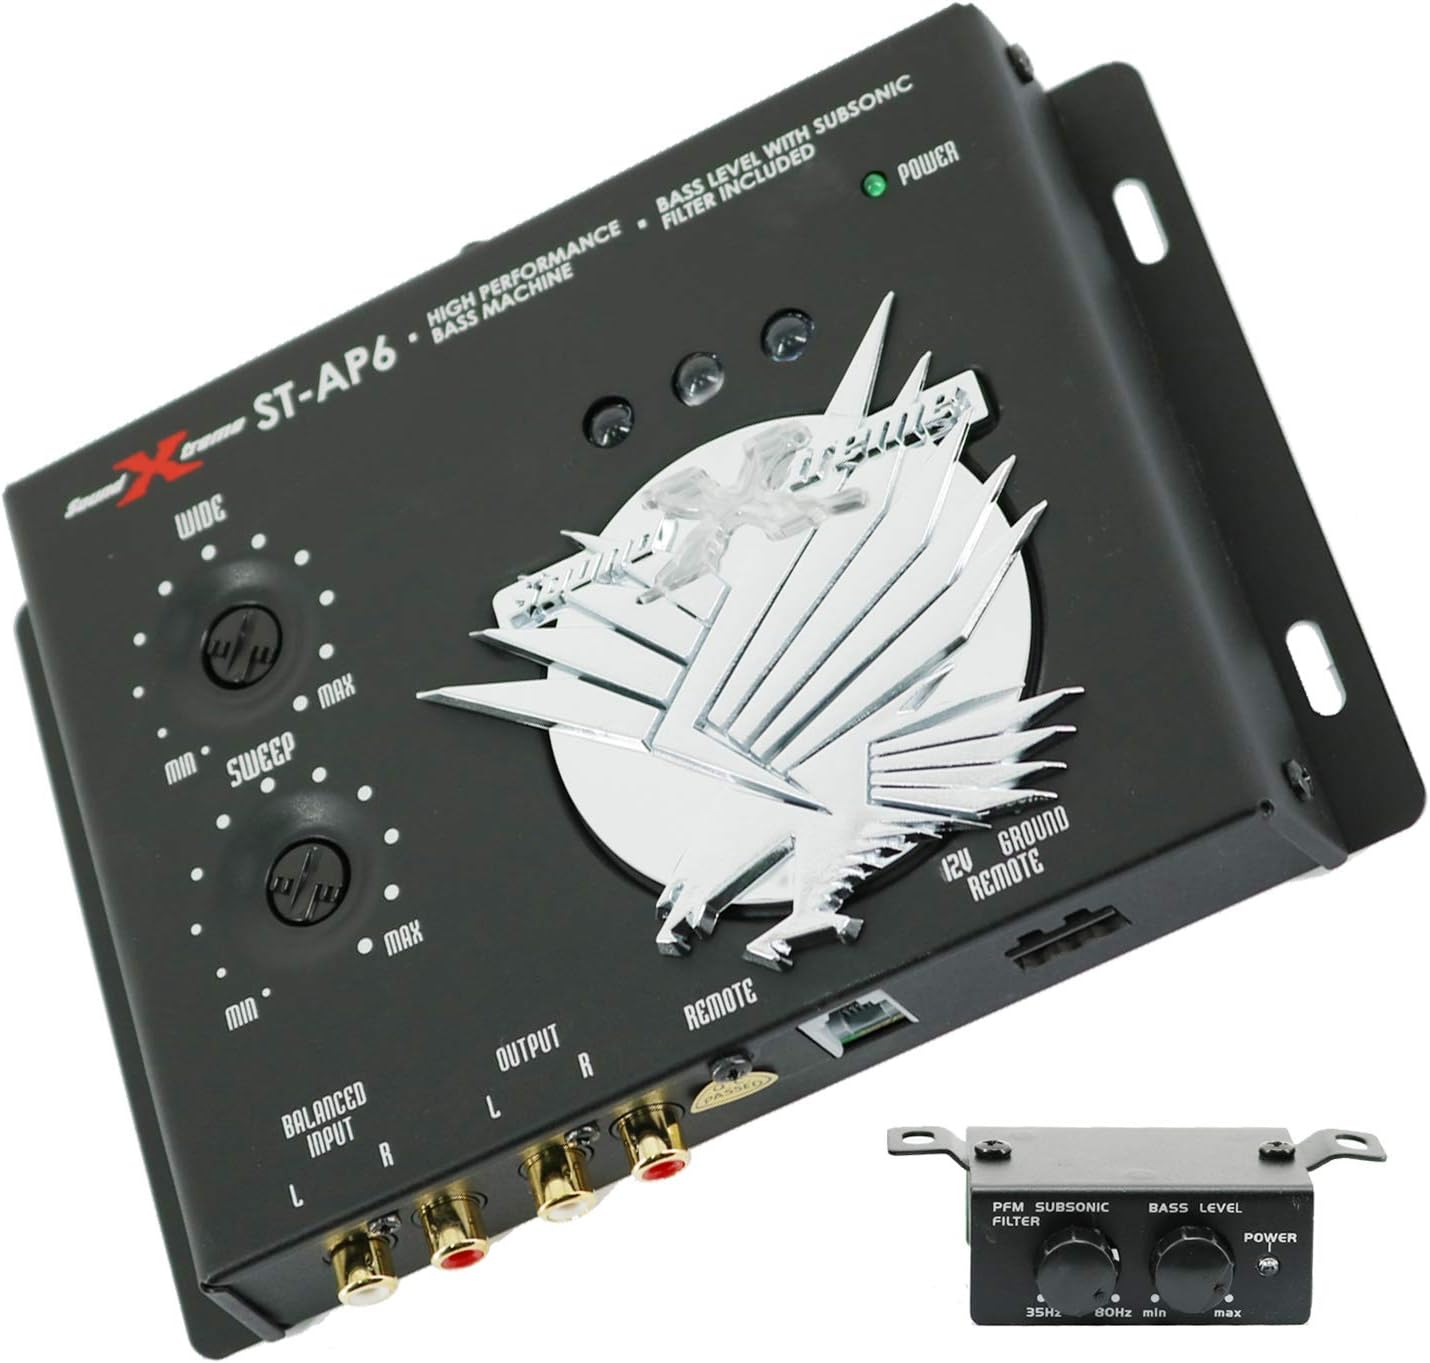
Figure 5: The SoundXtreme AP6 Bass Machine, a high-performance bass processor included in some bundles.
For detailed installation and operation instructions for the SoundXtreme AP6 Bass Machine, please refer to its dedicated user manual, as its functionality is separate from the Gravity 4000.1D ampөмүрлүү.
11. Кепилдик жана колдоо
For warranty information and technical support, please refer to the documentation provided with your purchase or contact Gravity customer service. Keep your proof of purchase for warranty claims.