
Introduction
Thank you for choosing the CHEREEKI Digital Alarm Clock. This manual provides detailed instructions for setting up, operating, and maintaining your new alarm clock. Please read it thoroughly to ensure optimal performance and to familiarize yourself with all its features.
This alarm clock features dual alarms, a nap timer, adjustable brightness and volume, 12/24-hour display, week display, 40 alarm sounds, snooze function, memory function, and both touch and voice control capabilities.
Пакеттин мазмуну
- CHEREEKI Digital Alarm Clock (Model 8809-2)
- USB заряддоо кабели
- User Manual
Продукт бүттүview
Ойготкуч саатыңыздын ар кандай бөлүктөрү жана башкаруу элементтери менен таанышыңыз.
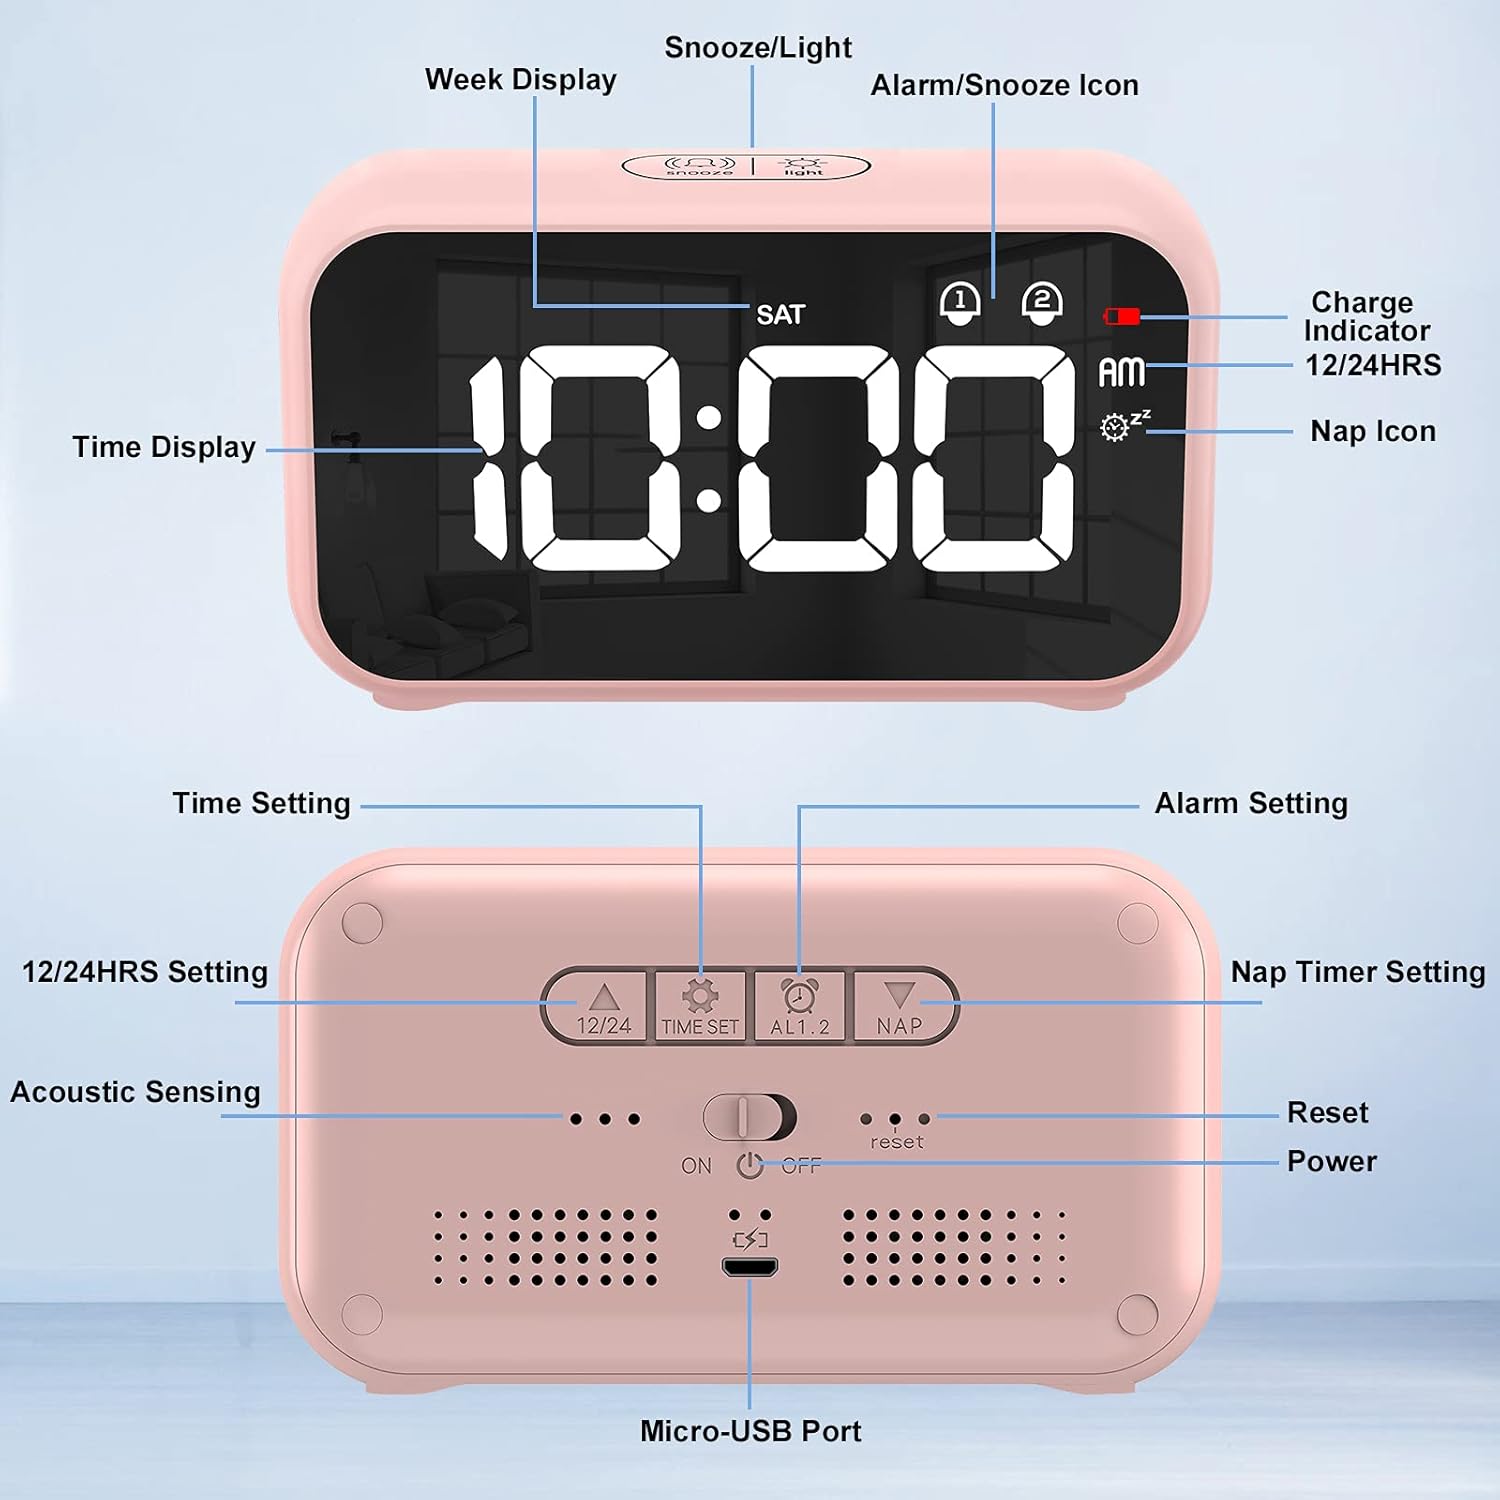
Сүрөттүн сүрөттөлүшү: This image displays both the front and back of the CHEREEKI Digital Alarm Clock. The front shows the digital time display, week display, AM/PM indicator, alarm icons (1 and 2), nap icon, and charge indicator. The back panel highlights the control buttons: 12/24HRS, TIME SET, ALARM 1, ALARM 2, NAP, Acoustic Sensing switch, Reset button, Power ON/OFF switch, and the Micro-USB Port.
Front Display Elements:
- Убакытты көрсөтүү: Учурдагы убакытты көрсөтөт.
- Апта дисплейи: Indicates the current day of the week (e.g., SAT).
- AM/PM индикатору: 12 сааттык формат үчүн.
- Alarm Icons (1 & 2): Indicate active alarms.
- Nap Icon: Indicates active nap timer.
- Кубат көрсөткүчү: Заряддоо абалын көрсөтөт.
Арткы панелдин башкаруу элементтери:
- 12/24HRS Button: 12 сааттык жана 24 сааттык убакыт форматтарынын ортосунда которулат.
- TIME SET баскычы: Убакытты орнотуу режимине кирет.
- СИГНАЛ 1 баскычы: Enters Alarm 1 setting mode.
- СИГНАЛ 2 баскычы: Enters Alarm 2 setting mode.
- NAP баскычы: Activates and sets the nap timer.
- Acoustic Sensing Switch: Enables/disables voice control feature.
- Калыбына келтирүү баскычы: Саатты баштапкы абалга келтирет.
- Кубатты күйгүзүү / өчүрүү Turns the clock on or off.
- Микро-USB порту: Аппаратты заряддоо үчүн.
Жогорку баскыч:
- ТЫНЧТЫК/ЖАРЫК баскычы: Activates snooze during an alarm, or adjusts display brightness when not alarming.
Жайгашуу
1. Charging the Alarm Clock
Before first use, or when the battery is low, charge the alarm clock using the provided USB cable.
- Connect the Micro-USB end of the cable to the Micro-USB Port on the back of the alarm clock.
- Connect the standard USB end of the cable to a 5V/1A or 5V/2A USB power adapter (not included) or a USB port on a computer.
- The charge indicator on the display will show charging status.

Сүрөттүн сүрөттөлүшү: This image illustrates the charging process. It shows the alarm clock connected via a USB cable to both a laptop's USB port and a wall adapter. The text emphasizes using only 5V/1A or 5V/2A adapters for charging.
2. Баштапкы күйгүзүү
Slide the Power ON/OFF switch on the back of the clock to the 'ON' position to power on the device.
Иштөө нускамалары
1. Убакытты белгилөө
- басыңыз УБАКЫТТЫ ОРНОТУУ button on the back. The hour digits will flash.
- колдонуу SNOOZE / LIGHT button on top to adjust the hour.
- Басыңыз УБАКЫТТЫ ОРНОТУУ Саатты ырастоо жана мүнөт коюуга өтүү үчүн кайрадан басыңыз. Мүнөт сандары күйүп-өчүп турат.
- колдонуу SNOOZE / LIGHT мүнөттөрдү жөндөө үчүн баскычты басыңыз.
- Басыңыз УБАКЫТТЫ ОРНОТУУ убакытты орнотуу режимин ырастоо жана чыгуу үчүн дагы бир жолу басыңыз.
2. Changing 12/24 Hour Format
басыңыз 12/24HRS button on the back to switch between 12-hour (with AM/PM indicator) and 24-hour formats.

Сүрөттүн сүрөттөлүшү: This image highlights the multi-functionality of the alarm clock, including dual clocks, week display, 12/24 time display, 40 alarm sounds, 5-60 minutes snooze, adjustable brightness, adjustable volume, and memory function. The clock itself displays '10:00 AM' with 'SAT' for Saturday.
3. Сигнализацияларды орнотуу (1-сигнализация жана 2-сигнализация)
Саат эки көз карандысыз ойготкучту колдойт.
- же басыңыз 1-ДАБЛ or 2-ДАБЛ button on the back. The alarm time will flash.
- колдонуу SNOOZE / LIGHT саатты жөндөө үчүн баскыч.
- Press the respective alarm button again to confirm the hour and move to minute setting.
- колдонуу SNOOZE / LIGHT мүнөттөрдү жөндөө үчүн баскычты басыңыз.
- Press the alarm button again to confirm minutes and proceed to alarm sound selection (40 options available). Use SNOOZE / LIGHT to cycle through sounds.
- Press the alarm button again to confirm the sound and proceed to volume adjustment. Use SNOOZE / LIGHT үнүн жөндөө
- Press the alarm button one last time to confirm all settings and activate the alarm. The corresponding alarm icon (1 or 2) will appear on the display.
- To deactivate an alarm, press its respective АЛАРМ сигнализация сүрөтчөсү дисплейден жок болгонго чейин баскычын басыңыз.

Сүрөттүн сүрөттөлүшү: This image shows two scenarios: 'Alarm clock 1 AM 07:30' with a person waking up, and 'Alarm clock 2 AM 08:00' with a child having breakfast. It highlights the dual alarm capability and the adjustable snooze function, which can be set from 5 to 60 minutes.
4. Тындырма функциясы
Ойготкуч чыкканда, басыңыз SNOOZE / LIGHT button on top to temporarily silence the alarm. The alarm will sound again after the set snooze duration (default is 5 minutes, adjustable between 5-60 minutes during alarm setup).
5. Nap Timer
The nap timer allows for short countdowns.
- басыңыз NAP button on the back. The nap icon will appear, and a default nap time will display.
- басыңыз NAP button repeatedly to cycle through available nap durations: 5, 15, 30, 45, 60, 75, or 90 minutes.
- The timer will start automatically after selecting a duration.
- To cancel the nap timer, press the NAP button until the nap icon disappears.

Сүрөттүн сүрөттөлүшү: This image shows a person taking a nap at a desk, with the alarm clock displaying '10:00 AM' and the nap icon active. The text explains that the nap timer can be used for countdowns of 5, 15, 30, 45, 60, 75, or 90 minutes for a short break.
6. Дисплейдин жарыктыгын тууралоо
When the clock is displaying the time (not in setting mode or alarming), press the SNOOZE / LIGHT button on top to cycle through 4 levels of display brightness (0%, 25%, 50%, 100%).

Сүрөттүн сүрөттөлүшү: This image features the alarm clock on a white table with a plant. It highlights the adjustable brightness feature, indicating 4-level brightness options. A slider graphic shows the range from 0% to 100% brightness, with instructions to press the SNOOZE/LIGHT button to adjust.
7. Үндү тууралоо
Volume for alarms is adjusted during the alarm setting process (refer to 'Setting Alarms' section).
8. Voice Control (Acoustic Sensing)
When the clock is running on battery power, the display will turn off after 6 seconds to conserve energy. If the Acoustic Sensing switch on the back is enabled, the LED display will light up for 6 seconds when an ambient sound of 90dB or higher is detected.
9. Сенсордук башкаруу
Similar to voice control, when running on battery, the display will light up for 6 seconds if the clock is touched or moved.

Сүрөттүн сүрөттөлүшү: This image is divided into three sections. The top section shows 'Touch Control', indicating that the display turns off after 6 seconds when running on battery. The bottom left section shows 'Voice Control', where the LED display lights up if ambient sound is ≥ 90dB, depicted by people high-fiving. The bottom right section shows 'Power Supply', where the display is always on when connected to power, with an image of the clock plugged into a wall outlet.
10. Эстутум функциясы
The alarm clock is equipped with a memory function. Your time and alarm settings will be retained even if the battery is depleted and then recharged, or if the clock is turned off and on again.

Сүрөттүн сүрөттөлүшү: This image shows the alarm clock on a desk, illustrating its memory function. It depicts the clock being 'ON' (displaying 10:00), then 'OFF' (blank display), and then 'POWER ON' (displaying 11:00, one hour later), with the text stating 'No need to reset the clock when the battery is restored or the clock is turned on again'.
Техникалык тейлөө
To ensure the longevity and proper functioning of your CHEREEKI Digital Alarm Clock, follow these maintenance guidelines:
- Тазалоо: Wipe the clock with a soft, dry cloth. Do not use abrasive cleaners, solvents, or harsh chemicals, as these can damage the surface.
- Суудан качуу: This device is not waterproof. Keep it away from water, high humidity, and direct splashes.
- Температура: Avoid exposing the clock to extreme temperatures (hot or cold) or direct sunlight for extended periods.
- Сактагыч: If storing the clock for a long time, ensure it is fully charged and stored in a cool, dry place.
Проблемаларды чечүү
If you encounter issues with your alarm clock, refer to the following common problems and solutions:
| Көйгөй | Мүмкүн себеп | Чечим |
|---|---|---|
| Дисплей бош же күңүрт. | Low battery; Not connected to power; Brightness set too low. | Charge the clock; Connect to a power source; Press SNOOZE/LIGHT to adjust brightness. |
| Ойготкуч угулбайт. | Alarm is not activated; Alarm volume is too low; Incorrect alarm time set. | Ensure alarm icon (1 or 2) is visible; Adjust alarm volume during setup; Verify alarm time. |
| Убакыт туура эмес. | Time not set correctly; 12/24 hour format issue. | Re-set the time using the TIME SET button; Check 12/24HRS setting. |
| Voice/Touch control not working. | Acoustic Sensing switch is OFF; Clock is connected to power. | Ensure Acoustic Sensing switch is ON; Note that these features only work when running on battery. |
| Clock is unresponsive. | Убактылуу программалык ката. | Press the Reset button on the back using a thin object (e.g., paperclip). |
Техникалык шарттар
- Бренд: ЧЕРЕКИ
- Модел: 8809-2
- Дисплей түрү: Санарип
- Кубат булагы: Зымдуу электрдик (USB аркылуу кайра заряддалуучу)
- Өзгөчөлүктөр: Dual Alarms, Nap Timer, Adjustable Brightness (4 levels), Adjustable Volume (8 levels), 12/24 Hour Display, Week Display, 40 Alarm Sounds, Snooze Function (5-60 minutes), Memory Function, Voice Control (Acoustic Sensing), Touch Control.
- Материал: Acrylonitrile бутадиен Styrene
- Түсү: Кызгылт
Кепилдик жана колдоо
This CHEREEKI product comes with a standard manufacturer's warranty. For specific warranty details, please refer to the documentation provided at the time of purchase or contact your retailer. If you require technical support or have questions not covered in this manual, please contact CHEREEKI customer service through the retailer's platform or the official brand webсайт.