Juplink EC3-750
JUPLINK WiFi Range Extender - User Manual
Model: EC3-750
Продукт бүттүview
The JUPLINK WiFi Range Extender (Model EC3-750) is designed to expand your existing Wi-Fi network coverage, eliminating dead zones and providing reliable internet access throughout your home or office. This dual-band device supports both 2.4GHz and 5GHz frequencies, offering speeds up to 750Mbps. It features multiple working modes including Repeater, Access Point (AP), and Router mode, along with two Fast Ethernet ports for wired connections.

1-сүрөт: JUPLINK EC3-750 WiFi Range Extender with included interchangeable power plugs (US, UK, EU).
Пакеттин мазмуну
- JUPLINK EC3-750 WiFi Range Extender
- Interchangeable Power Plugs (US, UK, EU)
- Ыкчам орнотуу колдонмосу
Орнотуу жана орнотуу
1. Жайгашкан жерди тандоо
For optimal performance, place the extender halfway between your router and the Wi-Fi dead zone. Avoid placing it too close to the router or in areas with weak existing Wi-Fi signals.

2-сүрөт: Illustration of correct and incorrect placement for the WiFi extender to ensure optimal signal reception and extension.
2. Күйгүзүү
- Select the appropriate power plug for your region and attach it to the extender.
- Plug the extender into a power outlet. The Power LED will illuminate.
3. Конфигурация режимдери
The EC3-750 supports three working modes: Repeater Mode, AP Mode, and Router Mode.

3-сүрөт: The three operational modes of the JUPLINK EC3-750: Router Mode, Repeater Mode, and AP Mode, showing their respective network configurations.
Repeater Mode (Extender)
This mode extends the coverage of an existing wireless network. It's ideal for eliminating Wi-Fi dead zones.
- Connect your computer or mobile device to the extender's default Wi-Fi network (e.g., "JUPLINK_EXT").
- ачуу а web browser and enter the default IP address (check the Quick Installation Guide for the exact address, typically 192.168.10.1 or similar).
- Учурдагы Wi-Fi тармагыңызды тандап, анын сырсөзүн киргизүү үчүн экрандагы көрсөтмөлөрдү аткарыңыз.
- The extender will reboot and begin extending your network.
AP режими (кирүү чекити)
In AP mode, the extender connects to a wired network (e.g., from a modem or router) and broadcasts a new wireless network. This is useful for adding Wi-Fi capability to a wired-only network.
- Connect an Ethernet cable from your modem/router to the WAN/LAN port on the extender.
- Компьютериңизди же мобилдик түзмөгүңүздү кеңейтүүчүнүн демейки Wi-Fi тармагына туташтырыңыз.
- кирүү web interface and select AP Mode. Configure the new Wi-Fi network name (SSID) and password.
Багыттоочу режим
In Router mode, the device acts as a primary router, connecting to a modem and creating a new wireless network for multiple devices.
- Connect an Ethernet cable from your modem to the WAN/LAN port on the extender.
- кирүү web interface and select Router Mode. Configure your internet connection type (e.g., PPPoE, Dynamic IP, Static IP) and set up your new Wi-Fi network.
Экстендерди иштетүү
WPS баскычы
The WPS (Wi-Fi Protected Setup) button provides a quick and easy way to connect to your existing router without manual configuration.
- Plug in the extender near your main router.
- Негизги роутериңиздеги WPS баскычын басыңыз.
- Within two minutes, press the WPS button on the JUPLINK extender.
- The extender will automatically connect to your router and extend its network.
Ethernet порттору
The extender is equipped with two Fast Ethernet ports (WAN/LAN and LAN) for wired connections. These ports allow you to connect devices like smart TVs, gaming consoles, or desktop computers directly to the extender for a stable wired connection.

4-сүрөт: The two Fast Ethernet ports (WAN/LAN and LAN) on the JUPLINK EC3-750, enabling high-speed wired connections for various devices.
Smart Signal көрсөткүчү
The signal indicator LEDs on the extender provide visual feedback on the strength of the Wi-Fi signal received from your main router, helping you find the optimal placement.
- Green/Strong Signal: Excellent reception.
- Orange/Moderate Signal: Good reception, but consider adjusting placement.
- Red/Weak Signal: Poor reception, move the extender closer to the router.
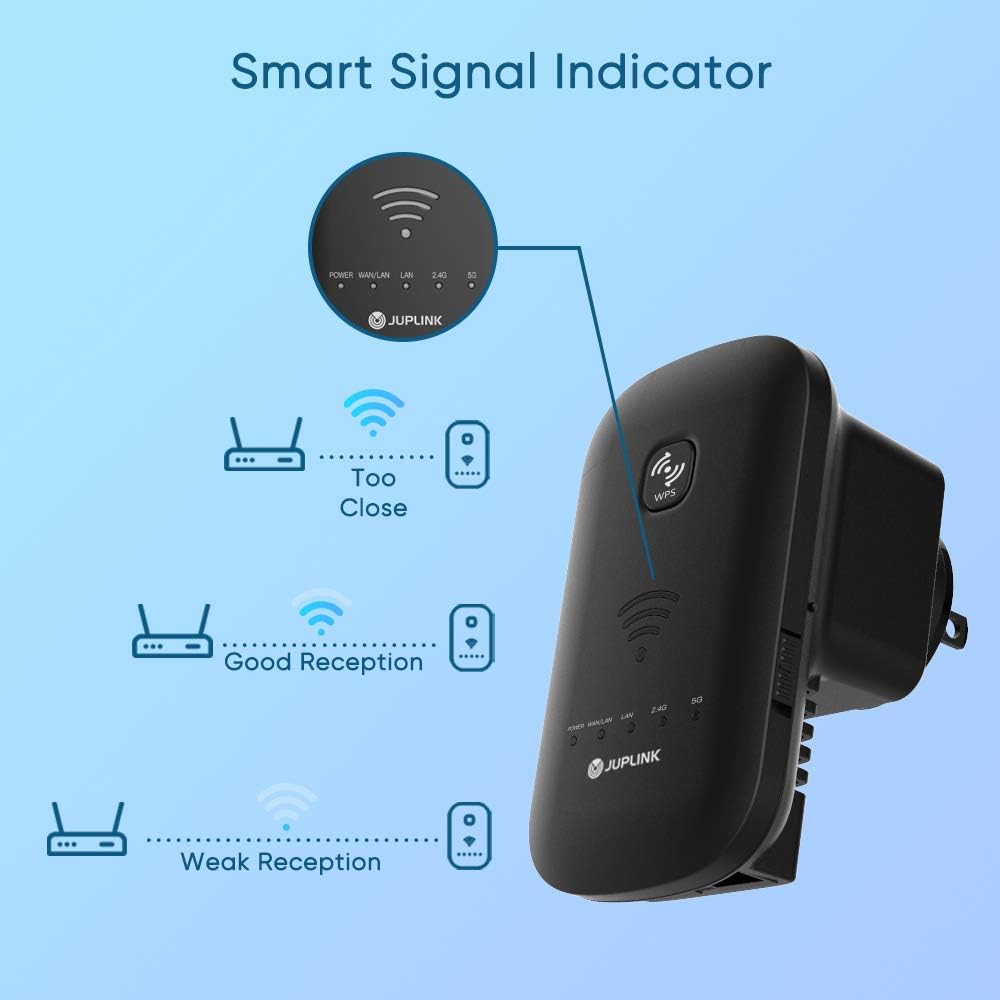
5-сүрөт: Explanation of the Smart Signal Indicator, showing how different LED colors correspond to signal strength (Too Close, Good Reception, Weak Reception).
Техникалык тейлөө
- Аппаратты таза жана чаңдан алыс кармаңыз. Тазалоо үчүн жумшак, кургак чүпүрөктү колдонуңуз.
- Ашыкча ысып кетүүнүн алдын алуу үчүн аппараттын айланасында туура желдетүүнү камсыз кылыңыз.
- Мезгил-мезгили менен өндүрүүчүнүн текшерүү webоптималдуу аткарууну жана коопсуздукту камсыз кылуу үчүн микропрограммаларды жаңыртуу үчүн сайт.
- Аппаратты экстремалдык температурага, нымдуулукка же тике күн нуруна тийгизүүдөн сактаңыз.
Проблемаларды чечүү
Кубат жок / Түзмөк күйбөй жатат
- Кеңейткичтин иштеп жаткан розеткага бекем сайылганын текшериңиз.
- Verify that the power outlet itself is functional by plugging in another device.
Cannot Connect to the Extender's Wi-Fi
- Make sure you are selecting the correct Wi-Fi network name (SSID) for the extender.
- Wi-Fi сырсөзүн эки жолу текшериңиз.
- Try restarting the extender by unplugging it and plugging it back in.
Extended Network Has No Internet Access
- Негизги роутериңизде активдүү интернет байланышы бар экенин текшериңиз.
- Verify that the extender is properly connected to your main router (check signal indicator).
- Reconfigure the extender in Repeater mode, ensuring you select the correct main Wi-Fi network and enter its password accurately.
- Try moving the extender closer to your main router.
Slow Speed on Extended Network
- Relocate the extender to a position that offers a stronger signal from your main router (refer to the Smart Signal Indicator).
- Башка электрондук түзүлүштөрдүн (мисалы, микротолкундуу мештер, зымсыз телефондор) тоскоолдуктарын минималдаштырыңыз.
- Негизги роутериңиз жетиштүү ылдамдыкты камсыз кылып жатканын текшериңиз.
Extenderди баштапкы абалга келтирүү
If issues persist, you may need to perform a factory reset. Locate the reset button (usually a small pinhole) on the extender. With the extender powered on, use a paperclip to press and hold the reset button for approximately 5-10 seconds until the LEDs flash. The extender will revert to factory default settings.
Техникалык шарттар
| Бренд | Juplink |
| Модель номери | EC3-750 |
| Маалыматтарды өткөрүү ылдамдыгы | Up to 750 Mbps (300 Mbps for 2.4GHz, 433 Mbps for 5GHz) |
| Жыштык тилкесинин классы | Кош тилкелүү (2.4 ГГц жана 5 ГГц) |
| Иштөө режимдери | Репитер, AP, Роутер |
| Ethernet порттору | 2 x Fast Ethernet (WAN/LAN, LAN) |
| Өлчөмдөр | 14 x 8.5 x 10 см |
| Элемент Салмагы | 190 г |
| Өзгөчөлүктөр | Access Point Mode, Smart Signal Indicator, WPS Button |

6-сүрөт: The EC3-750 Dual Band Wi-Fi Extender's capabilities, illustrating 300Mbps on the 2.4GHz band and 433Mbps on the 5GHz band for seamless connectivity.
Кепилдик жана колдоо
For warranty information and technical support, please refer to the warranty card included in your product packaging or visit the official Juplink webсайт. Кепилдик дооматтары үчүн сатып алуу дүмүрчөгүңүздү сактаңыз.
Өндүрүүчү: Juplink
Биринчи жеткиликтүү болгон күнү: 19-жылдын 2020-октябры
Ask a question about this manual
Ask about setup, troubleshooting, compatibility, parts, safety, or missing instructions. Manuals+ will review the question and use this page’s manual context to help answer it.