
1. Киришүү
This manual provides comprehensive instructions for the installation, operation, and maintenance of the Amio 01573 Parking Sensors 8 LED Sensor/Buzzer system. This system is designed to assist drivers in parking by detecting obstacles behind or in front of the vehicle and providing audible and visual alerts.
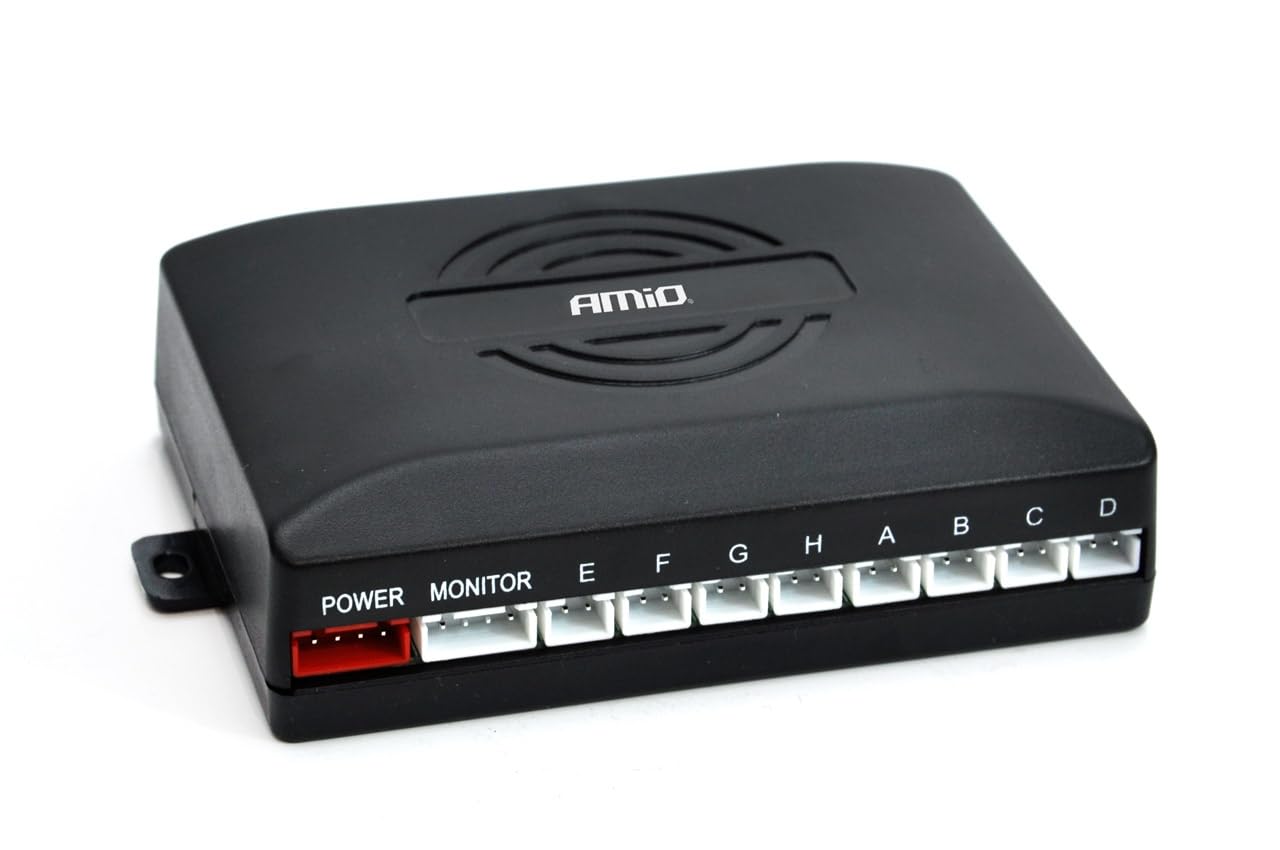
The Amio 01573 system includes eight ultrasonic sensors, a main control unit, an LED display with an integrated buzzer, and necessary wiring. Please read this manual thoroughly before installation and use to ensure proper functionality and safety.
2. Орнотуу жана орнотуу
Proper installation is crucial for the optimal performance of your parking sensor system. It is recommended that installation be performed by a qualified technician.
2.1 Компоненттер бүттүview
Баштоодон мурун, бардык компоненттердин бар экендигин текшериңиз:
- Негизги башкаруу блогу
- 8 Ultrasonic Sensors (typically 4 for front, 4 for rear)
- LED Display with Buzzer
- Электр кабели
- Drill Bit (for sensor holes)
2.2 Сенсорду орнотуу
The sensors should be installed in the front and rear bumpers of the vehicle. Ensure they are evenly spaced and at a consistent height, typically between 50-70 cm from the ground. Avoid installing sensors too close to metal parts or exhaust pipes.
Сүрөттүн сүрөттөлүшү: А генерал view of the Amio 01573 Parking Sensor kit components. It shows several black ultrasonic sensors, a main control box, an LED display unit, and various cables. This image illustrates the primary parts included in the system for installation.
2.3 Main Control Unit Installation
Mount the main control unit securely in a dry, protected area of the vehicle, such as the trunk or under the dashboard. Ensure it is away from heat sources and moisture. Connect the sensor cables to the corresponding ports on the control unit (usually labeled A, B, C, D for front and E, F, G, H for rear, or similar).
2.4 LED Display and Buzzer Installation
Install the LED display unit in a location visible to the driver, such as on the dashboard or near the rearview mirror. Connect the display cable to the main control unit. The integrated buzzer will provide audible alerts.
2.5 Кубат туташтыруу
Connect the power cable from the main control unit to the vehicle's electrical system. The rear sensors typically activate when the reverse gear is engaged, requiring connection to the reverse light power supply. Front sensors may be connected to an ignition-switched power source or a dedicated switch, depending on the desired functionality.
3. Иштөө нускамалары
Once installed, the Amio 01573 Parking Sensor system operates automatically to assist with parking maneuvers.
3.1 Системаны активдештирүү
- Арткы сенсорлор: Automatically activate when the vehicle is put into reverse gear.
- Алдыңкы сенсорлор: May activate automatically when the vehicle is moving slowly (e.g., below 10-15 km/h) or when a dedicated switch is engaged, depending on the installation configuration.
3.2 Чечмелөө боюнча эскертүүлөр
The system provides both audible and visual feedback:
- Audible Alerts (Buzzer):
- Slow beeping: Obstacle detected at a moderate distance.
- Faster beeping: Obstacle is closer.
- Continuous tone: Obstacle is very close (typically within 30 cm).
- Visual Alerts (LED Display):
- The display shows the approximate distance to the obstacle (e.g., in meters or centimeters).
- LED segments or bars illuminate, typically changing color (e.g., green to yellow to red) as the vehicle approaches an obstacle, indicating proximity and direction (left/center/right).
Always use the parking sensor system as an aid and not as a substitute for direct visual observation. Check your surroundings thoroughly before and during parking maneuvers.
4. Техникалык тейлөө
Regular maintenance ensures the longevity and reliability of your parking sensor system.
- Сенсор тазалоо: Periodically clean the surface of the ultrasonic sensors with a soft, damp cloth. Ensure they are free from dirt, mud, ice, or snow, as these can interfere with detection. Do not use abrasive cleaners.
- Кабелдик текшерүү: Occasionally check all visible cables and connections for any signs of wear, damage, or loose connections.
- Тоскоолдуктан качуу: Ensure no accessories, stickers, or paint are covering the sensor surfaces, as this can impair their function.
5. Кыйынчылыктарды
If you encounter issues with your Amio 01573 Parking Sensor system, refer to the following troubleshooting guide:
| Көйгөй | Мүмкүн себеп | Чечим |
|---|---|---|
| System does not power on / No display | Loose power connection, blown fuse, faulty control unit. | Check power cable connections. Inspect vehicle's fuse box for blown fuses. If problem persists, contact support. |
| Сенсорлор тоскоолдуктарды байкабай жатат | Dirty sensors, faulty sensor, incorrect wiring, sensor covered. | Clean sensor surfaces. Check sensor cable connections to the control unit. Ensure sensors are not obstructed. |
| False alarms / Continuous beeping without obstacle | Dirty sensors, sensor installed too close to ground/metal, electromagnetic interference. | Clean sensors. Verify sensor installation height and distance from metal parts. Check for strong electromagnetic sources nearby. |
| Баззер иштебейт | Loose connection to display unit, faulty display unit. | Check the cable connection between the control unit and the LED display. |
If these steps do not resolve the issue, it is recommended to consult a professional technician or contact Amio customer support.
6. Техникалык шарттар
The following are the technical specifications for the Amio 01573 Parking Sensors 8 LED Sensor/Buzzer system:
- Модел: 01573 Parking Sensors 8 LED Sensor / Buzzer
- Модель номери: AMI-01573
- Сенсорлордун саны: 8 (typically 4 front, 4 rear)
- аныктоо түрү: УЗИ
- Дисплей түрү: LED with integrated buzzer
- Элемент Салмагы: 3.31 унция (болжол менен 94 грамм)
- Product Dimensions (Control Unit): 4.88 x 4.02 x 1.5 дюйм (болжол менен 12.4 x 10.2 x 3.8 см)
- Өндүрүүчү: Amio
- Бренд: Amio
7. Кепилдик жана колдоо
Amio products are manufactured to high-quality standards. For information regarding warranty coverage, terms, and conditions, please refer to the documentation provided with your purchase or visit the official Amio webсайт.
For technical assistance, troubleshooting beyond this manual, or to inquire about replacement parts, please contact Amio customer support. When contacting support, please have your product model number (01573 or AMI-01573) and purchase details available.


