
1. Киришүү
This manual provides detailed instructions for the proper installation, operation, and maintenance of your Gravity G3-12D4 12-inch car audio subwoofer and Gravity WZ3000.1D Class D amplifier, along with the included 4-gauge amplifier installation kit. Please read this manual thoroughly before beginning installation to ensure correct setup and optimal performance.
2. Коопсуздук маалыматы
Орнотуу жана эксплуатациялоо учурунда ар дайым төмөнкү коопсуздук чараларын сактаңыз:
- Disconnect the vehicle's negative battery terminal before any wiring to prevent electrical shorts.
- Курч учтардан же кыймылдуу бөлүктөрдөн зыян келтирбөө үчүн бардык зымдар туура орнотулганын жана бекитилгенин текшериңиз.
- Use appropriate gauge wiring as specified in this manual to handle current loads and prevent overheating.
- Install fuses at the battery and near the amplifier as instructed to protect against power surges.
- Avoid mounting components in locations that obstruct vehicle operation or safety features.
- Do not expose components to excessive moisture or extreme temperatures.
- Seek professional assistance if you are unsure about any installation steps.
3. Пакеттин мазмуну
Пакетиңизде бардык буюмдар бар экенин текшериңиз:
- Gravity G3-12D4 12-inch Car Audio Subwoofer
- Gravity WZ3000.1D Class D Ampөмүрлүү
- 4 Өлчөөчү Amplifier Installation Kit, including:
- 17 ft. 4 Gauge Power Cable
- 3 ft. 4 Gauge Ground Cable
- Inline AGU Fuse Holder with 80A + 100A Fuses
- 17 ft. Double Shielded RCA Cable
- 17 ft. 18 Gauge Turn-On Cable
- 20 ft. 16 Gauge Speaker Wire
- All necessary accessories and terminals
- Алыстан бассты башкаруу баскычы
4. Продукциянын өзгөчөлүктөрү
Gravity G3-12D4 Subwoofer
- Dual 4 Ohm Voice Coil Configuration
- Competition Grade Pressed Paper Cone
- High Roll Foam Surround
- Advanced Air Flow Cooling System
Gravity WZ3000.1D Ampөмүрлүү
- Class D MOSFET Power Ampөмүрлүү
- Stable at 1 Ohm, 2 Ohm, and 4 Ohm loads
- High and Low Level Inputs
- Variable Low Pass Crossover (LPF)
- Variable Bass Boost
- Subsonic чыпкасы
4 Өлчөөчү Ampкөтөргүч орнотуу комплекти
- High Quality Thick 4 Gauge Power and Ground Cables
- Inline AGU Fuse Holder with multiple fuses for protection
- True Sound Double Shielded RCA Cable for clear signal transmission
- Complete set of accessories and terminals for a professional installation
5. Орнотуу жана орнотуу
Proper installation is crucial for performance and safety. If you are not confident in your ability to install this system, please consult a professional installer.
5.1. Сабвуферди орнотуу
The G3-12D4 subwoofer requires a suitable enclosure (not included) for optimal performance. Ensure the enclosure is properly sealed and sized according to subwoofer specifications. Mount the subwoofer securely to the enclosure using appropriate screws, ensuring a tight seal around the mounting flange.

Сүрөт: алдыңкы view of the Gravity G3-12D4 12-inch subwoofer, showing the black cone with a red Gravity logo and red stitching on the foam surround.

Сүрөт: Арткы view of the Gravity G3-12D4 12-inch subwoofer, displaying the magnet structure and speaker terminals.
5.2. монтаждоо Ampөмүрлүү
Select a mounting location for the WZ3000.1D amplifier that is dry, well-ventilated, and protected from physical damage. Common locations include under a seat, in the trunk, or mounted to a custom amplifier rack. Ensure there is sufficient airflow around the amplifier for cooling. Secure the amplifier firmly using screws.

Сүрөт: каптал view of the Gravity WZ3000.1D amplifier, showing the heat sink fins for cooling.
5.3. Системаны туташтыруу
Follow these steps carefully for wiring the amplifier and subwoofer:
- Power Cable (Red 4 Gauge): Run the 17 ft. 4 gauge power cable from the vehicle's positive battery terminal to the amplifier location. Install the inline AGU fuse holder within 18 inches (45 cm) of the battery. Do not insert the fuse until all wiring is complete.
- Ground Cable (Black 4 Gauge): Connect the 3 ft. 4 gauge ground cable from the amplifier's ground terminal to a clean, unpainted metal surface on the vehicle chassis. Ensure a solid, low-resistance connection. The ground point should be as short as possible.
- Remote Turn-On Cable (Blue 18 Gauge): Connect the 17 ft. 18 gauge turn-on cable from the amplifier's REM terminal to the remote turn-on output of your head unit. This cable signals the ampбаш бирдиги менен күйгүзүү жана өчүрүү үчүн көтөргүч.
- RCA Signal Cables: Connect the 17 ft. double shielded RCA cable from the RCA outputs of your head unit to the RCA INPUTs on the WZ3000.1D ampөмүрлүү.
- Speaker Wiring (16 Gauge): Connect the 20 ft. 16 gauge speaker wire from the amplifier's speaker output terminals to the G3-12D4 subwoofer. Ensure correct polarity (+ to + and - to -). For a single G3-12D4 (dual 4-ohm voice coils), you can wire the voice coils in parallel for a 2-ohm load or in series for an 8-ohm load. The WZ3000.1D amplifier is stable down to 1 ohm, so a 2-ohm parallel configuration is recommended for maximum power output.
- Алыстан басс башкаруу: Connect the remote bass control knob to the dedicated REMOTE port on the amplifier. Mount the knob in an accessible location for easy adjustment.
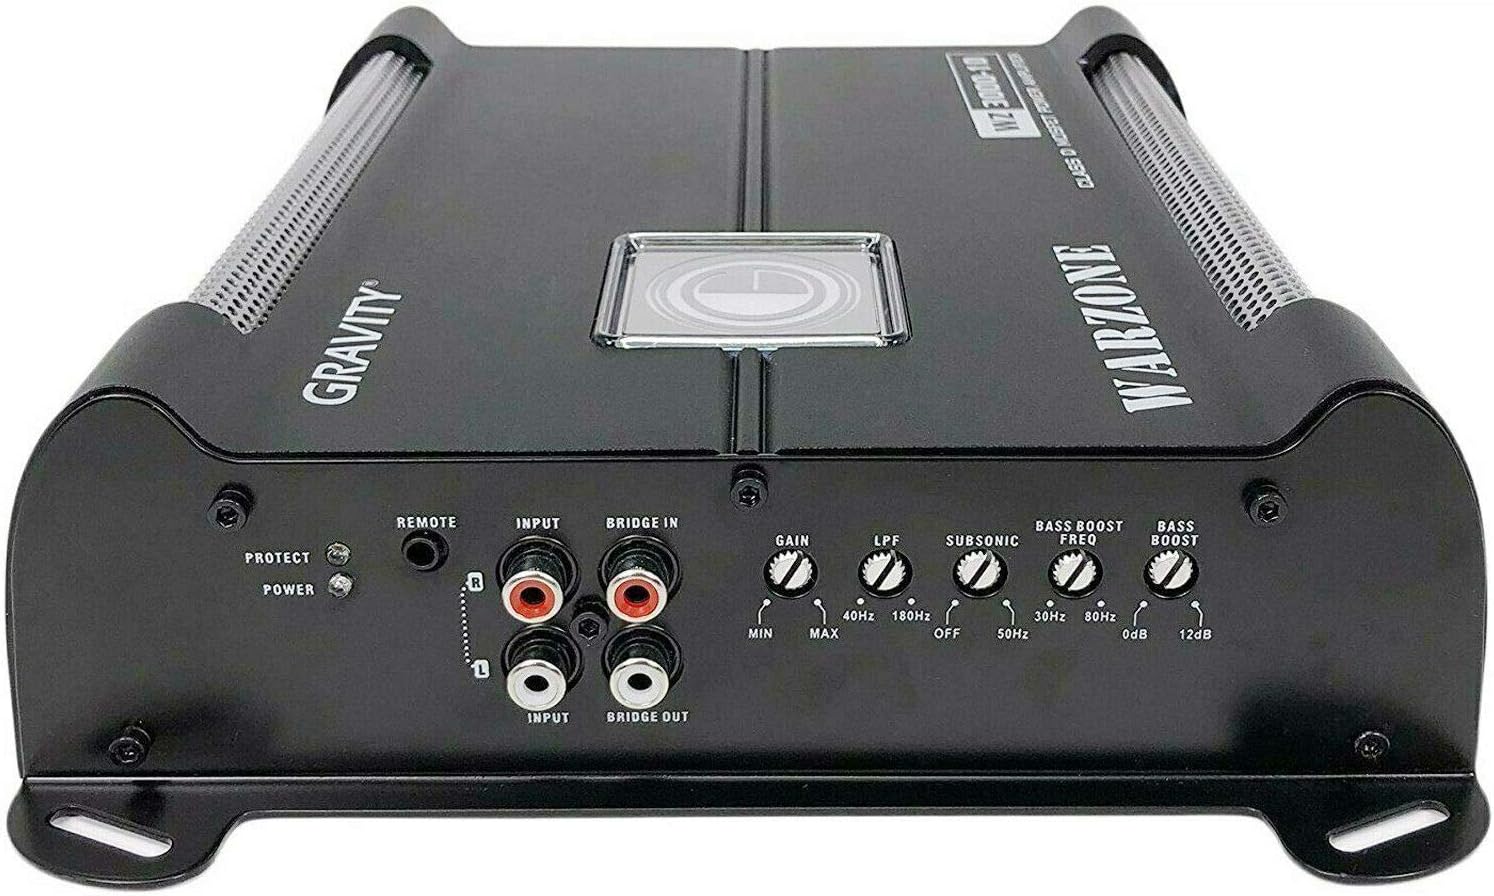
Image: Front panel of the Gravity WZ3000.1D amplifier, displaying RCA inputs, remote control port, and various adjustment knobs.

Image: Rear panel of the Gravity WZ3000.1D amplifier, showing the power input terminals (+12V, GND, REM) and speaker output terminals.

Image: The remote bass control knob, used for adjusting subwoofer output level from the driver's seat.
5.4. Акыркы туташуу
Once all wiring is securely connected and checked for shorts, insert the appropriate fuse (80A or 100A, depending on your system's power draw) into the inline AGU fuse holder near the battery. Reconnect the vehicle's negative battery terminal.
6. Иштөө нускамалары
After installation, power on your head unit. The amplifier should turn on automatically (indicated by a power LED). Adjust the amplifier settings as follows:
- GAIN (Киргизүү деңгээли): Start with the GAIN control at minimum. Play a familiar track with strong bass at about 75% of your head unit's maximum volume. Slowly increase the GAIN until you hear distortion, then back off slightly. This sets the ampлифттин киргизүү сезгичтигин башкы блоктун чыгаруу сигналына дал келтириңиз.
- LPF (төмөн өткөрүүчү чыпка): This control filters out high frequencies, allowing only low frequencies to pass to the subwoofer. Set the LPF between 40 Hz and 180 Hz. A common starting point is 80 Hz, but adjust to blend smoothly with your main speakers.
- СУБСОНИКАЛЫК Чыпка: This filter removes extremely low frequencies below the audible range that can cause damage to the subwoofer. Set it between 0 Hz and 50 Hz. A setting around 25-30 Hz is often suitable for ported enclosures, while sealed enclosures may not require it as much.
- BASS BOOST FREQ: This selects the frequency at which the bass boost will be applied. Adjust this to enhance a specific bass frequency range.
- БАС КҮЧӨТҮҮ: This control increases the output level at the selected bass boost frequency (0-12 dB). Use sparingly to avoid distortion and potential speaker damage.
- Алыстан басс башкаруу: This knob allows you to adjust the subwoofer's output level conveniently from your listening position without affecting other ampкөтөргүч орнотуулары.
7. Техникалык тейлөө
To ensure longevity and optimal performance of your car audio system:
- Бардык зымдардын туташууларынын бекемдигин жана коррозияга туруктуулугун үзгүлтүксүз текшерип туруңуз.
- сактаңыз amplifier and subwoofer free from dust and debris. Use a soft, dry cloth for cleaning.
- камсыз кылуу amplifier's cooling fins are not obstructed to prevent overheating.
- Avoid exposing the subwoofer cone to direct sunlight for extended periods, as UV rays can degrade materials.
8. Кыйынчылыктарды
Эгер көйгөйлөргө туш болсоңуз, төмөнкү жалпы көйгөйлөрдү жана чечимдерди караңыз:
| Көйгөй | Мүмкүн себеп | Чечим |
|---|---|---|
| Кубат жок / Ampкөтөргүч күйбөйт | Күйгүзүүчү Начар кубат же жерге туташуу Алыстан күйгүзүү сигналы жок | Check and replace fuse in fuse holder Бардык кубат жана жерге туташуулар коопсуз экенин текшериңиз Check remote wire connection to head unit and ampөмүрлүү |
| Сабвуферден үн жок | RCA кабелдери ажыратылган же бузулган Динамиктин зымдары ажыратылган же кыска туташкан Ampкөтөргүч пайда өтө төмөн Башкы бирдиктин үнү өтө төмөн | RCA байланыштарын текшерүү Динамик зымдарынын туташууларын текшериңиз жана кыска туташууларды текшериңиз Тууралоо ampкөтөрүүчү пайда Increase head unit volume |
| Distorted Sound | Пайда өтө жогору коюлган Бузулган динамик же ampөмүрлүү Туура эмес LPF же бассты күчөтүү жөндөөлөрү | Кыскартуу ampкөтөрүүчү пайда Inspect speaker and amplifier for damage Adjust LPF and Bass Boost settings |
| Ampliifier Overheating | Жетишсиз желдетүү Туура эмес импеданс жүгү Пайда өтө жогору коюлган | Айланадагы абанын туура айлануусун камсыз кылыңыз ampөмүрлүү Динамик импеданстын дал келгенин текшериңиз amplifier's stable load Кыскартуу ampкөтөрүүчү пайда |
9. Техникалык шарттар
Gravity G3-12D4 Subwoofer
- Speaker Size: 12 Inches
- Voice Coil Configuration: Dual 4 Ohm
- Peak Power: 2000 Watts (each)
- RMS Power: 1000 Watts (each)
- Жыштыктын жообу: 30 - 500 Гц
- Сезгичтик: 87 дБ
Gravity WZ3000.1D Ampөмүрлүү
- Max Power: 3000W @ 1 Ohm
- Класс: Д
- Stable Impedance: 1 Ohm, 2 Ohm, 4 Ohm
- Signal-to-Noise Ratio (S/N): 70 dB
- Жыштыктын жообу: 8 Гц ~ 180 Гц
- Жалпы гармоникалык бурмалоо (THD): 0.2%
- Bass Boost Level: 0 ~ 12 dB
- Low Pass Filter (LPF): 40 Hz ~ 180 Hz
- Subsonic Filter: 0 ~ 50 Hz
- Dimensions (L×W×H): 223.5mm (8.8 in) × 211mm (8.3 in) × 64.5 mm (2.5 in)
4 Өлчөөчү Ampкөтөргүч орнотуу комплекти
- Power Cable: 17 ft. 4 Gauge
- Ground Cable: 3 ft. 4 Gauge
- Fuse Holder: Inline AGU with 80A + 100A Fuses
- RCA Cable: 17 ft. Double Shielded
- Turn-On Cable: 17 ft. 18 Gauge
- Speaker Wire: 20 ft. 16 Gauge
10. Кепилдик жана колдоо
Gravity products are designed for reliability and performance. For specific warranty terms and conditions, please refer to the warranty card included with your product or contact Gravity customer support. Keep your purchase receipt as proof of purchase for any warranty claims.
For technical support or inquiries, please visit the official Gravity webсайтка же кардарларды тейлөө бөлүмүнө кайрылыңыз.