
1. Киришүү
This manual provides detailed instructions for the installation, operation, and maintenance of your XENOCAM 8-Channel 5M-N/1080N Hybrid Digital Video Recorder (DVR). This DVR supports multiple video input modes including AHD, TVI, CVI, Analog, and IP cameras, offering a versatile solution for your security surveillance needs. Please read this manual thoroughly before using the product to ensure proper setup and functionality.
2. Пакеттин мазмуну
Төмөндө тизмеленген нерселердин баары пакетиңизге камтылганын текшериңиз. Эгерде кандайдыр бир буюмдар жок же бузулуп калса, сатуучуга кайрылыңыз.
- 1x XENOCAM 8-Channel 5M-N/1080N DVR (Hard Disk Drive NOT included)
- 1x Power Supply
- 1x USB чычкан
- 1x Колдонуучунун колдонмосу (бул документ)

2.1-сүрөт: Package Contents. This image displays the XENOCAM 8-Channel DVR unit, its power adapter, a USB mouse, and the printed user manual, confirming all standard inclusions.
3. Продукт бүтүп калдыview
The XENOCAM 8-Channel Hybrid DVR is designed for comprehensive video surveillance. It features multiple video input ports, audio input/output, and various connectivity options for seamless integration into your security system.
3.1 Алдыңкы жана арткы панелдер

3.1-сүрөт: Front and Rear Panels. The top image shows the front panel with navigation buttons (ESC, MENU, OK, directional arrows) and a USB port. The bottom image displays the rear panel with 8 BNC video input ports, HD-port (HDMI), AUDIO IN/OUT (RCA), VGA, NET (RJ-45), USB, and DC 12V power input.
3.2 Өлчөмдөр
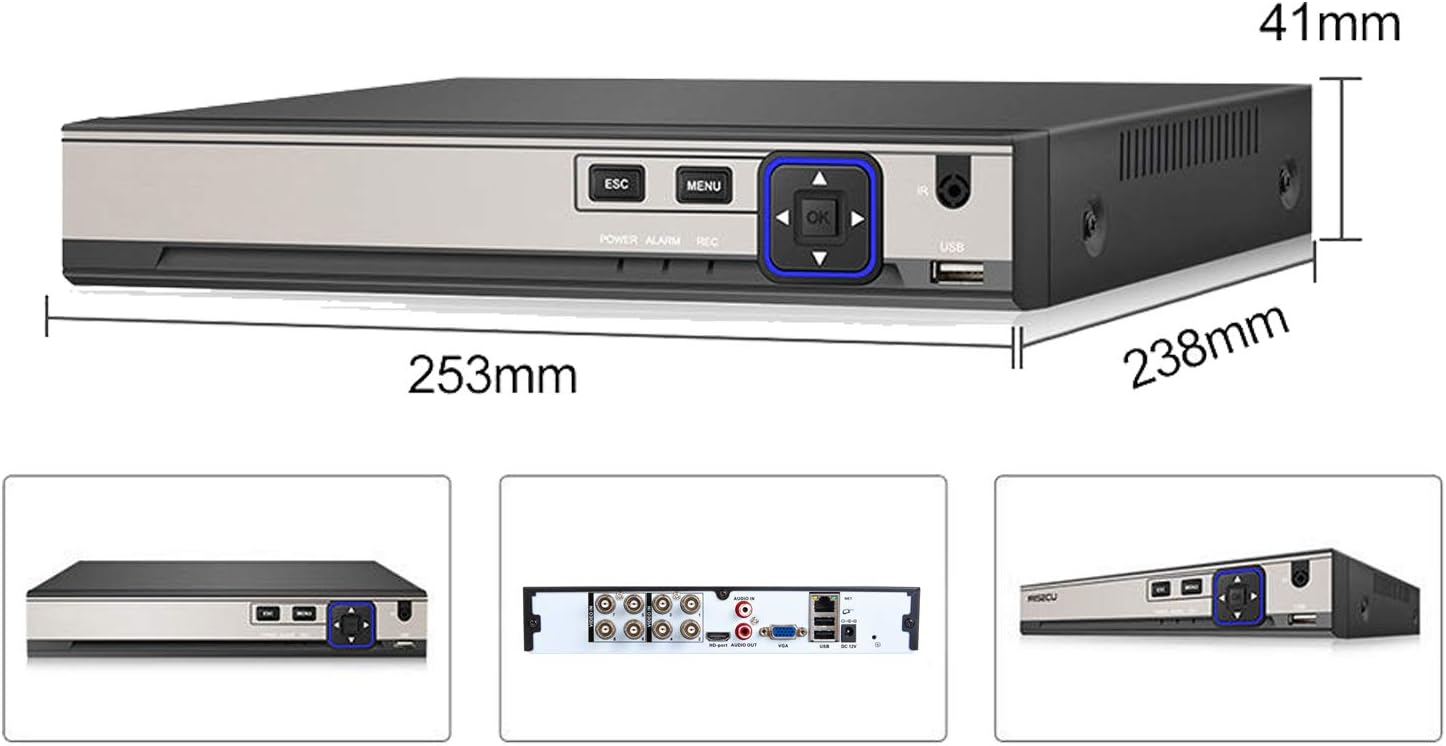
3.2-сүрөт: DVR Dimensions. The image illustrates the physical dimensions of the DVR unit: approximately 253mm in length, 238mm in width, and 41mm in height.
4. Орнотуу
4.1 Катуу дискти (HDD) орнотуу
This DVR does not include a pre-installed HDD. An HDD is required for recording video. The DVR supports one SATA HDD interface with a maximum capacity of 6TB.
- DVRдин үстүнкү капкагын бурап алып салыңыз.
- Connect the SATA data cable and power cable from the DVR to your HDD.
- Secure the HDD to the bottom of the DVR chassis using the provided screws.
- Үстүнкү капкакты ордуна коюп, бурама менен бекитиңиз.
4.2 Connecting Cameras and Display
- Connect your AHD/TVI/CVI/Analog cameras to the BNC VIDEO IN порттор арткы панелде.
- Connect a monitor to the HDMI or VGA чыгаруу порту.
- Connect the USB mouse to one of the USB порттор.
- Кубат адаптерин DC 12V input and plug it into a power outlet.
- The DVR will power on automatically.
4.3 Баштапкы конфигурация
Upon first boot, you will be prompted to set up basic parameters. The default login username is Админ. сен керек set a password for the device to access the system.
- Follow the on-screen prompts to set the language, time zone, and date format.
- Set a strong password for the 'Admin' user.
- If an HDD is installed, the system may prompt you to format it. Confirm to proceed.
4.4 Тармакты орнотуу
Роутериңизден Ethernet кабелин туташтырыңыз NET (RJ-45) port on the DVR. The DVR supports 10M/100Mbps network speeds.
- From the Main Menu, navigate to System > Network.
- Ensure DHCP is enabled for automatic IP address assignment, or configure a static IP address manually.
- Test network connectivity.
4.5 Channel Type Configuration (Hybrid Mode)
This DVR supports various camera types. If your cameras are not displaying, you may need to adjust the channel type settings.
- Түз эфирди оң баскыч менен басыңыз view Негизги менюну ачуу үчүн экран.
- багыттоо System > Digital.
- In the ChannelType menu, select the appropriate mode for your cameras (e.g., 1080N for analog/AHD, or IP for network cameras). The DVR supports hybrid modes like 4ch 1080N AHD + 4ch 1080P IP.
- Click OK and the DVR will reboot to apply changes.
Видео 4.1: XENOCAM AHD DVR Operation Introduction. This video demonstrates the initial setup and menu navigation of the XENOCAM DVR, including how to access system settings, adjust display resolution, and configure channel types for different camera inputs. It also shows how to check for storage abnormalities.
5. Иштөө
5.1 Live View
After successful setup, the DVR will display the live feed from connected cameras. You can switch between single-camera view жана көп камералуу тор views (1/4/8 screen display) using the on-screen menu or mouse controls.
5.2 Жазуу режимдери
DVR ар кандай жазуу режимдерин колдойт:
- Кол менен: Жаздырууну кол менен баштоо/токтотуу.
- Ойготкуч: Сигнализация окуясы ишке киргенде жазып алат.
- Кыймылды аныктоо: Records when motion is detected in the camera's view.
- Убакыт: Records according to a pre-set schedule.
Configure recording settings via Main Menu > Record.
5.3 Ойнотуу
үчүн view foo жазылганtage:
- Түз эфирди оң баскыч менен басыңыз view экран жана танда Ойнотуу.
- Select the desired date and camera channel.
- Use the timeline to navigate and play recordings.
5.4 Remote Access (P2P Monitoring)
The DVR supports P2P (Peer-to-Peer) remote monitoring via the XMeye free app for Android and iOS devices.
- жүктөп алыңыз XMeye түзмөгүңүздүн колдонмолор дүкөнүнөн колдонмо.
- Register an account if you don't have one.
- Add your DVR by scanning the unique QR code displayed on the DVR's screen (usually found in System > NetService or Info > Version).
- Сиз азыр болот view live streams and playback recordings remotely.
5.5 Motion Detection & Instant Alerts
Configure motion detection to trigger recordings and receive alerts.
- багыттоо Негизги меню > Сигнализация > Кыймылды аныктоо.
- Enable motion detection for desired channels.
- Set the detection area and sensitivity.
- Configure alert actions such as email notifications or mobile app alerts.
6. Техникалык тейлөө
6.1 Катуу дискти башкаруу
Regularly check the status of your HDD to ensure continuous recording. The DVR will overwrite old footage when the HDD is full, based on your settings.
- To check HDD information, go to Main Menu > Info > HDD Info.
- If you encounter 'No Storage' errors, ensure an HDD is properly installed and formatted.
6.2 Тазалоо
Keep the DVR unit clean and free from dust to prevent overheating and ensure optimal performance. Use a soft, dry cloth for cleaning. Do not use liquid cleaners.
7. Кыйынчылыктарды
| Көйгөй | Мүмкүн себеп | Чечим |
|---|---|---|
| No video displayed on monitor | Loose cable connection, incorrect display resolution, incorrect channel type. | Check HDMI/VGA cable connections. Adjust display resolution via System > DISPLAY. Verify channel type settings in System > Digital. |
| "No Storage for Recording!" message | No HDD installed, HDD not formatted, HDD faulty. | Install an HDD. Format the HDD via Main Menu > Advanced > HDD Info. Replace faulty HDD if necessary. |
| DVRге алыстан кирүү мүмкүн эмес | Network issue, incorrect app settings, firewall blocking. | Ensure DVR is connected to the internet. Check network settings (DHCP/Static IP). Verify QR code scan in XMeye app. Check router firewall settings. |
| Паролду унутуп калдыңыз | Сырсөз жоголгон же унутулган. | Contact XENOCAM support for password reset procedures. |
8. Техникалык шарттар
| Өзгөчөлүк | Спецификация |
|---|---|
| Видео киргизүү | 8-channel BNC input |
| Video Output | HDMI/VGA (up to 1080P) |
| Аудио киргизүү/чыгаруу | 1CH/1CH RCA |
| Видеону кысуу | H.265 |
| Preview Сапат | 8*5M-N@12fps (6 in 1); 8*4M-N@15fps (6 in 1); 8*1080N (6 in 1) |
| Record Resolution & Frame | 8*5M-N@8fps (6 in 1); 8*4M-N@8fps (6 in 1); 8*1080N@15fps (6 in 1) |
| Playback Quality | 4*5M-N@8fps (6 in 1); 8*4M-N@8fps (6 in 1); 8*1080N@15fps (6 in 1) |
| Жазуу режимдери | Manual, Alarm, Motion Detection, Timing |
| Backup Modes | Network, USB portable HDD, USB DVD-RW |
| HDD интерфейси | 1x SATA (Max 6TB) |
| Тармак интерфейси | 1x RJ-45 10M/100Mbps |
| USB интерфейси | 2x USB 2.0 |
| DVR Modes | DVR: 8*5M-N; 8*1080N Hybrid: 4ch 1080N AHD + 4ch 1080P IP NVR: 16*1080P; 8*5M |
| Мобилдик колдонмо | XMeye (free) |
| PC программалык камсыздоо | CMS, VMS |
| Продукциянын өлчөмдөрү | 9.96 x 9.37 x 1.65 дюйм (253 x 238 x 41 мм) |
| Элемент Салмагы | 2.59 фунт |
9. Кепилдик жана колдоо
XENOCAM products are designed for reliability and performance. For warranty information, technical support, or service inquiries, please refer to the warranty card included with your product or visit the official XENOCAM webсайт. Кепилдик дооматтары үчүн сатып алганыңыздын далилин сактап коюңуз.