
1. Киришүү
This manual provides essential information for the safe and efficient operation of your iProda 2 in 1 Laptop, Model M1169YM. Please read this manual thoroughly before using the device and retain it for future reference. This convertible laptop features an 11.6-inch touchscreen, powered by an Intel N4100 processor, and runs on Windows 10 Pro.

Image: The iProda 2 in 1 Laptop can be used in multiple configurations, including traditional laptop, tent, stand, and tablet modes, showcasing анын ар тараптуулугу.
2. Коопсуздук маалыматы
Түзмөгүңүзгө зыян келтирбөө же өзүңүзгө жаракат келтирбөө үчүн төмөнкү коопсуздук чараларын сактаңыз:
- Аппаратты экстремалдык температурага, түз күндүн нуруна же жогорку нымдуулукка дуушар кылбаңыз.
- Аппаратты түшүрүүдөн же катуу соккудан сактаныңыз.
- Кубаттоо үчүн берилген же бекитилген кубат адаптерин гана колдонуңуз.
- Аппаратты суудан жана башка суюктуктардан алыс кармаңыз.
- Аппаратты өз алдынча бөлүүгө же оңдоого аракет кылбаңыз. Квалификациялуу тейлөө кызматкерлерине кайрылыңыз.
3. Пакеттин мазмуну
Пакетиңизде бардык буюмдар бар экенин текшериңиз:
- iProda 2 in 1 Laptop (Model M1169YM)
- Кубаттуу адаптер
- Колдонуучунун Колдонмосу (бул документ)
4. Продукт бүтүп калдыview
The iProda 2 in 1 Laptop is designed for versatility, offering multiple usage modes and essential connectivity options.
4.1. Негизги өзгөчөлүктөрү
- 11.6 дюймдук IPS сенсордук экран: A responsive 10-point precision touchscreen with 1920x1080 resolution for interactive use.
- Конвертирленген дизайн: 360-degree hinge allows seamless transition between laptop, tablet, tent, and stand modes.
- Intel N4100 Processor: Provides efficient performance for daily tasks.
- Windows 10 Pro: Pre-installed operating system for productivity and security.
- Кеңейтүүчү сактагыч: Supports M.2 2242 SSD for additional storage capacity.

Image: Key features of the iProda laptop, including its touchscreen, operating system, display specifications, and camera resolution.

Image: The laptop's 360-degree hinge allows it to convert into a tablet, enabling direct interaction via its precision touchscreen.
4.2. Порттор жана баскычтар
Familiarize yourself with the various ports and buttons on your laptop:
- Тип-C Port: Used for power supply and data transfer.
- Микро HDMI: Тышкы дисплейлерге туташуу үчүн.
- Микро USB: USB түзмөктөрүн туташтыруу үчүн.
- TF карта уячасы: For expanding storage with a TF (MicroSD) card.
- Кубат баскычы: Аппаратты күйгүзүү/өчүрүү же уктатуу үчүн.
- Үн баскычтары: To adjust audio output.
- Наушник джек: Наушниктерди же тышкы динамиктерди туташтыруу үчүн.

Сүрөт: деталдуу view of the laptop's side panels, indicating the location and function of each port and button for easy identification.
5. Орнотуу
5.1. Батареяны заряддоо
Before first use, fully charge the laptop's battery. Connect the provided power adapter to the Type-C port on the laptop and plug it into a power outlet. The charging indicator light will illuminate.
5.2. Биринчи жүктөө жана Windows орнотуу
- Экран күйгөнгө чейин Кубат баскычын басып, кармап туруңуз.
- Follow the on-screen instructions to complete the Windows 10 Pro initial setup, including language selection, network connection, and user account creation.
6. Ноутбугуңузду иштетүү
6.1. Сенсордук экранды колдонуу
The 10-point precision touchscreen allows for intuitive interaction with Windows 10 Pro. Use gestures such as tapping, swiping, pinching, and stretching to navigate, zoom, and interact with applications.
6.2. Баскычтоп жана сенсордук такта
The integrated keyboard and touchpad provide traditional input methods. The touchpad supports multi-touch gestures for scrolling, zooming, and switching applications.

Image: The laptop's full-size American keyboard and responsive touchpad, designed for comfortable typing and navigation.
6.3. Convertible Modes
The 360-degree hinge allows you to switch between various modes:
- Ноутбук режими: Standard configuration for typing and productivity.
- Планшет режими: Fold the screen back completely for a tablet experience, ideal for browsing or drawing.
- Чатыр режими: Position the laptop like a tent for media consumption or presentations.
- Туруу режими: Flip the keyboard face down to use the screen as a display, suitable for watching videos.

Image: The laptop configured in tent mode, demonstrating its flexibility for viewклавиатура тоскоолдук кылбастан мазмунду иштетүү.
7. Сактагычты кеңейтүү
The laptop comes with 64GB eMMC storage. You can expand the storage capacity by installing an M.2 2242 SSD (128GB/256GB/512GB, not included).
7.1. Installing an M.2 2242 SSD
To install an M.2 2242 SSD:
- Power off the laptop and disconnect the power adapter.
- Carefully open the back cover of the laptop.
- Locate the M.2 slot.
- Insert the M.2 2242 SSD into the slot and secure it with the appropriate screw (if provided).
- Арткы жапкычты ордуна коюңуз.
- Upon booting, you may need to initialize and format the new SSD through Windows Disk Management.
Note: If you are unsure about this procedure, it is recommended to seek professional assistance.

Image: Visual representation of the M.2 SSD slot, illustrating how additional storage can be integrated into the laptop.
8. Байланыш
8.1. Wi-Fi туташуусу
The laptop supports dual-frequency 2.4GHz/5GHz Wi-Fi. To connect to a wireless network:
- Тутум тактасындагы Wi-Fi сөлөкөтүн чыкылдатыңыз.
- Тизмеден каалаган тармакты тандаңыз.
- Эгер суралса, тармак сырсөзүн киргизип, "Туташуу" баскычын чыкылдатыңыз.
8.2. External Display (Micro HDMI)
Connect an external monitor or TV using a Micro HDMI to HDMI cable. Once connected, you can configure display settings (duplicate, extend, second screen only) through Windows display settings.
8.3. USB түзмөктөрү
Use the Micro USB port or the Type-C port (with an appropriate adapter) to connect peripherals such as a mouse, keyboard, or external storage devices.
9. Техникалык тейлөө
9.1. Тазалоо
To clean the laptop, power it off and disconnect the power adapter. Use a soft, lint-free cloth slightly dampened with water or a screen cleaner for the display. Avoid harsh chemicals or abrasive materials.
9.2. Батареяга кам көрүү
Батареянын иштөө мөөнөтүн узартуу үчүн:
- Батареяны бат-баттан толук кубаттап калуудан алыс болуңуз.
- Ноутбукка жогорку температураны тийгизбеңиз.
- Ноутбукту узак убакытка сактасаңыз, батареянын 50-70% га чейин заряддалганын текшериңиз.
10. Кыйынчылыктарды
Бул жерде сиз кабылышы мүмкүн болгон жалпы маселелерди чечүү жолдору бар:
| Көйгөй | Чечим |
|---|---|
| Ноутбук күйбөйт. | Ensure the battery is charged. Connect the power adapter and try again. If still unresponsive, perform a hard reset by holding the power button for 10-15 seconds. |
| Экран бош же бүлбүлдөп турат. | Restart the laptop. Check if an external display is connected and interfering. Update display drivers if possible. |
| Wi-Fi туташуу маселелери. | Wi-Fi күйгүзүлгөнүн текшериңиз. Роутериңизди жана ноутбугуңузду өчүрүп-күйгүзүңүз. Windows'тогу тармак жөндөөлөрүн текшериңиз. |
| Сенсордук экран жооп бербей жатат. | Restart the laptop. Ensure the screen is clean. Check for any pending Windows updates or driver updates for the touchscreen. |
11. Техникалык шарттар
Technical specifications for the iProda 2 in 1 Laptop (Model M1169YM):
| Өзгөчөлүк | Деталь |
|---|---|
| Бренд | iProda |
| Модель номери | M1169YM |
| Операция системасы | Windows 10 Pro |
| Screen Size | 11.6 дюйм |
| Screen Resolution | 1920 x 1080 пиксел (1080p) |
| Процессор | Intel N4100 (up to 2.4 GHz Burst Frequency) |
| RAM | 4 ГБ DDR4 |
| Катуу диск | 64 ГБ eMMC |
| Графикалык карта | Integrated (UHD 600 Graphics) |
| Зымсыз түрү | 2.4 GHz / 5 GHz Dual-frequency Wi-Fi |
| Батареянын орточо иштөө мөөнөтү | 8 Hours (3500mAh, 27Wh) |
| Элемент Салмагы | 3.63 фунт |
| Продукциянын өлчөмдөрү | 11.99 x 11.6 x 0.5 дюйм |
| Байланыш технологиясы | HDMI, USB Type-C, Micro USB |
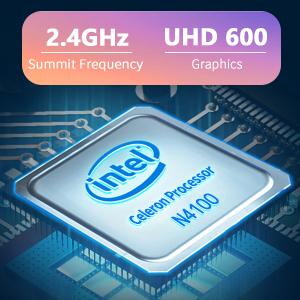
Image: The Intel Celeron N4100 processor, central to the laptop's performance, highlighting its clock speed and integrated graphics capabilities.

Image: The laptop's battery specifications, indicating its power capacity for extended use.
12. Кепилдик жана колдоо
For warranty information and technical support, please refer to the documentation included with your purchase or visit the official iProda website. Contact information for customer service can typically be found on the manufacturer's support page.