1. Продукт бүтүп калдыview
This manual provides essential information for the safe and efficient operation of your Beko DIS35020 Slim 45 cm Built-in Dishwasher. Please read it thoroughly before installation, first use, and maintenance.
The Beko DIS35020 is a fully integrated dishwasher designed for seamless installation into your kitchen cabinetry. It features a slim 45 cm width, accommodating 10 place settings, and operates quietly. Key features include an adjustable rack, internal LED lighting, and multiple wash programs.

Сүрөт 1.1: Алдыңкы view of the Beko DIS35020 built-in dishwasher with the control panel visible and the upper rack partially extended.
2. Коопсуздук маалыматы
Жараат алуудан же шайманга зыян келтирбөө үчүн ар дайым төмөнкү коопсуздук эрежелерин сактаңыз.
- Электр коопсуздугу: Идиш жуугуч туура жерге туташтырылган розеткага туташтырылганын текшериңиз. Узарткычтарды колдонбоңуз. Кандайдыр бир тейлөө же тазалоодон мурун электр энергиясын өчүрүңүз.
- Суу коопсуздугу: Ensure water connections are secure to prevent leaks. Do not operate the dishwasher if there is a visible water leak.
- Балдардын коопсуздугу: Keep children away from the dishwasher, especially when it is operating or contains detergent. The door should not be left open unattended.
- Кир жуугуч жана чайкоочу каражат: Store detergents and rinse aids out of reach of children. Use only detergents specifically designed for automatic dishwashers.
- Курч объекттер: Load sharp items (knives, skewers) with the points facing down to prevent injury.
- Ысык беттер: The interior of the dishwasher can be hot immediately after a cycle. Allow time for cooling before unloading.
- Орнотуу: Орнотуу жергиликтүү эрежелерге ылайык квалификациялуу техник тарабынан аткарылышы керек.
3. Орнотуу
The Beko DIS35020 is designed for built-in installation. Proper installation is crucial for optimal performance and safety. It is highly recommended that installation be carried out by a professional installer.
3.1. Орнотууга чейинки текшерүүлөр
- Verify that the installation space meets the required dimensions.
- Ensure access to a grounded electrical outlet, a water supply connection, and a drain point.
- Unpack the dishwasher carefully and inspect for any transit damage.
3.2. Өлчөмдөрү жана жайгаштырылышы
Refer to the installation diagram for precise measurements and clearances required for built-in integration.
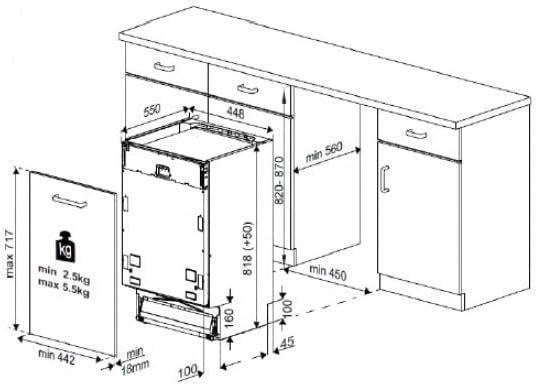
Image 3.1: Detailed installation diagram with minimum and maximum dimensions for cabinet integration. The diagram indicates a minimum width of 450mm for the cabinet opening, and appliance height adjustable between 820-870mm.
3.3. Байланыштар
- Суу кириши: Суу кирүүчү шлангды минималдуу басымы 0.03 МПа жана эң көп дегенде 1 МПа болгон муздак суу менен камсыздоого туташтырыңыз.
- Дренаждык шланг: Securely connect the drain hose to your household drainage system, ensuring there are no kinks or blockages.
- Электр байланышы: Plug the dishwasher into a dedicated, grounded 240V electrical outlet.
Warning: Incorrect installation can lead to electric shock, fire, or water damage. Always consult a qualified professional.
4. Initial Setup and Loading
Before using your dishwasher for the first time, follow these steps for optimal performance.
4.1. Жуучу каражатты жана чайкоочу каражатты кошуу
Open the detergent dispenser located on the inner side of the dishwasher door. Add the recommended amount of dishwasher detergent to the main compartment. If using rinse aid, fill the rinse aid dispenser until the indicator shows full.

Image 4.1: The detergent and rinse aid dispenser compartment, typically found on the inside of the dishwasher door.
4.2. Идиштерди жүктөө
Proper loading ensures thorough cleaning and prevents damage to your dishes. The Beko DIS35020 features an adjustable rack for flexibility.
- Төмөнкү текче: Ideal for large items like plates, serving dishes, and pots. Ensure items do not block the spray arms.
- Жогорку Рак: Suitable for glasses, cups, small bowls, and delicate items. The rack can be adjusted to accommodate taller items below.
- Ашкана себет: Place forks and spoons with handles down, and knives with handles up for safety.

Image 4.2: The lower rack of the dishwasher, correctly loaded with various plates.

Image 4.3: The upper rack of the dishwasher, showing proper placement of glasses and cups.

Image 4.4: A removable cutlery basket, demonstrating how to load forks, spoons, and knives.
5. Иштөө нускамалары
Follow these steps to operate your Beko DIS35020 dishwasher.
5.1. Башкаруу панели
The control panel is located on the top edge of the dishwasher door. It features touch controls and LED indicators for program selection and status.
5.2. Жуу программасын тандоо
Your dishwasher offers several wash programs to suit different needs:
- Кадимки: Күнүмдүк кирдеген идиштерге стандарттуу программа.
- Интенсивдүү: Катуу булганган казандарга, идиштерге жана идиштерге.
- Тез жуу: A shorter cycle for lightly soiled items that need to be cleaned quickly.
To select a program, press the corresponding button on the control panel. The LED indicator for the selected program will illuminate.
5.3. Циклды баштоо
- Идиш жуугуч машинанын эшиги бекем жабылганын текшериңиз.
- Тандалган жуу программасын баштоо үчүн "Баштоо/Тынытуу" баскычын басыңыз.
- The dishwasher will automatically proceed through the wash, rinse, and dry phases.
An internal LED light provides visibility inside the dishwasher during operation and when loading/unloading.
6. Техникалык тейлөө жана тазалоо
Үзгүлтүксүз техникалык тейлөө идиш жуугуч машинаңыздын узак жана натыйжалуулугун камсыздайт.
6.1. Фильтрлерди тазалоо
The filter system prevents food particles from recirculating and clogging the spray arms. Clean the filters regularly (e.g., weekly or bi-weekly, depending on usage).
- Twist and remove the coarse filter from the bottom of the dishwasher.
- Separate the fine filter and microfilter.
- Rinse all filter components under running water to remove food debris. Use a soft brush if necessary.
- Фильтрлерди кайра чогултуп, идиш жуугуч машинага бекем салыңыз.
6.2. Бүркүтүүчү куралдарды тазалоо
Periodically check the spray arm nozzles for blockages. If clogged, remove the spray arms and clear the holes with a thin wire or toothpick.
6.3. Тышкы жана ички тазалоо
- Сырткы беттерин жумшак менен сүртүңүз, гamp кездеме. Абразивдүү тазалагычтарды колдонбоңуз.
- For the interior, run an empty cycle with a dishwasher cleaner or a cup of white vinegar to remove mineral buildup and odors.
6.4. Rinse Aid and Salt Indicators
Refill rinse aid and dishwasher salt (if applicable to your water hardness settings) when their respective indicators on the control panel or dispenser light up.
7. Кыйынчылыктарды
Кызматка кайрылуудан мурун, кайраview төмөнкү жалпы маселелер жана аларды чечүү жолдору.
| Көйгөй | Мүмкүн себеп | Чечим |
|---|---|---|
| Идиш жуугуч иштебейт. | Электр менен камсыздоо маселеси, эшик туура жабылган жок, программа тандалган жок. | Электр туташуусун текшериңиз, эшиктин бекитилгенин текшериңиз, жуу программасын тандаңыз. |
| Идиштер таза эмес. | Туура эмес жүктөө, бүркүтүүчү түтүктөрдүн бүтөлүшү, жуугуч каражаттын жетишсиздиги, туура эмес программа. | Идиштерди туура кайра салыңыз, чачыраткычтарды жана чыпкаларды тазалаңыз, көбүрөөк жуучу каражат кошуңуз, интенсивдүү программаны тандаңыз. |
| Water remains in the bottom. | Clogged filter, blocked drain hose, drain pump issue. | Clean filters, check drain hose for kinks, consult service if pump is faulty. |
| Иш учурунда ашыкча ызы-чуу. | Идиш чачкычтарга тоскоол болуп, насостогу бөтөн нерсе, туура эмес орнотулган. | Идиштерди кайра жайгаштырыңыз, бөтөн нерселердин бар-жогун текшериңиз, идиш жуугуч машинанын тегиз турганын текшериңиз. |
If the problem persists after attempting these solutions, please contact Beko customer support.
8. Техникалык шарттар
Below are the key technical specifications for the Beko DIS35020 dishwasher:
| Өзгөчөлүк | Спецификация |
|---|---|
| Модель номери | DIS35020 |
| Форма фактору | Камтылган (толугу менен интеграцияланган) |
| Орнотуулар | 10 |
| Өлчөмдөрү (H x W x D) | Adjustable height 820-870 mm, Width 448 mm, Depth 550 mm (approx. based on diagram) |
| Тtage | 240V |
| Жуу программалары | Normal, Intensive, Quick Wash |
| Кошумча функциялар | Adjustable Rack, Internal LED Light |
| Материал | Дат баспас болоттон жасалган (ички) |
| Ызы-чуу деңгээли | 49 дБ (энергия белгисинен) |
| Энергия эффективдүүлүгү классы | D (New Energy Label Scale) |
| Энергияны керектөө (100 циклге) | 76 кВт.саат |
| Сууну керектөө (бир циклге) | 11.9 литр |
| Стандарттык программанын узактыгы | 3:30 (hours:minutes) |
| Камтылган компоненттер | Адаптер |

Image 8.1: The EU Energy Label for the Beko DIS35020, detailing its energy and water consumption, noise level, and capacity.
9. Кепилдик жана колдоо
Your Beko DIS35020 dishwasher comes with a manufacturer's warranty. Please refer to the warranty card included with your appliance for specific terms and conditions, including coverage duration and registration details.
For technical assistance, spare parts, or to schedule a service appointment, please contact Beko customer support. You can find contact information on the Beko official webсайтында же продукт документациясында.
When contacting support, please have your model number (DIS35020) and serial number ready. The serial number is typically located on a label inside the dishwasher door or on the back of the appliance.