1. Киришүү
This manual provides detailed instructions for the Abovsare Digital Alarm Clock, Model 8810. This device features a large LED display, automatic brightness adjustment, multiple alarm settings, and a memory function to retain time data during power interruptions. It displays time, date, and temperature, making it a versatile addition to various indoor environments.

Figure 1: Abovsare Digital Alarm Clock (Model 8810)
2. Коопсуздук маалыматы
- Электр камсыздоо: Only connect the device with the provided USB port or a 5V/1A or 5V/2A adapter. Using excessive voltage may cause screen damage or malfunction.
- Жайгашкан жери: Ensure the clock is placed on a stable surface or securely mounted on a wall to prevent falling.
- Курчап турган чөйрө: Түзмөктү өтө жогорку температурага, түз күн нуруна, жогорку нымдуулукка же чаңдуу чөйрөгө дуушар кылбаңыз.
- Тазалоо: Do not use abrasive cleaners or immerse the device in water. Refer to the Maintenance section for proper cleaning instructions.
- Демонтаж: Аппаратты өз алдынча бөлүүгө же оңдоого аракет кылбаңыз. Жардам алуу үчүн кардарларды колдоо бөлүмүнө кайрылыңыз.
3. Пакеттин мазмуну
Пакетте бардык буюмдар бар экенин текшериңиз:
- Abovsare Digital Alarm Clock (Model 8810)
- USB кубат кабели
- Колдонуучунун Колдонмосу (бул документ)
4. Продукт бүтүп калдыview
The Abovsare Digital Alarm Clock features a large LED display for clear visibility and intuitive controls for easy operation.
4.1 Алдыңкы дисплей
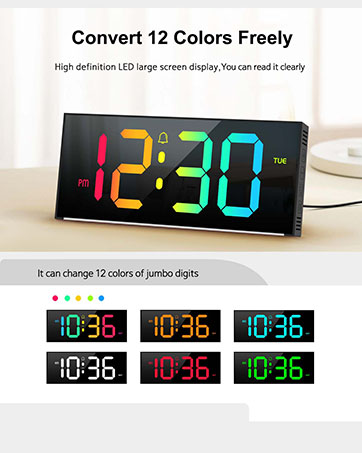
Figure 2: Multifunctional Digital Clock Display
- Убакытты көрсөтүү: Large digits show current time (12-hour or 24-hour format).
- Дата дисплей: Айды жана күндү көрсөтөт.
- Температура дисплейи: Айлана-чөйрөнүн температурасын Цельсий же Фаренгейтте көрсөтөт.
- Сигнал индикаторлору: Icons for Alarm 1 and Alarm 2.
- AM/PM индикатору: 12 сааттык убакыт форматы үчүн.
4.2 Rear Controls

Figure 3: Rear Control Buttons and Ports
- SET баскычы: Убакытты, датаны жана ойготкучтарды орнотуу режимине кирет.
- ЖОГОРУ/ТӨМӨН баскычтары: Adjust values during setting mode or change brightness/volume.
- ALARM 1/ALARM 2 баскычтары: Activate/deactivate specific alarms.
- USB Power Port: Электр кабелин туташтыруу үчүн.
- Дубалга орнотуучу тешиктер: For optional wall installation.
5. Орнотуу
5.1 Кубат туташтыруу
- Connect the provided USB power cable to the USB Power Port on the back of the clock.
- Plug the other end of the USB cable into a 5V/1A or 5V/2A USB adapter (not included) or a compatible USB port.
- Дисплей күйүп, сааттын күйүп турганын билдирет.
Note: This clock is corded electric and requires continuous power. It is not battery operated for primary function, but has a built-in memory function (CR2032 3V button battery) to retain settings during power outages.

Figure 4: Power Connection and Memory Function
5.2 Алгачкы убакытты жана датаны орнотуу
Upon first power-up or after a prolonged power disconnection, you may need to set the time and date.
- басып, кармап туруңуз SET Убакытты орнотуу режимине өтүү үчүн баскычын басыңыз. Сааттын сандары күйүп-өчүп турат.
- колдонуу UP or ылдый саатты тууралоо үчүн баскычтар.
- Басыңыз SET Саатты ырастоо жана мүнөт коюуга өтүү үчүн кайрадан басыңыз. Мүнөт сандары күйүп-өчүп турат.
- колдонуу UP or ылдый мүнөттөрдү тууралоо үчүн баскычтар.
- Басууну улантыңыз SET жыл, ай жана күн жөндөөлөрүн өзгөртүү үчүн, ар бирин тууралоо UP or ылдый баскычтар.
- Басыңыз SET орнотуу режиминен чыгуу үчүн акыркы жолу.
Tip: Ensure the clock is set to the correct year before setting the time/date for accurate day-of-week calculations.
6. Иштөө нускамалары
6.1 Жарыктыкты жөндөө
The clock features 5 levels of brightness adjustment and an automatic dimmer function.
5-сүрөт: Жарыктыкты жөндөө функциясы
- Кол менен тууралоо: Touch the top button of the alarm clock to cycle through 5 brightness levels.
- Автоматтык күңүрттөө: The clock automatically adjusts brightness based on the time period:
- 7:00 - 17:59: Highlight brightness
- 18:00 - 22:59: Medium brightness
- 23:00 - 5:59: Darkest brightness
- 6:00 - 6:59: Medium highlight brightness
- Кол менен жокко чыгаруу: After manual adjustment, the clock will remember your setting for that specific period. However, at the start of a new period, the brightness will revert to the system's preset automatic rules.
6.2 Ойготкучтарды орнотуу
Саат эки көз карандысыз ойготкуч жөндөөсүн колдойт.

Figure 6: Two Alarm Settings Example
- басыңыз 1-ДАБЛ or 2-ДАБЛ button to activate/deactivate the respective alarm. An alarm icon will appear/disappear on the display.
- To set an alarm time, press and hold the 1-ДАБЛ or 2-ДАБЛ баскычы. Саат цифралары жарк этет.
- колдонуу UP or ылдый саатты тууралоо үчүн баскычтар.
- басыңыз АЛАРМ Саатты ырастоо жана мүнөт жөндөөсүнө өтүү үчүн баскычын кайра басыңыз. Мүнөттөрдүн сандары күйүп-өчүп турат.
- колдонуу UP or ылдый мүнөттөрдү тууралоо үчүн баскычтар.
- басыңыз АЛАРМ button one last time to exit alarm setting mode.
6.3 Ringtones and Volume
The clock offers 40 selectable ringtones and 4 volume levels.
- While in alarm setting mode (after setting the time), press the АЛАРМ button again to enter ringtone selection. Use ЖОГОРУ/ТӨМӨН to cycle through 40 ringtones.
- басыңыз АЛАРМ button again to enter volume adjustment. Use ЖОГОРУ/ТӨМӨН to select one of 4 volume levels.
- басыңыз АЛАРМ сактоо жана чыгуу үчүн баскыч.
6.4 Тындыруу функциясы
When an alarm sounds, gently tap the top of the clock to activate the snooze function. The alarm will pause and sound again after a set interval (typically 5-9 minutes, refer to specific product documentation for exact duration).
6.5 Монтаждоо параметрлери
The clock can be placed on a tabletop or mounted on a wall.
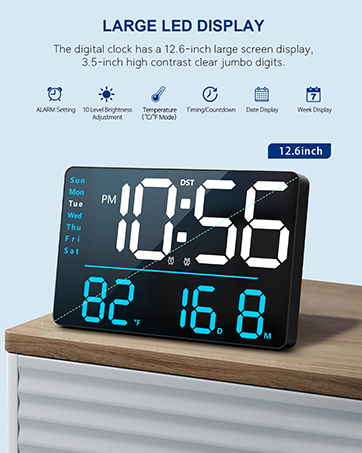
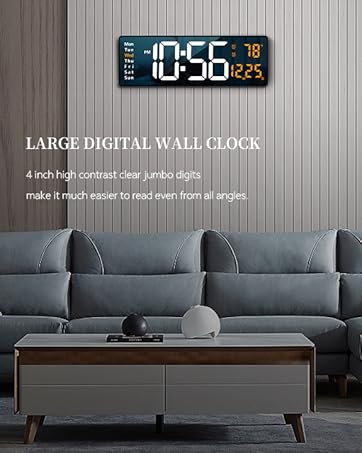
Figure 7: Tabletop and Wall Mounting Options
- Столдун үстүнө жайгаштыруу: Simply place the clock on any flat, stable surface.
- Дубалга орнотуу: Use the double wall hanging holes on the back of the clock. Ensure appropriate hardware (screws, anchors) is used for your wall type to securely mount the device.
7. Техникалык тейлөө
- Тазалоо: Wipe the clock's surface with a soft, dry, or slightly damp кездеме. Катуу химиялык заттарды, абразивдүү тазалагычтарды же эриткичтерди колдонбоңуз.
- Чаңды тазалоо: Regularly dust the clock to prevent accumulation, especially around the display and buttons.
- Электр энергиясын өчүрүү: If the clock will not be used for an extended period, disconnect it from the power source. The internal memory battery will retain settings.
8. Кыйынчылыктарды
| Көйгөй | Мүмкүн себеп | Чечим |
|---|---|---|
| Display is off or flickering. | No power, incorrect adapter, loose connection. | Ensure the USB cable is securely connected. Use a 5V/1A or 5V/2A adapter. Check power outlet. |
| Убакыт/дата туура эмес. | Not set correctly, power interruption without memory backup. | Follow instructions in Section 5.2 to reset time and date. The internal memory battery should prevent loss during brief outages. |
| Ойготкуч угулбайт. | Alarm not activated, volume too low, incorrect time set. | Ensure the alarm icon is visible. Check alarm time. Adjust alarm volume (Section 6.3). |
| Brightness changes unexpectedly. | Automatic dimmer is active. | This is normal behavior for the automatic brightness dimmer. Manual adjustments are temporary for the current period. |
| Баскычтар жооп бербейт. | Temporary software glitch, conflict with touch keys. | Disconnect power for a few seconds and reconnect. Avoid touching the top touch keys while adjusting rear buttons. |
9. Техникалык шарттар
- Бренд: Абовсаре
- Модель номери: 8810
- Түсү: Зым-кара
- Дисплей түрү: Digital LED
- Продукциянын өлчөмдөрү: 10.4"W x 2.8"H
- Кубат булагы: Corded Electric (USB-5V Power Supply)
- Материал: Акрилонитрил бутадиен стирол (ABS)
- Монтаж түрү: Стол же дубалга орнотулган
- Элемент Салмагы: 9.6 унция
- Эс тутумдун батареясы: 1 CR2032 battery required (for memory function only)
- Өзгөчөлүктөр: Large LED display, Automatic Brightness Dimmer, Memory Function, Multiple Ringtones, Dual Alarms, Date, Temperature Display.
10. Кепилдик жана колдоо
For warranty information or technical support, please refer to the retailer's return policy or contact Abovsare customer service through the official brand store or your purchase platform.
Кайтаруу саясаты: Typically 30 days for refund/replacement (check with your retailer).
Abovsare Brand Store: Visit the Abovsare Store on Amazon