1. Продукт бүтүп калдыview
This manual provides detailed instructions for the installation, operation, and maintenance of your SMARTSTANDARD 5.5 Feet Bypass Sliding Barn Door Hardware Kit. This kit is designed for double wooden doors, allowing them to slide smoothly and quietly on a single track, suitable for openings up to 54 inches wide.

Image: The SMARTSTANDARD 5.5 Feet Bypass Sliding Barn Door Hardware Kit installed, showcasing two wooden barn doors in a home setting.
2. Пакеттин мазмуну
Please verify that all components listed below are present in your package. If any parts are missing or damaged, please contact customer support.
- 2x Rail sections
- 1x Rail connector
- 4x Hangers (rollers)
- 4x Wall spacers
- 1x Floor Guide
- 2x Door Stoppers
- 2x Hex Keys
- Necessary mounting hardware (screws, bolts, etc.)
Note: Door panels are NOT included in this hardware kit.
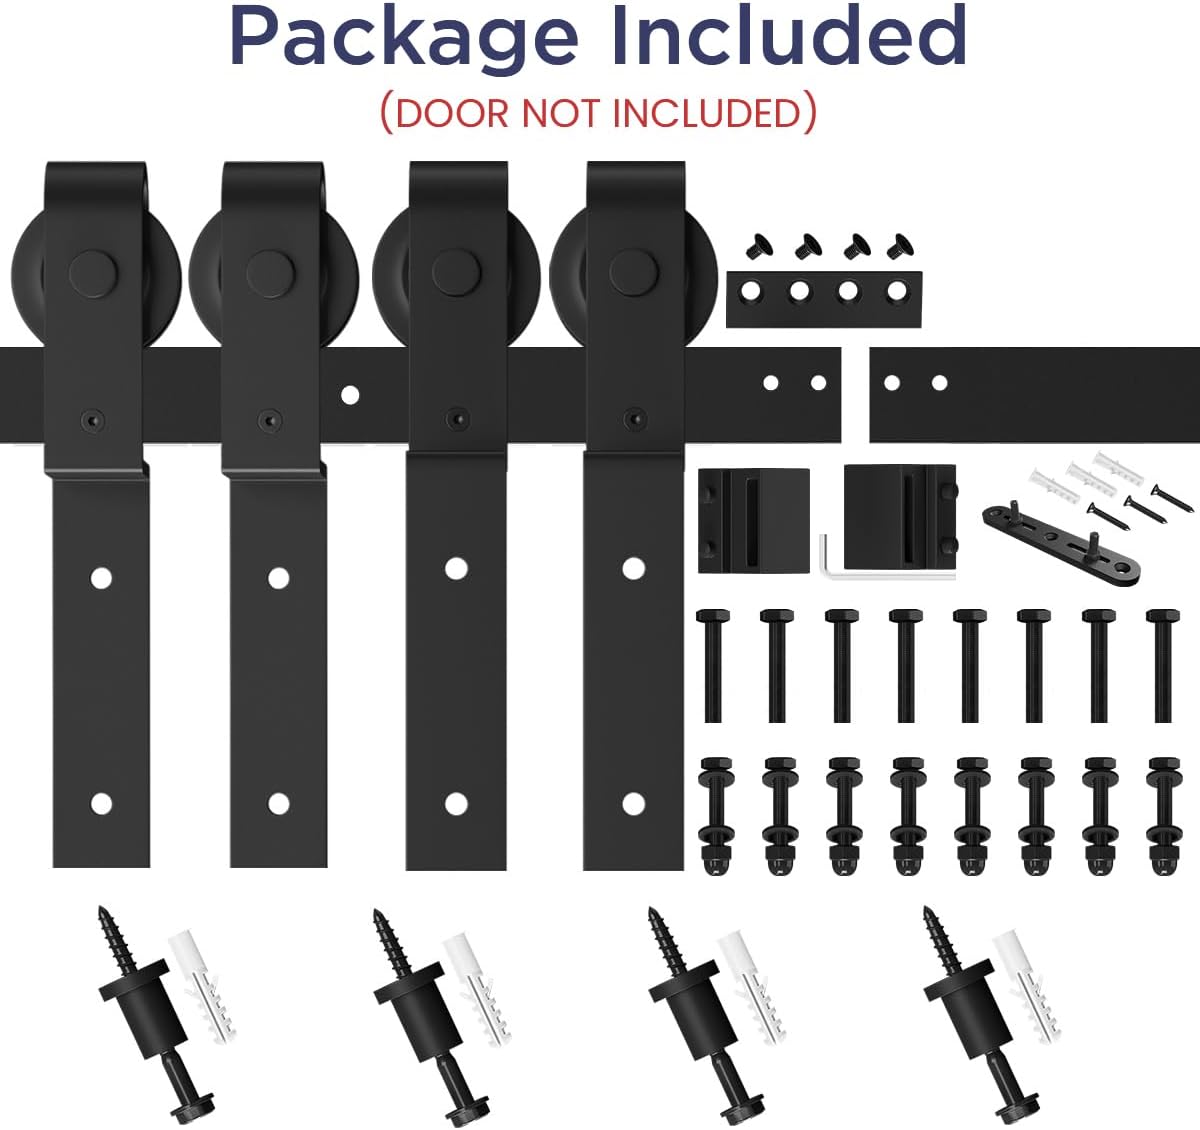
Image: A visual representation of all hardware components included in the kit, laid out for easy identification.
3. Продукттун спецификациялары
| Атрибут | Спецификация |
|---|---|
| Бренд | SMARTSTANDARD |
| Модель номери | SDH-0055-JBYPASS-ONERAIL |
| Түс | Кара |
| Материал | Carbon Steel |
| Стиль | Заманбап |
| Элемент Салмагы | 20.7 фунт |
| Эшиктин салмагынын сыйымдуулугу | 220 фунт |
| Эшиктин панелинин калыңдыгын тууралоо | 1 3/8 "ден 1 3/4" чейин |
| Rail Construction | 1/4" heavy duty carbon steel, solid inside |
| Керектүү Ассамблея | Ооба |
Шайкештик диаграммасы
| Рельстин өлчөмү | Кайталануу | Бир эшиктин туурасы | Мукабанын ачылышы | Fit For |
|---|---|---|---|---|
| 5.5 FT | 8"-12" | 30"-33" | 48"-58" | Double Door |
The rail comes in two pieces, connected by a connector. There will be an 8"-12" overlap space since the two doors hang on one single rail. The door panel width should be wider than half of the (opening + overlap space) to ensure the opening is fully covered.
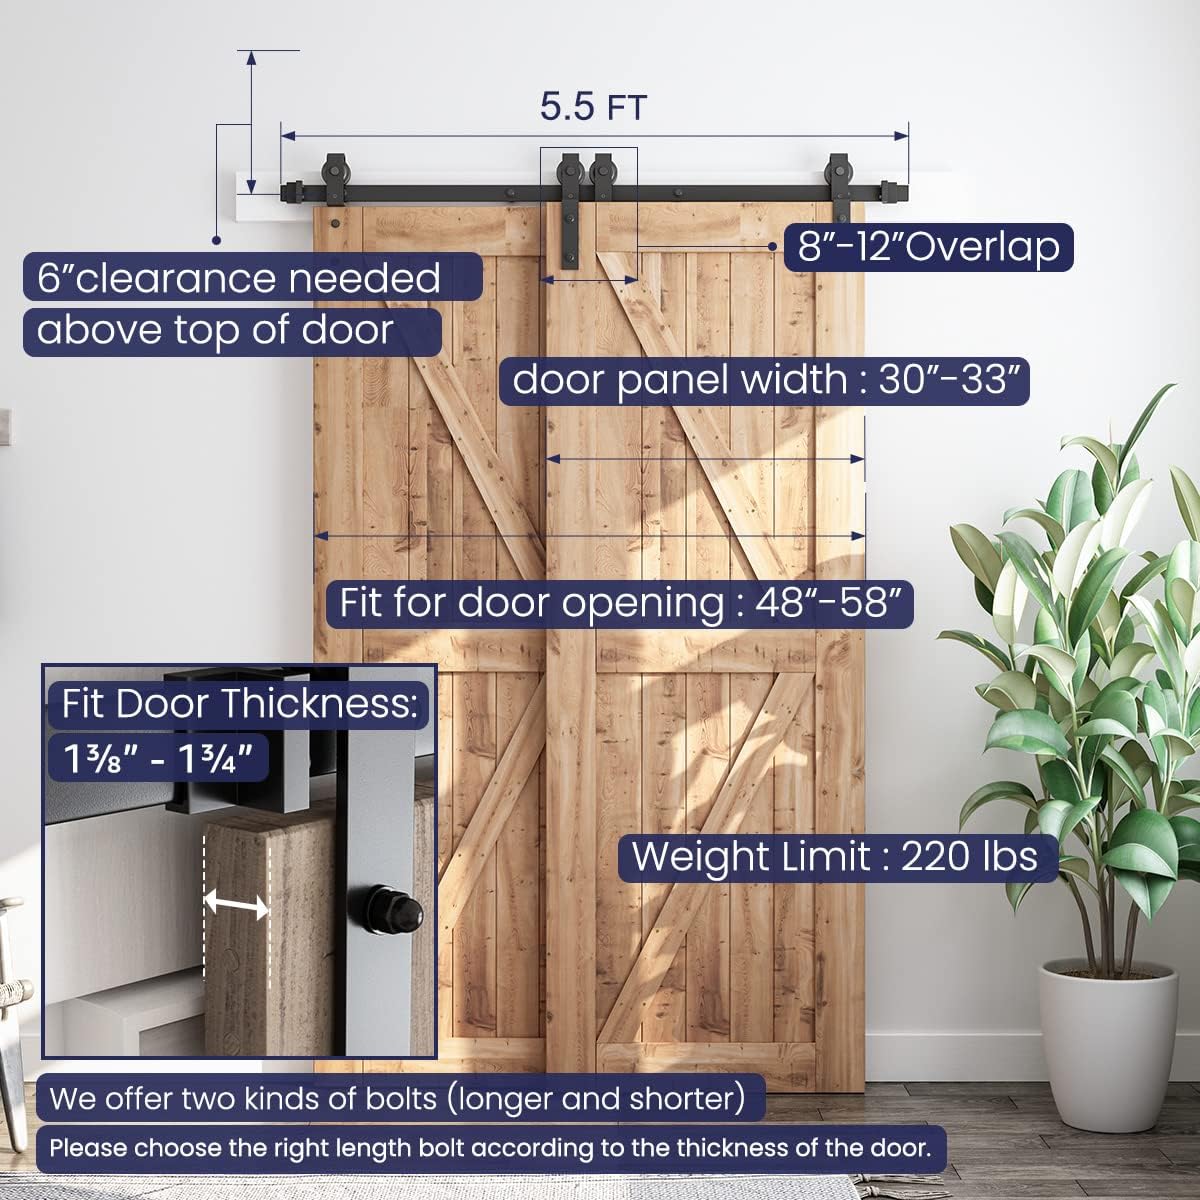
Image: A diagram illustrating key dimensions, clearances, door panel width, and weight limits for the 5.5 FT kit.
4. Орнотуу боюнча колдонмо
Careful measurement and adherence to these steps will ensure a successful installation. It is recommended to have a second person assist during certain stagорнотуу.
Орнотууга чейинки кароолор:
- Ensure a minimum of 6 inches clearance above the top of your door opening for the track and hangers.
- The wall where the track will be mounted must be sturdy enough to support the weight of the doors and hardware. If necessary, install a header board (not included) across the door opening to provide a solid mounting surface.
- Choose the correct length bolts for your door thickness (1 3/8" to 1 3/4").
Этап-этабы менен орнотуу:
- Mark Stud Locations: Use a stud finder to locate and mark the studs in the wall above your door opening. This is crucial for secure mounting.
- Attach Header Board (if needed): If your wall studs do not align with the track mounting holes or if the wall is not solid, attach a sturdy header board to the wall. Ensure it is level and securely fastened to the studs.
- Install the Metal Track: Position the two rail sections and connect them using the provided connector. Mount the assembled track to the wall or header board, ensuring it is perfectly level. Use the appropriate wall spacers and bolts.
- Install the Rollers (Hangers): Attach the hangers to the top edge of your barn doors. Ensure they are securely fastened and aligned correctly.
- Mount the Anti-Jump Disks: Install the anti-jump disks on the top edge of your doors, above the hangers. These prevent the doors from lifting off the track.
- Mount the Stoppers: Install the door stoppers on the track at the desired positions to limit the travel of the doors.
- Mount the Floor Guides: Mark the screw places for the floor guide on the floor. Drill pilot holes and secure the floor guide. This guide keeps the bottom of the doors stable.
- Lift and Place the Door on the Track: With assistance, carefully lift each door and hook the rollers onto the track. Adjust the door stoppers and floor guide as needed for smooth operation.

Image: A visual guide detailing the 8 steps for installing the SMARTSTANDARD bypass barn door hardware, from marking studs to placing the doors on the track.
Video: An official SMARTSTANDARD video demonstrating the installation process for a 4-12FT Bypass Barn Door Hardware Kit, showing key steps and features.
5. Операция
The bypass sliding barn door system allows two doors to operate independently on a single track, overlapping each other to open or close the entryway. To operate, simply grasp the door handle (not included) and slide the door along the track. The rollers are designed for smooth and quiet movement.

Image: Two wooden barn doors in an open position, demonstrating the bypass functionality and revealing the room beyond.
6. Техникалык тейлөө
Regular maintenance will ensure the longevity and smooth operation of your barn door hardware kit.
- Тазалоо: Wipe the track and rollers periodically with a soft, damp чаңды жана калдыктарды тазалоо үчүн кездеме. Абразивдүү тазалагычтардан алыс болуңуз.
- Майлоо: If the rollers begin to squeak or feel stiff, apply a small amount of silicone-based lubricant to the roller bearings and the top of the track.
- Бекер текшерүү: Periodically check all screws and bolts for tightness, especially those securing the track to the wall and the hangers to the doors. Tighten any loose fasteners to prevent sagging or misalignment.
- Кабат боюнча колдонмо: Ensure the floor guide remains free of obstructions and is securely fastened to the floor.
7. Кыйынчылыктарды
If you encounter any issues with your barn door hardware, refer to the following common problems and solutions:
- Doors are difficult to slide or are sticking:
- Check the track for any debris or obstructions and clean if necessary.
- Lubricate the rollers and track with a silicone-based lubricant.
- Ensure the track is perfectly level. Adjust mounting if needed.
- Verify the floor guide is properly aligned and not causing friction.
- Doors are not covering the opening completely:
- Re-check your door panel width against the recommended dimensions in the compatibility chart. The door panel width should be wider than half of the (opening + overlap space).
- Adjust the door stoppers to allow for maximum closure.
- Doors are scraping the floor:
- This often indicates incorrect initial measurements for track height. The track should be mounted at a height that allows for a small gap (e.g., 3/8 inch) between the bottom of the door and the floor.
- Ensure the floor guide is not installed too high or interfering with the door's movement.
- Verify the door hangers are securely attached and not slipping.
- Иш учурунда ашыкча ызы-чуу:
- Роликтерди жана жол дөңгөлөктөрүн майлаңыз.
- Check for loose fasteners on the hangers or track.
- Ensure the anti-jump disks are properly installed and not rubbing excessively.
8. Кепилдик жана колдоо
SMARTSTANDARD is committed to providing high-quality products. For specific warranty information, please refer to the product packaging or contact SMARTSTANDARD customer service directly. If you have any questions, require assistance with installation, or need to report missing/damaged parts, our professional customer service team is available to help.
For support, please visit the official SMARTSTANDARD store or contact us through the platform where you purchased the product.