Introduction
Thank you for choosing the PILOT 720p Vehicle Dash Cam. This manual provides detailed instructions for the proper installation, operation, and maintenance of your new dash camera. Please read this manual thoroughly before use to ensure optimal performance and longevity of the device.
This dash cam is designed to record video footage while driving, offering features such as 720p HD resolution, a wide viewing angle, motion detection, and loop recording. It comes with an 8GB Micro SD card and a universal window mount for convenient setup.
Пакеттин мазмуну
Төмөндө тизмеленген нерселердин баары пакетиңизге камтылганын текшериңиз:
- Dash Cam Unit
- 8 ГБ микро SD карта
- Сорох кубогын таһыгар
- USB унаа кубаттагычы
- USB Charger and Sync Cable
- Колдонуучунун Колдонмосу (бул документ)
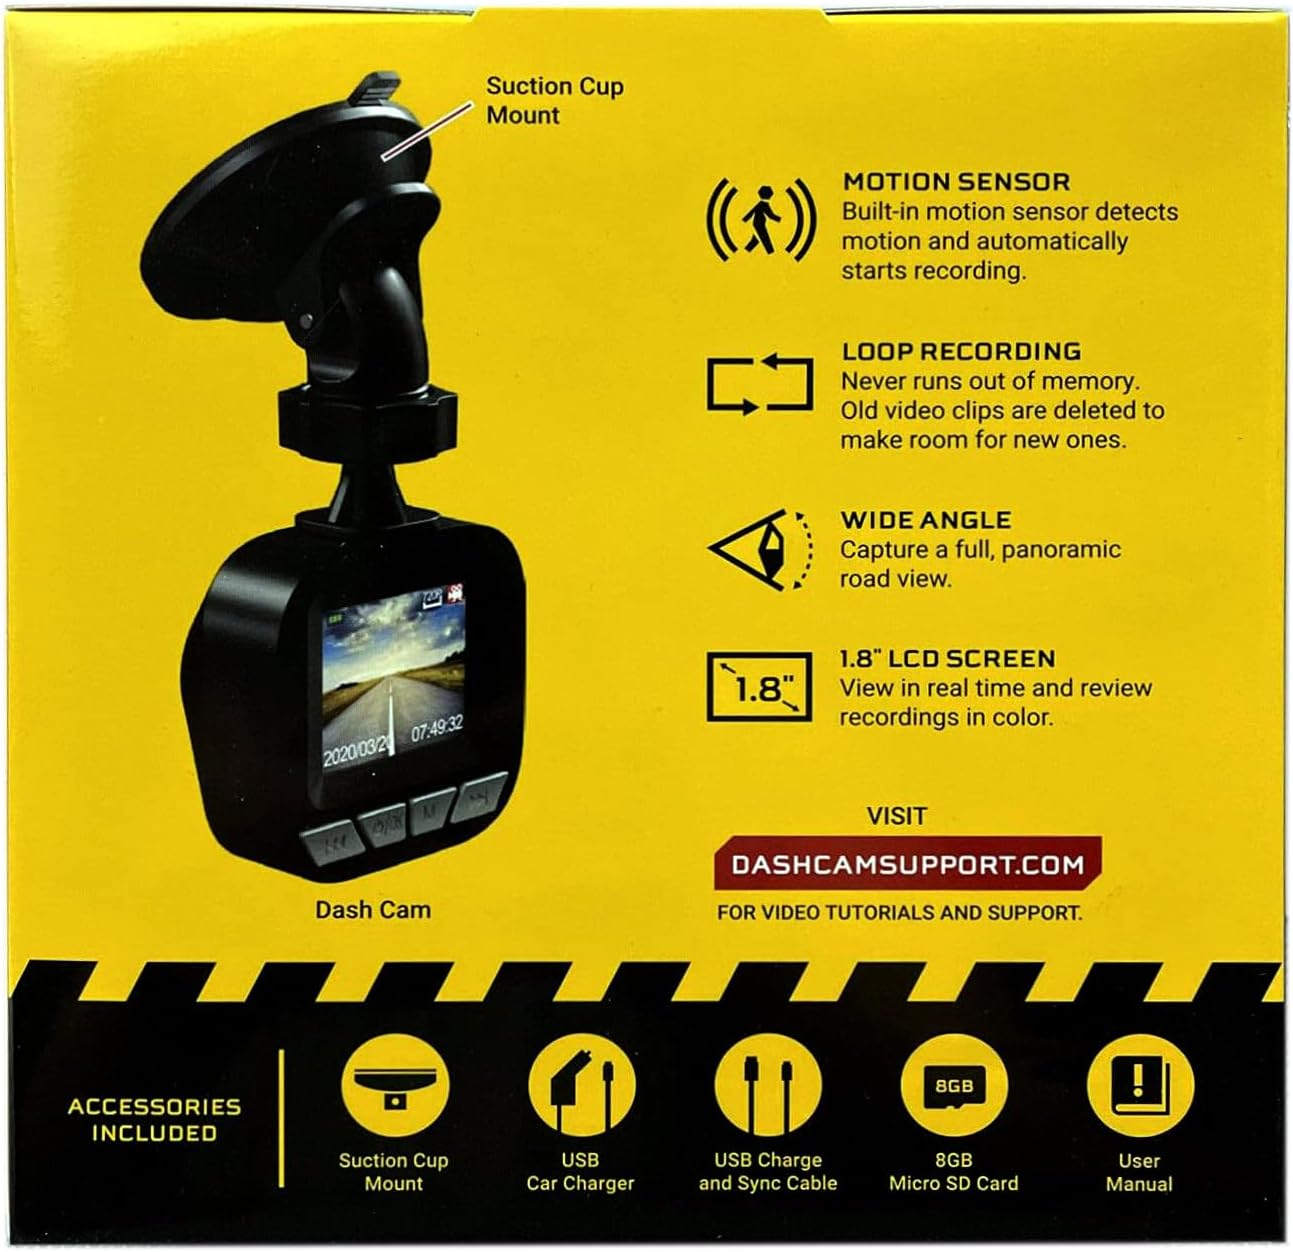
Image: The dash cam unit, suction cup mount, USB car charger, USB charge and sync cable, 8GB Micro SD card, and user manual are shown, along with a summary of key features like motion sensor, loop recording, wide angle, and 1.8" LCD screen.
Продукт өзгөчөлүктөрү
- Чечим: 720p HD видео жазуу.
- Экрандын өлчөмү: 1.8-inch LCD display for real-time viewжана ойнотуу.
- Viewбурч: Wide-angle lens to capture a broad road view.
- Кыймыл сенсору: Built-in sensor detects motion and automatically initiates recording.
- Цикл жаздыруу: Automatically overwrites older video clips when the memory card is full, ensuring continuous recording.
- Микрофон: Built-in for audio recording.
- Сактагыч: Supports Micro SD cards up to 32GB (8GB card included).
- Күч: Built-in rechargeable Lithium-ion battery and USB 2.0 port for charging.
Орнотуу колдонмосу
1. Micro SD картаны салуу
Locate the Micro SD card slot on the side or bottom of the dash cam. Gently insert the included 8GB Micro SD card into the slot until it clicks into place. Ensure the card is inserted correctly to avoid damage. The dash cam supports cards up to 32GB.
2. Камераны орнотуу
- Clean the desired area on your vehicle's windshield where you intend to mount the dash cam. Ensure the surface is dry and free of dust.
- Соргуч чөйчөктүн бекиткичин аспаптар панелинин камерасына бекитиңиз.
- Press the suction cup firmly against the windshield and flip the lever to secure it in place.
- Тунук болушу үчүн камеранын бурчун тууралаңыз view of the road ahead, avoiding any obstructions.

Сүрөт: жакын план view of the front of the PILOT dash cam, showing the camera lens and the "PILOT" brand logo. This illustrates the main unit for mounting.
3. Кубатты туташтыруу
Connect the USB car charger to your vehicle's 12V power outlet (cigarette lighter socket). Then, connect the USB charger and sync cable from the car charger to the USB port on the dash cam. The dash cam will typically power on automatically when the vehicle starts and power is supplied.
Иштөө нускамалары
Күйгүзүү/өчүрүү
- Автоматтык: The dash cam will power on and begin recording automatically when connected to a power source and the vehicle ignition is turned on. It will power off automatically when the vehicle is turned off and power is disconnected.
- Кол менен: To manually power on or off, press and hold the power button (usually located on the side or bottom of the unit) for a few seconds.
Жазуу режимдери
- Үзгүлтүксүз цикл жаздыруу: Видеорегистратор видеону үзгүлтүксүз циклдер менен жаздырат (мисалы, 1, 3 же 5 мүнөттүк сегменттер). Micro SD карта толгондо, эң эскиси ачылат files will be overwritten by new recordings. This ensures you always have the most recent footage.
- Кыймылды аныктоо жазуусу: When enabled in the settings, the dash cam will automatically start recording if it detects motion in front of the camera while the vehicle is parked and the dash cam is powered on. This feature is useful for monitoring your vehicle when stationary.
Viewжазууларды кабыл алуу
The 1.8-inch LCD screen allows you to view жаша фооtage жана review recorded videos directly on the device. Use the navigation buttons (typically labeled 'Menu', 'Up', 'Down', 'OK') to browse through the menu options and playback recorded files. Refer to the on-screen interface for specific navigation prompts.
Дата жана убакыт Stamp
Ensure the date and time are set correctly in the dash cam's settings menu. This is crucial for accurate record-keeping of video footage.
Техникалык тейлөө
- Линзаны тазалоо: Видеонун сапатын так сактоо үчүн камеранын линзасын жумшак, мамыксыз чүпүрөк менен үзгүлтүксүз тазалап туруңуз. Абразивдүү материалдардан же катуу химиялык заттардан алыс болуңуз.
- SD Card башкаруу: It is recommended to format the Micro SD card periodically (e.g., once a month) within the dash cam's settings menu. This helps maintain card performance and prevents data corruption. Back up any important footage форматтоодон мурун.
- Батареяга кам көрүү: The built-in Lithium-ion battery is primarily for emergency recording and saving settings. For continuous operation, keep the dash cam connected to the vehicle's power supply. Avoid exposing the device to extreme temperatures for extended periods.
- Программалык камсыздоонун жаңыртуулары: Check the manufacturer's support webсайт (DASHCAMSUPPORT.COM) periodically for any available firmware updates to improve performance and add new features.
Проблемаларды чечүү
| Көйгөй | Мүмкүн чечим |
|---|---|
| Dash камерасы күйбөйт. |
|
| Dash cam turns off frequently during driving. |
|
| Video footage бүдөмүк же түшүнүксүз. |
|
| Видеорегистратор жаздырбай жатат. |
|
Техникалык шарттар
| Өзгөчөлүк | Деталь |
|---|---|
| Резолюция | 720p HD |
| Screen Size | 1.8 дюйм |
| Viewбурч | Wide Angle (135 Degrees Field Of View) |
| Motion Sensor | Камтылган |
| Loop жаздыруу | Камтылган |
| Микрофон | Камтылган |
| USB порту | USB 2.0 |
| Батарея | Камтылган кайра заряддалуучу литий-ион |
| Эстутум картасын колдоо | 32 ГБ чейин Micro SD (8 ГБ кошулган) |
| Элемент Салмагы | 8 унция |
| Байланыш технологиясы | USB |
| Монтаж түрү | Терезе тоосу |
Колдоо
For additional assistance, video tutorials, or further support, please visit the official support webсайт:
Колдоо кызматына кайрылганда, продуктуңуздун модели жөнүндө маалыматты даярдап коюңуз.