
Kadimendium V01A
ANENG V01A Digital Multimeter User Manual
Model: V01A | Brand: Kadimendium
1. Киришүү
This user manual provides detailed instructions for the safe and effective operation of the ANENG V01A Auto Range True RMS Digital Multimeter. This ultra-portable multi-tester is designed for measuring AC/DC current, voltage, resistance, and for continuity testing. Its intelligent measurement capabilities allow for automatic identification and display of measurement data, making it user-friendly for various electrical tasks.
2. Коопсуздук маалыматы
Please read all safety warnings and operating instructions carefully before using this multimeter. Failure to follow these instructions may result in electric shock, fire, or serious injury.
- Сыноо өткөргүчтөрүн чынжырчага туташтыруудан мурун, мультиметр туура өлчөө режиминде экенине ар дайым ынаныңыз.
- Ар бир өлчөө диапазону үчүн көрсөтүлгөн максималдуу киргизүү маанилеринен ашпаңыз.
- Том менен иштөөдө өтө этият болуңузtag30V AC RMS, 42V пик же 60V DC жогору. Бул томtagшок коркунучун жаратат.
- Inspect test leads for damage before each use. Do not use if insulation is damaged or if the metal is exposed.
- Do not operate the multimeter if it appears damaged or is not operating properly.
- Батарея аз индикатор пайда болгондо, батарейкаларды дароо алмаштырыңыз.
- Сыноо учурунда колдоруңузду жана манжаларыңызды зонд тосмолорунун артында кармаңыз.
- This device is designed for indoor use and should not be exposed to rain or moisture.

Image: A warning sign with multilingual text emphasizing the importance of reading product instructions carefully before use.
3. Пакеттин мазмуну
Төмөндө тизмеленген нерселердин баары пакетиңизге камтылганын текшериңиз. Эгерде кандайдыр бир нерселер жок болсо же бузулса, кардарларды колдоо менен байланышыңыз.
- 1 x ANENG V01A Digital Multimeter (Battery not included)
- 2 x Test Probes (Red and Black)
- 1 x User Manual

Image: The ANENG V01A Digital Multimeter, its test probes, and the user manual, displayed alongside its product packaging.
4. Продукт бүтүп калдыview
Familiarize yourself with the components of your ANENG V01A Digital Multimeter.

Сүрөт: ачык фронт view of the ANENG V01A Digital Multimeter, showcasing its display, buttons, and input jacks, accompanied by its red and black test leads.

Сүрөт: түз фронт view of the ANENG V01A Digital Multimeter, highlighting its display and control panel.

Image: The ANENG V01A Digital Multimeter shown with its integrated kickstand extended, allowing for angled viewтегиз бетте басуу.
Негизги компоненттер:
- LCD дисплей: Өлчөө көрсөткүчтөрүн, бирдиктерин жана функциянын көрсөткүчтөрүн көрсөтөт.
- Функция баскычтары:
- NCV баскычы: Байланышсыз көлөмдү иштететtage аныктоо.
- H/* баскычы: Data Hold function (short press) and Backlight/Flashlight activation (long press).
- Кубат баскычы: Turns the multimeter On/Off.
- Киргизүү уячалары:
- COM Jack (Black): Common terminal for all measurements. Connect the black test lead here.
- VΩmA Jack (Red): Көлөм үчүн киргизүүtage, Resistance, and milliampere Current measurements. Connect the red test lead here.
- 10A Fused Jack (Red): Input for high current (up to 10A) measurements. Connect the red test lead here for 10A measurements.
- Test Probes: Red and black leads for connecting to circuits.
5. Орнотуу
5.1 Батареяны орнотуу
The ANENG V01A Multimeter requires 2 x AAA batteries (not included) for operation.
- Мультиметрдин өчүрүлгөнүн текшериңиз.
- Мультиметрдин артындагы батарея бөлүкчөсүнүн капкагын табыңыз.
- Батарея отсегин ачуу үчүн бурагычты колдонуңуз.
- Бөлүмдүн ичинде көрсөтүлгөндөй туура полярдуулукка (+ жана -) карап, эки AAA батарейкасын салыңыз.
- Батарея уясынын капкагын ордуна коюңуз жана аны бурама менен бекитиңиз.
5.2 Сыноо өткөргүчтөрүн туташтыруу
Always connect the black test lead to the COM jack. Connect the red test lead to the appropriate input jack based on the measurement you intend to perform.
- Voltage, Resistance, Continuity, and milliampere Current (mA) measurements: Connect the red test lead to the VΩmA джек.
- For high current (up to 10A) measurements: Connect the red test lead to the 10A Fused джек.

Image: The ANENG V01A Digital Multimeter with its red and black test leads properly connected to the input jacks, ready for use.
6. Иштөө нускамалары
6.1 Power On/Off and Auto Range
басыңыз Күч button to turn the multimeter on. The V01A features an auto-range function, meaning it automatically recognizes and displays the measurement data without requiring manual range selection. To turn off the multimeter, press the Күч button again. The device also has an Auto Power Off feature to conserve battery life.

Image: The ANENG V01A Digital Multimeter with its display showing a reading, emphasizing its auto-ranging capability for convenient measurement.
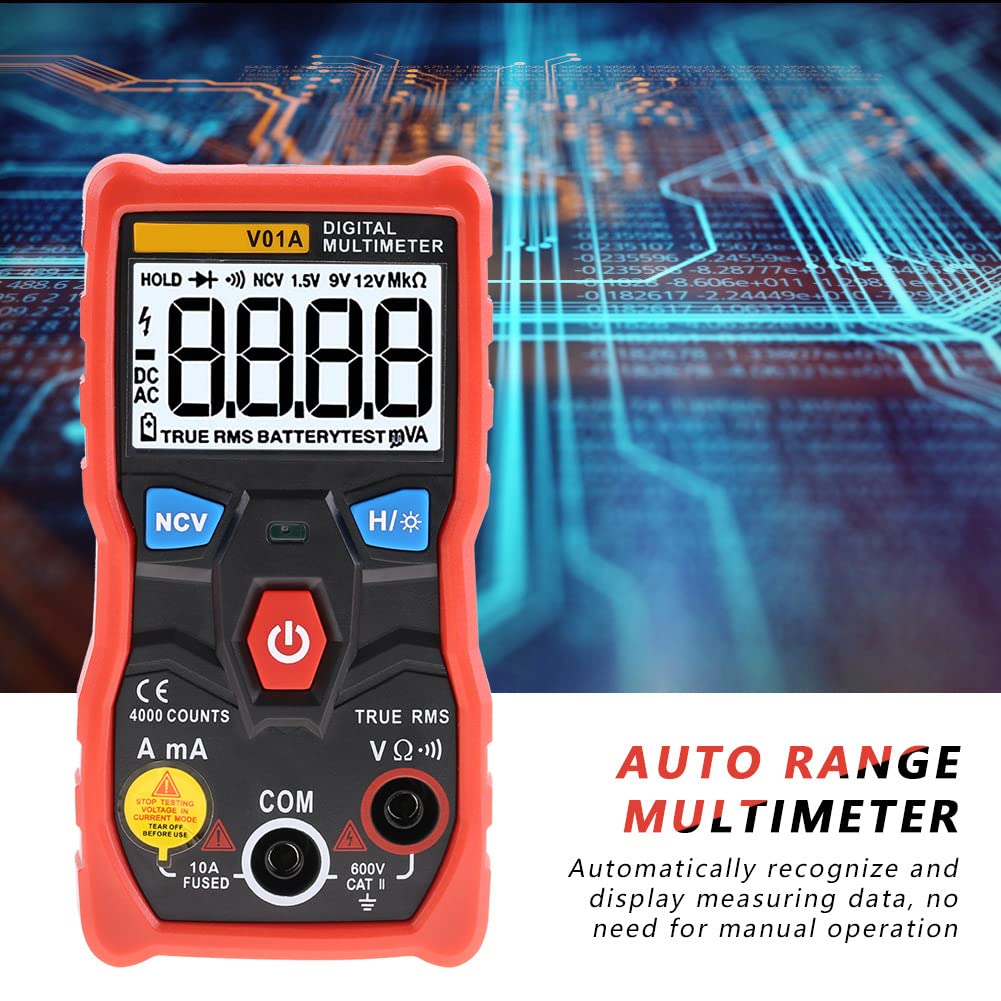
Сүрөт: жакын план view of the ANENG V01A Digital Multimeter's display, highlighting the "AUTO RANGE MULTIMETER" text and indicating its automatic measurement recognition.
6.2 Өлчөө функциялары
6.2.1 DC Voltage Өлчөө
Connect the red test lead to the VΩmA jack and the black test lead to the COM jack. Connect the probes across the DC voltage source. The multimeter will automatically detect and display the DC voltage.

Image: A user's hands holding the multimeter probes to measure components on a circuit board, demonstrating a typical voltage or resistance measurement scenario.
6.2.2 AC томtage Өлчөө
Connect the red test lead to the VΩmA jack and the black test lead to the COM jack. Connect the probes across the AC voltage source. The multimeter will automatically detect and display the AC voltage (True RMS).
6.2.3 DC/AC Current Measurement (mA/A)
Абайлаңыз: To measure current, the multimeter must be connected in series with the circuit. Never connect the multimeter in parallel with a voltage source when in current mode, as this can damage the device or blow the fuse.
- Милли үчүнampere (mA) current: Connect the red test lead to the VΩmA jack and the black test lead to the COM jack.
- үчүн ampere (A) current (up to 10A): Connect the red test lead to the 10A Fused jack and the black test lead to the COM jack.
Break the circuit and connect the multimeter in series. The multimeter will automatically detect and display the current.
6.2.4 Каршылыкты өлчөө
Connect the red test lead to the VΩmA jack and the black test lead to the COM jack. Ensure the circuit or component is de-energized before measuring resistance. Connect the probes across the component. The multimeter will automatically detect and display the resistance in Ohms (Ω), kilo-Ohms (kΩ), or Mega-Ohms (MΩ).
6.2.5 Үзгүлтүксүздүк тести
Connect the red test lead to the VΩmA jack and the black test lead to the COM jack. Ensure the circuit is de-energized. Touch the probes to the two points you want to test for continuity. If there is continuity (low resistance), the multimeter will emit an audible beep.
6.2.6 Контактсыз томtage (NCV) аныктоо
басыңыз NCV button. Hold the top part of the multimeter near an AC voltage source (e.g., a live wire or outlet). The multimeter will indicate the presence of AC voltage through an audible beep and/or visual indicator on the display, without direct contact.
6.2.7 Battery Test (1.5V, 9V, 12V)
The multimeter can test common battery voltages. Connect the red test lead to the VΩmA jack and the black test lead to the COM jack. Connect the probes to the positive and negative terminals of the battery. The multimeter will display the battery voltage.

Image: A user's hands holding the multimeter probes to test the voltage of a 9V battery, demonstrating the battery test function.
6.3 Атайын функциялар
- Дайындарды кармоо (H): баскычын кыска басыңыз H/* Учурдагы көрсөткүчтү дисплейде тоңдуруу үчүн баскычты басыңыз. Бошотуу үчүн кайра басыңыз.
- Backlight/Flashlight (*): көпкө басыңыз H/* button to turn on the display backlight and the integrated flashlight. Long press again to turn them off. This is useful for working in dimly lit environments.
- Авто өчүрүү: Мультиметр батареянын иштөө мөөнөтүн үнөмдөө үчүн бир аз убакыт иштебей тургандан кийин автоматтык түрдө өчөт.
- Батареянын төмөн көрсөткүчү: A battery icon will appear on the display when the battery voltage төмөн, бул батареяларды алмаштыруу керектигин көрсөтүп турат.
7. Техникалык тейлөө
7.1 Тазалоо
Ишти жарнама менен сүртүңүзamp cloth and mild detergent. Do not use abrasives or solvents. Keep the input jacks free of dust and debris.
7.2 Батареяны алмаштыруу
When the low battery indicator appears on the display, replace the batteries as described in Section 5.1. Always use 2 x AAA batteries.
7.3 Сактоо
If the multimeter is not used for a long period, remove the batteries to prevent leakage and damage to the device. Store the multimeter in a cool, dry place, away from direct sunlight and extreme temperatures.
8. Кыйынчылыктарды
If you encounter issues with your multimeter, refer to the table below for common problems and solutions.
| Көйгөй | Мүмкүн себеп | Чечим |
|---|---|---|
| Мультиметр күйбөйт. | Өлүк же туура эмес орнотулган батарейкалар. | Батареянын полярдуулугун текшериңиз же батарейкаларды алмаштырыңыз. |
| Көрсөтүлгөн көрсөткүчтөр же "OL" көрсөткүчү жок. | Open circuit, out of range, or incorrect function/lead connection. | Check circuit continuity, ensure measurement is within range, verify test lead connections for the selected function. |
| Туура эмес окуулар. | Low battery, environmental interference, or damaged test leads. | Replace batteries, move away from strong electromagnetic fields, inspect and replace damaged test leads. |
| Үзгүлтүксүздүк тести үн чыгарбайт. | Ачык схема же жогорку каршылык. | Ensure good contact with the circuit; the circuit may not be continuous. |
9. Техникалык шарттар
| Параметр | Нарк |
|---|---|
| Бренд | ANENG (Kadimendium) |
| Модел | V01A |
| Дисплей | 4000 эсеп |
| DC Voltage Диапазон | 4.000В, 40.00В, 400.0В, 600В |
| AC Voltage Диапазон | 4.000V, 40.00V, 400.0V, 600V (True RMS) |
| AC ток диапазону | 999.9мА, 9.999А |
| DC ток диапазону | 999.9мА, 9.999А |
| Каршылык диапазону | 4.000kΩ, 40.00kΩ, 400.0kΩ, 4.000MΩ, 40.00MΩ |
| AC жыштыгына жооп | 40Гц-1кГц |
| Үзгүлтүксүздүк тести | Ооба |
| NCV (контактсыз томtage) | Ооба |
| Auto колому | Ооба |
| Чыныгы RMS | Ооба |
| Маалыматтарды кармоо | Ооба |
| Арткы жарык | Ооба |
| Кол чырак | Ооба |
| Авто өчүрүү | Ооба |
| Батареянын төмөн көрсөткүчү | Ооба |
| Материал | ABS, PVC |
| Sample Rate | 3SPS |
| Иштөө чөйрөсү | 0~40℃, <75%RH |
| Сактоо чөйрөсү | -20~60℃, <80%NH |
| Электр камсыздоо | 2 x AAA Batteries (NOT included) |
| Өлчөмдөр | 12 x 6 x 2.8 см / 4.7 x 2.4 x 1.1 дюйм |
| Салмагы (болжол менен) | 199 г / 7.0 унция |
10. Кепилдик жана колдоо
This product comes with a standard manufacturer's warranty. For specific warranty terms and conditions, please refer to the warranty card included with your purchase or contact the seller directly. If you have any questions, require technical assistance, or need to report an issue, please contact Kadimendium customer support through your purchase platform. We are committed to providing timely assistance and ensuring your satisfaction.
Ask a question about this manual
Ask about setup, troubleshooting, compatibility, parts, safety, or missing instructions. Manuals+ will review the question and use this page’s manual context to help answer it.