1. Киришүү
Thank you for choosing the FERM PDM1037s 13mm 1010W Drill. This instruction manual provides important information regarding the safe operation, setup, maintenance, and troubleshooting of your new power tool. Please read this manual thoroughly before using the drill and keep it for future reference.
The FERM PDM1037s is a robust corded electric rotary drill designed for various drilling tasks in wood, metal, and masonry. It features a powerful 1010W motor, a 13mm keyed chuck, adjustable speed, reverse rotation, and a hammer function for efficient performance.
2. Коопсуздук нускамалары
ЭСКЕРТҮҮ: Бул электр куралы менен берилген бардык коопсуздук эскертүүлөрүн, нускамаларды, иллюстрацияларды жана спецификацияларды окуңуз. Төмөндө саналып өткөн бардык көрсөтмөлөрдү аткарбоо электр шокуна, өрткө жана/же олуттуу жаракатка алып келиши мүмкүн.
Электр куралынын жалпы коопсуздук эскертүүлөрү:
- Жумуш аймагынын коопсуздугу: Иштеген жериңизди таза жана жарыктандырыңыз. Башаламан же караңгы жерлер кырсыкка чакырат. Жарылуучу чөйрөдө, мисалы, күйүүчү суюктуктар, газдар же чаң бар жерде электр шаймандарын иштетпеңиз.
- Электр коопсуздугу: Электр шайманынын сайгычтары розеткага дал келиши керек. Эч качан сайгычты эч кандай жол менен өзгөртпөңүз. Эч кандай адаптер сайгычтарды жерге туташтырылган (жерге туташтырылган) электр шаймандары менен колдонбоңуз. Түтүктөр, радиаторлор, диапазондор жана муздаткычтар сыяктуу жерге туташтырылган же жерге туташтырылган беттерге денеге тийбеңиз.
- Жеке коопсуздук: Always wear eye protection. Use hearing protection when operating noisy tools. Wear a dust mask if operations create dust. Dress properly; do not wear loose clothing or jewelry. Keep hair and clothing away from moving parts.
- Электр куралын колдонуу жана сактоо: Электр аспапты күчтөп албаңыз. Колдонмоңуз үчүн туура электр шайманын колдонуңуз. Кандайдыр бир тууралоолорду жасоодон, аксессуарларды алмаштыруудан же электр шаймандарын сактоодон мурда вилканы кубат булагынан ажыратыңыз.
- Кызмат: Электр шайманыңызды квалификациялуу оңдоочуга бирдей алмаштыруучу бөлүктөрдү гана колдонуңуз. Бул электр инструментинин коопсуздугун камсыз кылат.
3. Продукциянын компоненттери
The FERM PDM1037s drill consists of several key components for its operation. Familiarize yourself with these parts before use.
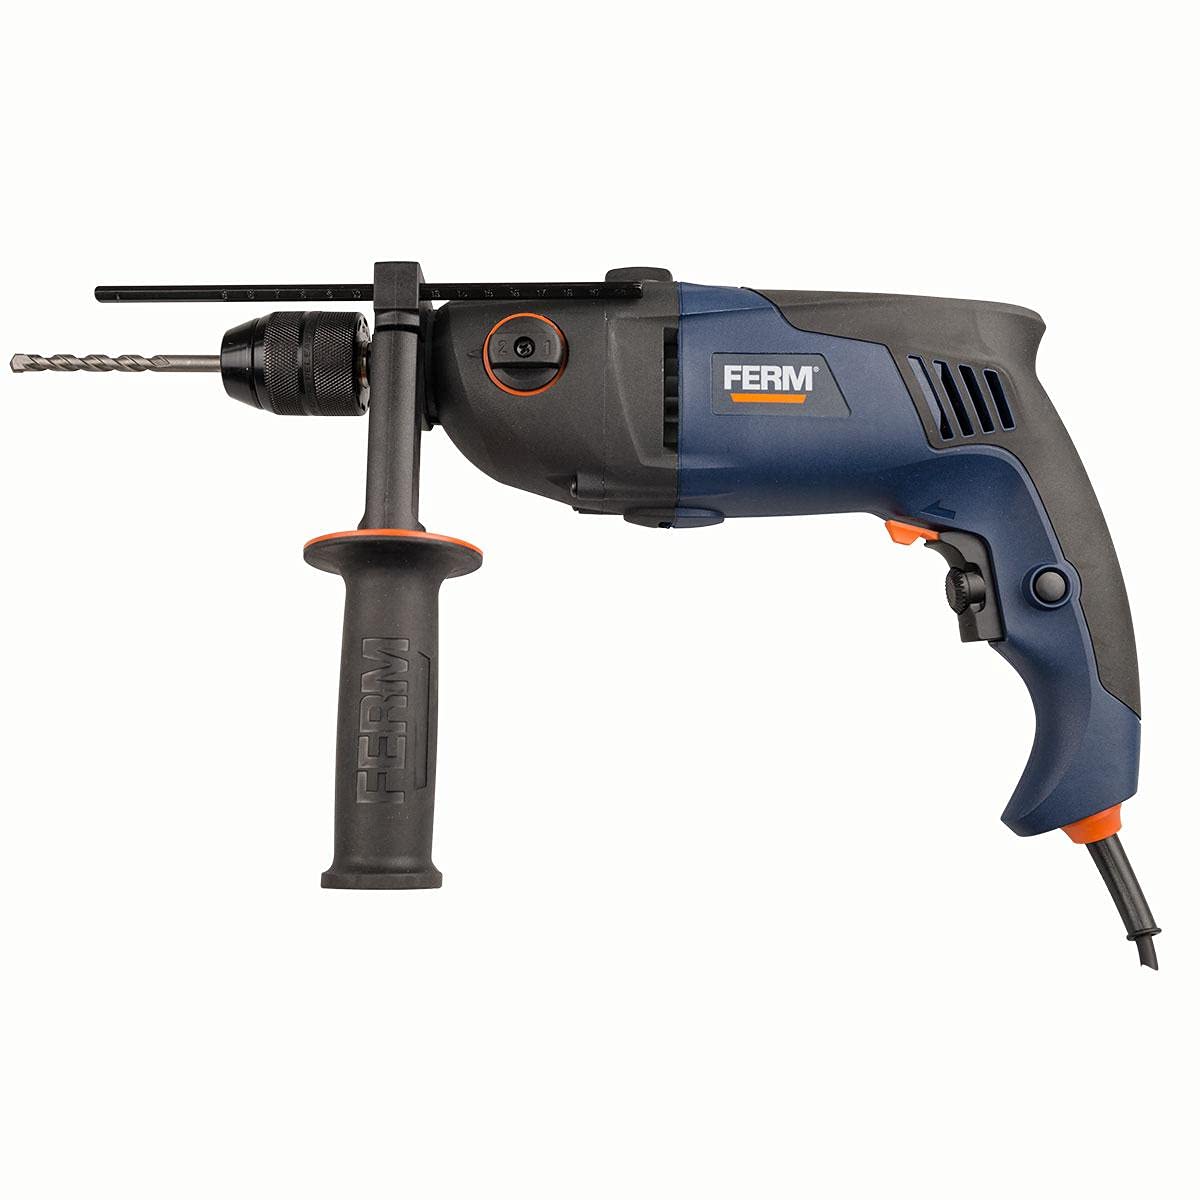
1-сүрөт: Бүттүview of the FERM PDM1037s drill. This image shows the main body of the drill, including the chuck, auxiliary handle, and power cord connection point.
- Чак: Holds the drill bits securely. This model uses a keyed chuck.
- Тереңдик токтотуу: Каалаган бургулоо тереңдигин орнотуу үчүн колдонулат.
- Көмөкчү тутка: Иш учурунда кошумча кармоону жана башкарууну камсыз кылат.
- Режим тандоочу которгуч: For switching between rotary drilling and hammer drilling modes.
- Ылдамдыкты башкаруу терүү: Максималдуу айлануу ылдамдыгын тууралайт.
- Trigger Switch: Бургулоону иштетет.
- Кулпулоо баскычы: Триггерди кармап турбастан үзгүлтүксүз иштөө үчүн.
- Алдыга/Артка которуу: Айлануу багытын өзгөртөт.
- Электр кабели: Connects the drill to the electrical supply.
4. Техникалык шарттар
Below are the technical specifications for the FERM PDM1037s drill:
| Өзгөчөлүк | Спецификация |
|---|---|
| Модель номери | FERM PDM1037s |
| Бренд | FERM |
| Power Source | Электр зымдары |
| Максималдуу күч | 1010 Ватт |
| Чактын түрү | Keyed Чак |
| Чак Size | 13 мм |
| Максималдуу айлануу ылдамдыгы | 3000 RPM |
| Жөнгө салынуучу ылдамдык | Ооба |
| Кайтарым функциясы | Ооба |
| Балка функциясы | Ооба |
| Screwdriver Function | Ооба |
| Элемент Салмагы | 11 грамм |
| Түс | Көп түстүү |
| Батареялар талап кылынат | Жок |
| Дата биринчи жеткиликтүү | 7-июль, 2021-жыл |
| ASIN | B098TZFVWC |
5. Орнотуу
5.1 Көмөкчү тутканы бекитүү
The auxiliary handle provides better control and stability. Loosen the handle by twisting it counter-clockwise. Slide it over the chuck and position it to your desired angle. Tighten the handle by twisting it clockwise until secure.
5.2 Installing the Depth Stop
Insert the depth stop into the hole on the auxiliary handle. Adjust the depth stop to the desired drilling depth by sliding it in or out. Secure it by tightening the screw or lever on the auxiliary handle.
5.3 Бургулоочу биттерди салуу жана алуу
- Бургу кубат булагынан ажыратылганын текшериңиз.
- Use the chuck key to loosen the chuck jaws by turning it counter-clockwise.
- Бургулоочу битти патронго толугу менен киргизип, анын ортосуна туура келгенин текшериңиз.
- Tighten the chuck jaws firmly using the chuck key by turning it clockwise. Ensure the bit is securely held.
- To remove, loosen the chuck jaws with the chuck key and pull out the bit.
6. Иштөө нускамалары
6.1 Кубат туташтыруу
Электр шнурын ылайыктуу электр розеткасына туташтырыңыз. Voltage matches the drill's requirements.
6.2 Иштөө режимин тандоо
Use the mode selector switch (typically located on the top or side of the drill) to choose between:
- Айланма бургулоо: Жыгачты, металлды, пластмассаны жана керамиканы бургулоо үчүн.
- Балка менен бургулоо: Таш, бетон жана ташта бургулоо үчүн.
6.3 Ылдамдыкты жөндөө
The drill features an adjustable speed control dial. Rotate the dial to set the maximum speed for your application. Lower speeds are suitable for larger drill bits, softer materials, or screwdriving. Higher speeds are for smaller bits and harder materials.
6.4 Алдыга/Артка айлантуу
Use the forward/reverse switch (usually near the trigger) to select the direction of rotation. Forward rotation (clockwise) is for drilling and tightening screws. Reverse rotation (counter-clockwise) is for removing screws or freeing a jammed drill bit.
6.5 Бургулоону баштоо жана токтотуу
- Баштоо: Press the trigger switch. The speed is variable depending on how far the trigger is pressed.
- Үзгүлтүксүз иштөө үчүн: Press the trigger switch fully and then press the lock-on button. Release the trigger.
- To Stop (from continuous operation): Press the trigger switch again and release it.
- To Stop (from momentary operation): Ишти ачкычты бошотуңуз.
6.6 Бургулоо боюнча кеңештер
- Always secure your workpiece to prevent it from moving.
- Туруктуу, бирдей басымды колдонуңуз. Бургулоону мажбурлабаңыз.
- For deep holes, periodically withdraw the drill bit to clear chips and allow cooling.
- When drilling metal, use cutting oil to prolong bit life and improve cutting efficiency.
- When drilling masonry, ensure the hammer function is engaged and use appropriate masonry drill bits.
7. Техникалык тейлөө
Regular maintenance ensures the longevity and safe operation of your FERM PDM1037s drill.
7.1 Тазалоо
- Тазалоодон мурун бургучту ар дайым розеткадан ажыратыңыз.
- Keep the ventilation openings clean to prevent overheating. Use a soft brush or compressed air to clear dust and debris.
- Жарнама менен курал корпусун сүртүңүзamp кездеме. Катуу химиялык заттарды же абразивдүү тазалагычтарды колдонбоңуз.
7.2 Көмүртек щеткалары
The motor is equipped with carbon brushes. If the drill experiences excessive sparking or reduced performance, the carbon brushes may need replacement. This should be performed by a qualified service technician.
7.3 Сактоо
Store the drill in a dry, secure location out of reach of children. Protect it from moisture and direct sunlight.
8. Кыйынчылыктарды
This section addresses common issues you might encounter with your drill.
| Көйгөй | Мүмкүн себеп | Чечим |
|---|---|---|
| Бургулоо башталбайт | No power supply; Faulty power cord/plug; Faulty switch; Worn carbon brushes | Check power outlet and cord; Contact qualified service technician for switch or brush replacement. |
| Кыскартылган күч/ ылдамдык | Эскирген көмүртек щеткалары; Ашыкча жүктөм; Ылдамдыктын туура эмес жөндөлүшү | Replace carbon brushes (by technician); Reduce load; Adjust speed dial to higher setting. |
| Мотордон ашыкча учкун чыгат | эскирген көмүр щеткалары; Кир коммутатор | Have carbon brushes and commutator checked/replaced by a qualified service technician. |
| Бургулоо биттери | Incorrect bit for material; Excessive pressure; Material too hard | Use appropriate bit; Reduce pressure; Consider hammer function for masonry. |
9. Кепилдик жана колдоо
FERM products are manufactured to high-quality standards and are guaranteed against manufacturing defects for a period specified by local regulations from the date of purchase. This warranty does not cover damage caused by misuse, abuse, normal wear and tear, or unauthorized repairs.
For warranty claims, technical support, or service inquiries, please contact your local FERM dealer or authorized service center. Please have your proof of purchase and the product model number (PDM1037s) available when contacting support.
For more information, visit the official FERM webсайт: www.ferm.com