
PowMr ML2440
PowMr 40A MPPT Күн зарядын контролдоочу Колдонуучунун колдонмосу
Модели: ML2440
1. Киришүү
This manual provides essential information for the safe and efficient operation of your PowMr 40A MPPT Solar Charge Controller, model ML2440. Please read this manual thoroughly before installation and use to ensure optimal performance and longevity of the product.
2. Коопсуздук нускамалары
- Ensure all wiring is correctly connected and secured to prevent short circuits or damage.
- Always connect the battery to the charge controller first, then the solar panels, and finally the load. Disconnect in the reverse order.
- Контроллерди өз алдынча оңдоого же өзгөртүүгө аракет кылбаңыз. Тейлөө үчүн квалификациялуу адистерге кайрылыңыз.
- Контроллерди күйүүчү материалдардан жана тике күндүн нурунан алыс, жакшы желдетилген жерге орнотуңуз.
- Электр системалары менен иштөөдө тиешелүү жеке коргонуу шаймандарын (ЖКК) кийиңиз.
- Системанын томун камсыз кылууtage matches the controller's specifications (12V/24V auto-detection).
3. Продукт бүтүп калдыview
The PowMr 40A MPPT Solar Charge Controller is designed to efficiently manage power from your solar panels to charge various battery types, including Lithium, Sealed, Gel, and Flooded batteries. It features Maximum Power Point Tracking (MPPT) technology for optimized solar energy harvesting, automatic 12V/24V system voltage detection, and a clear LCD display for monitoring system status.
3.1-сүрөт: Фронт view of the PowMr 40A MPPT Solar Charge Controller.
This image shows the main unit of the PowMr 40A MPPT Solar Charge Controller, highlighting its compact design and integrated LCD screen.
The controller supports a maximum solar input voltage of 100V and a maximum input power of 1100W for a 24V system (550W for 12V). It also includes temperature compensation for accurate charging across varying environmental conditions.

3.2-сүрөт: Temperature compensation feature.
This image illustrates the temperature compensation capability of the controller, ensuring optimal battery charging performance in both hot and cold environments.
4. Орнотуу жана зымдар
Күн батареясын башкаруучу түзүлүшүңүздүн коопсуз жана натыйжалуу иштеши үчүн туура орнотуу абдан маанилүү. Бул кадамдарды кылдаттык менен аткарыңыз.
4.1 Электр өткөргүч схемасы

4.1-сүрөт: Wiring diagram for the PowMr MPPT Solar Charge Controller.
This diagram illustrates the correct connection order for the battery, solar panels, DC load, and optional inverter. A temperature sensor is also shown.
4.2 Туташуу кадамдары
- Алгач батареяны туташтырыңыз: Connect the battery to the charge controller's battery terminals. Ensure correct polarity. The controller will auto-detect 12V or 24V system voltage.
- Күн панелдерин туташтыруу: Connect the solar panels to the PV input terminals. Ensure correct polarity. The controller will begin charging if sufficient sunlight is available.
- Connect DC Load (Optional): If using a DC load directly from the controller, connect it to the load terminals.
- Инверторду туташтыруу (кошумча): If using an inverter, connect it to the battery terminals (not directly to the load terminals of the controller).
- Температура сенсорун туташтыруу: For accurate temperature compensation, connect the provided temperature sensor to the designated port on the controller and place the sensor near the battery.
Disconnection Order: To disconnect the system, always follow the reverse order: Disconnect load, then solar panels, then battery.
5. Иштөө нускамалары
This section details how to monitor and configure your charge controller using its integrated LCD display and the optional Bluetooth mobile application.
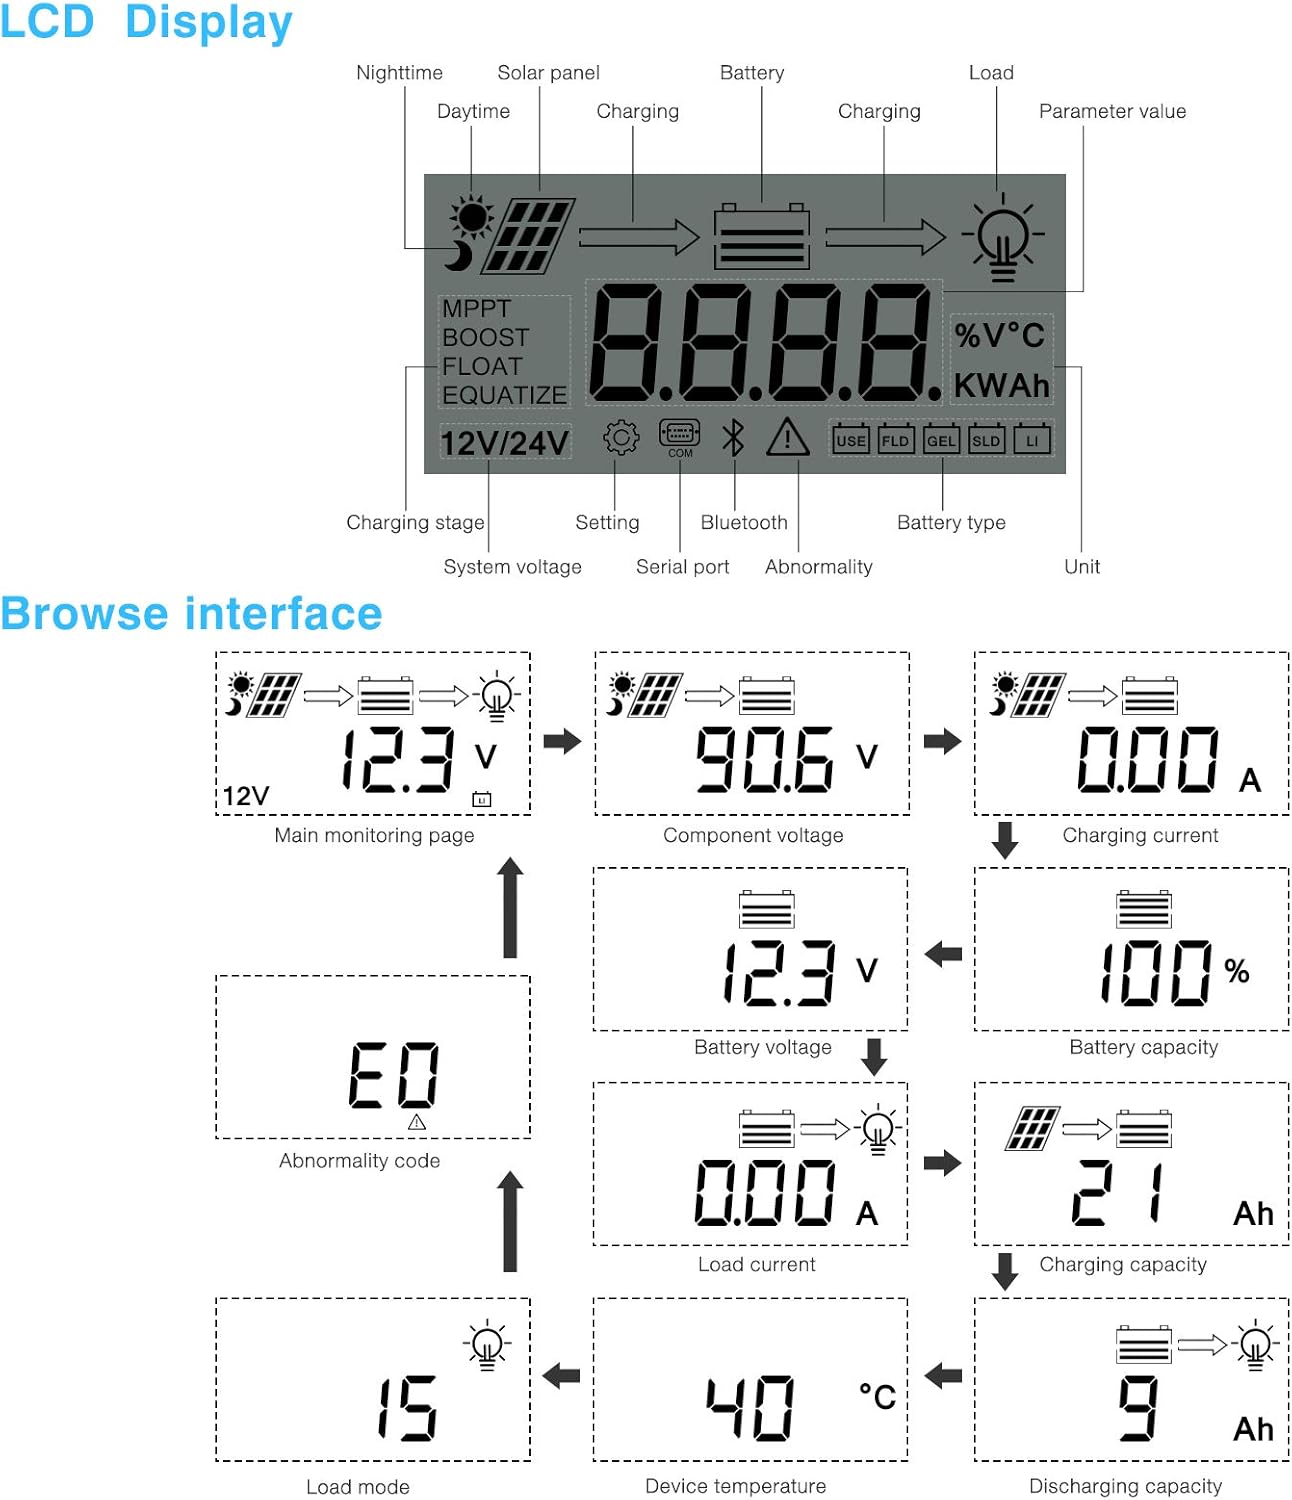
5.1 ЖК дисплей аштыview

5.1-сүрөт: LCD Display and Browse Interface.
This image shows the various icons and parameters displayed on the LCD screen, along with the navigation flow through different monitoring pages.
The LCD provides real-time information about your solar system. Key indicators include:
- Заряддоо Сtage: MPPT, Boost, Float, Equalize.
- System Voltage: 12V/24V auto-detected.
- Батарея түрү: Icons for Lithium (Li), Sealed (SLD), Gel (GEL), Flooded (FLD).
- Статус көрсөткүчтөрү: Solar panel activity, battery charging, load status, abnormality.
- Параметрдин мааниси: Көрсөтөт томtage, current, capacity, temperature, etc.
Use the buttons below the LCD to navigate through different screens to view parameters such as main monitoring page, component voltagд, заряддоо тогу, батарейканын томtage, battery capacity, load current, charging capacity, device temperature, discharging capacity, abnormality codes, and load mode.
5.2 Bluetooth Mobile Application
The controller supports an optional Bluetooth module (BT-1) for remote monitoring and parameter adjustment via a mobile application (available for Apple iOS and Android devices). The Bluetooth module connects to the RS232 port on the controller.

5.2-сүрөт: Controller with optional Bluetooth module.
This image displays the PowMr MPPT Solar Charge Controller alongside its optional BT-1 Bluetooth communication module and connecting cable.

5.3-сүрөт: BT-1 Bluetooth module.
А деталдуу view of the BT-1 Bluetooth module, which enables wireless communication with the solar charge controller for remote monitoring and settings adjustments.

5.4-сүрөт: Bluetooth Mobile Interface Display.
This image shows various screens from the mobile application, including real-time monitoring, data records, energy records, and parameter settings.
The mobile application allows you to:
- Monitor real-time system data (voltage, current, power, temperature).
- View historical data and energy records.
- Adjust various charging parameters and battery settings.
- Демейки жөндөөлөрдү калыбына келтирүү.
6. Техникалык тейлөө
Үзгүлтүксүз техникалык тейлөө заряд контроллериңиздин узак мөөнөттүү иштешин жана оптималдуу иштешин камсыз кылат.
- Тазалоо: Periodically clean the controller's exterior with a dry cloth to remove dust and debris. Ensure ventilation openings are clear.
- Байланыштары: Жыл сайын бардык зымдардын туташууларынын бекемдигин жана дат басышын текшерип туруңуз. Бош туташуулар ысып кетүүгө жана начар иштөөгө алып келиши мүмкүн.
- Курчап турган чөйрө: Ensure the installation environment remains within the specified operating temperature range and is free from excessive moisture or dust.
7. Кыйынчылыктарды
This section provides guidance for common issues. Refer to the LCD display for abnormality codes.
- Дисплей жок/кубат жок:
- Батарея байланыштарын текшерип, батареянын көлөмүн текшериңизtage иштөө диапазонунда.
- Verify that the battery fuse (if installed) is intact.
- Заряддоо жок:
- Ensure solar panels are connected correctly and receiving sufficient sunlight.
- Күн панелин текшерүү томtage жана ток.
- Verify that the battery is not fully charged or in a protection state.
- Жүктөө иштебей жатат:
- Check load connections and ensure the load current does not exceed the controller's rating.
- Батареянын көлөмүн текшериңизtage төмөнкү көлөмдөн жогоруtage disconnect (LVD) setting.
- Check for any abnormality codes on the LCD related to load output.
- Abnormality Codes (e.g., "E0"):
- Refer to the specific abnormality code displayed on the LCD. Consult the full product manual or manufacturer's support for detailed explanations and solutions for each code.
8. Техникалык шарттар
Technical specifications for the PowMr 40A MPPT Solar Charge Controller (Model ML2440).

8.1-сүрөт: Product Specifications Table.
This table provides detailed technical parameters for the ML2420, ML2430, and ML2440 models. The ML2440 column is relevant for this 40A controller.
| Параметр | Value (ML2440) |
|---|---|
| Модел | ML2440 |
| Система томtage | 12V / 24V Auto |
| Жүктү жоготуу | 0.7 Втдан 1.2 Вт чейин |
| Батарея көлөмүtage | 9дан 35Вга чейин |
| Макс. күн киргизүү тtage | 100V (25°C), 90V (-25°C) |
| Макс. power point voltage диапазону | Батарея көлөмүtage +2Вдан 75Вга чейин |
| Кубатталуучу токтун номиналы | 40A |
| Номиналдуу жүктөө агымы | 20A |
| Max. сыйымдуулук жүк көтөрүмдүүлүк | 10000 uF |
| Max. фотоэлектрдик тутумдун киргизүү кубаты | 550W/ 12V, 1100W/ 24V |
| Конверсиянын эффективдүүлүгү | ≤ 98% |
| MPPT көзөмөлдөө натыйжалуулугу | > 99% |
| Температуранын ордун толтуруу коэффициенти | -3.0mv/ °C/ 2V (default) |
| Иштөө температурасы | -35°Cден +45°Cге чейин |
| Коргоо даражасы | IP32 |
| Салмагы | 2кг |
| Байланыш ыкмасы | RS232 |
| Бийиктик | ≤ 3000м |
| Продукт өлчөмдөрү | 238*173*72.5 мм |
9. Кепилдик жана колдоо
For warranty information, please refer to the documentation included with your product packaging or visit the official PowMr website. If you encounter any issues not covered in this manual or require further assistance, please contact PowMr customer support.
PowMr Official Webсайт: Amazonдагы PowMr дүкөнүнө барыңыз
Ask a question about this manual
Ask about setup, troubleshooting, compatibility, parts, safety, or missing instructions. Manuals+ will review the question and use this page’s manual context to help answer it.