1. Киришүү
This manual provides detailed instructions for the setup, operation, and maintenance of your Volcora Thermal Receipt Printer, Model 500204. This high-speed 80mm POS printer features an auto cutter and offers versatile connectivity options including USB and Bluetooth, supporting various operating systems. Please read this manual thoroughly before using the printer to ensure proper functionality and longevity.
2. Коопсуздук маалыматы
- Ensure the printer is connected to a grounded power outlet.
- Do not expose the printer to water or high humidity.
- Принтерди күн тийген жерге же жылуулук булактарынын жанына коюудан алыс болуңуз.
- Принтер менен кошо берилген кубат адаптерин гана колдонуңуз.
- Принтерди өзүңүз чечүүгө же оңдоого аракет кылбаңыз. Жардам алуу үчүн кардарларды колдоо бөлүмүнө кайрылыңыз.
- Keep hands clear of the auto cutter mechanism during operation.
3. Пакеттин мазмуну
Төмөндө тизмеленген нерселердин баары пакетиңизге камтылганын текшериңиз:
- Volcora Thermal Receipt Printer - Standard
- Кубаттуу адаптер
- Кагаз ролик
- USB кабели
- CD (for drivers and manual)
- Manual
- Sample Receipt Paper

3.1-сүрөт: Included Components - Thermal Receipt Printer, Power Adapter, USB Cable, Test Paper, and Installation CD.
4. Продукт бүтүп калдыview

4.1-сүрөт: Фронт view of the Volcora Thermal Receipt Printer with a sampквитанция.
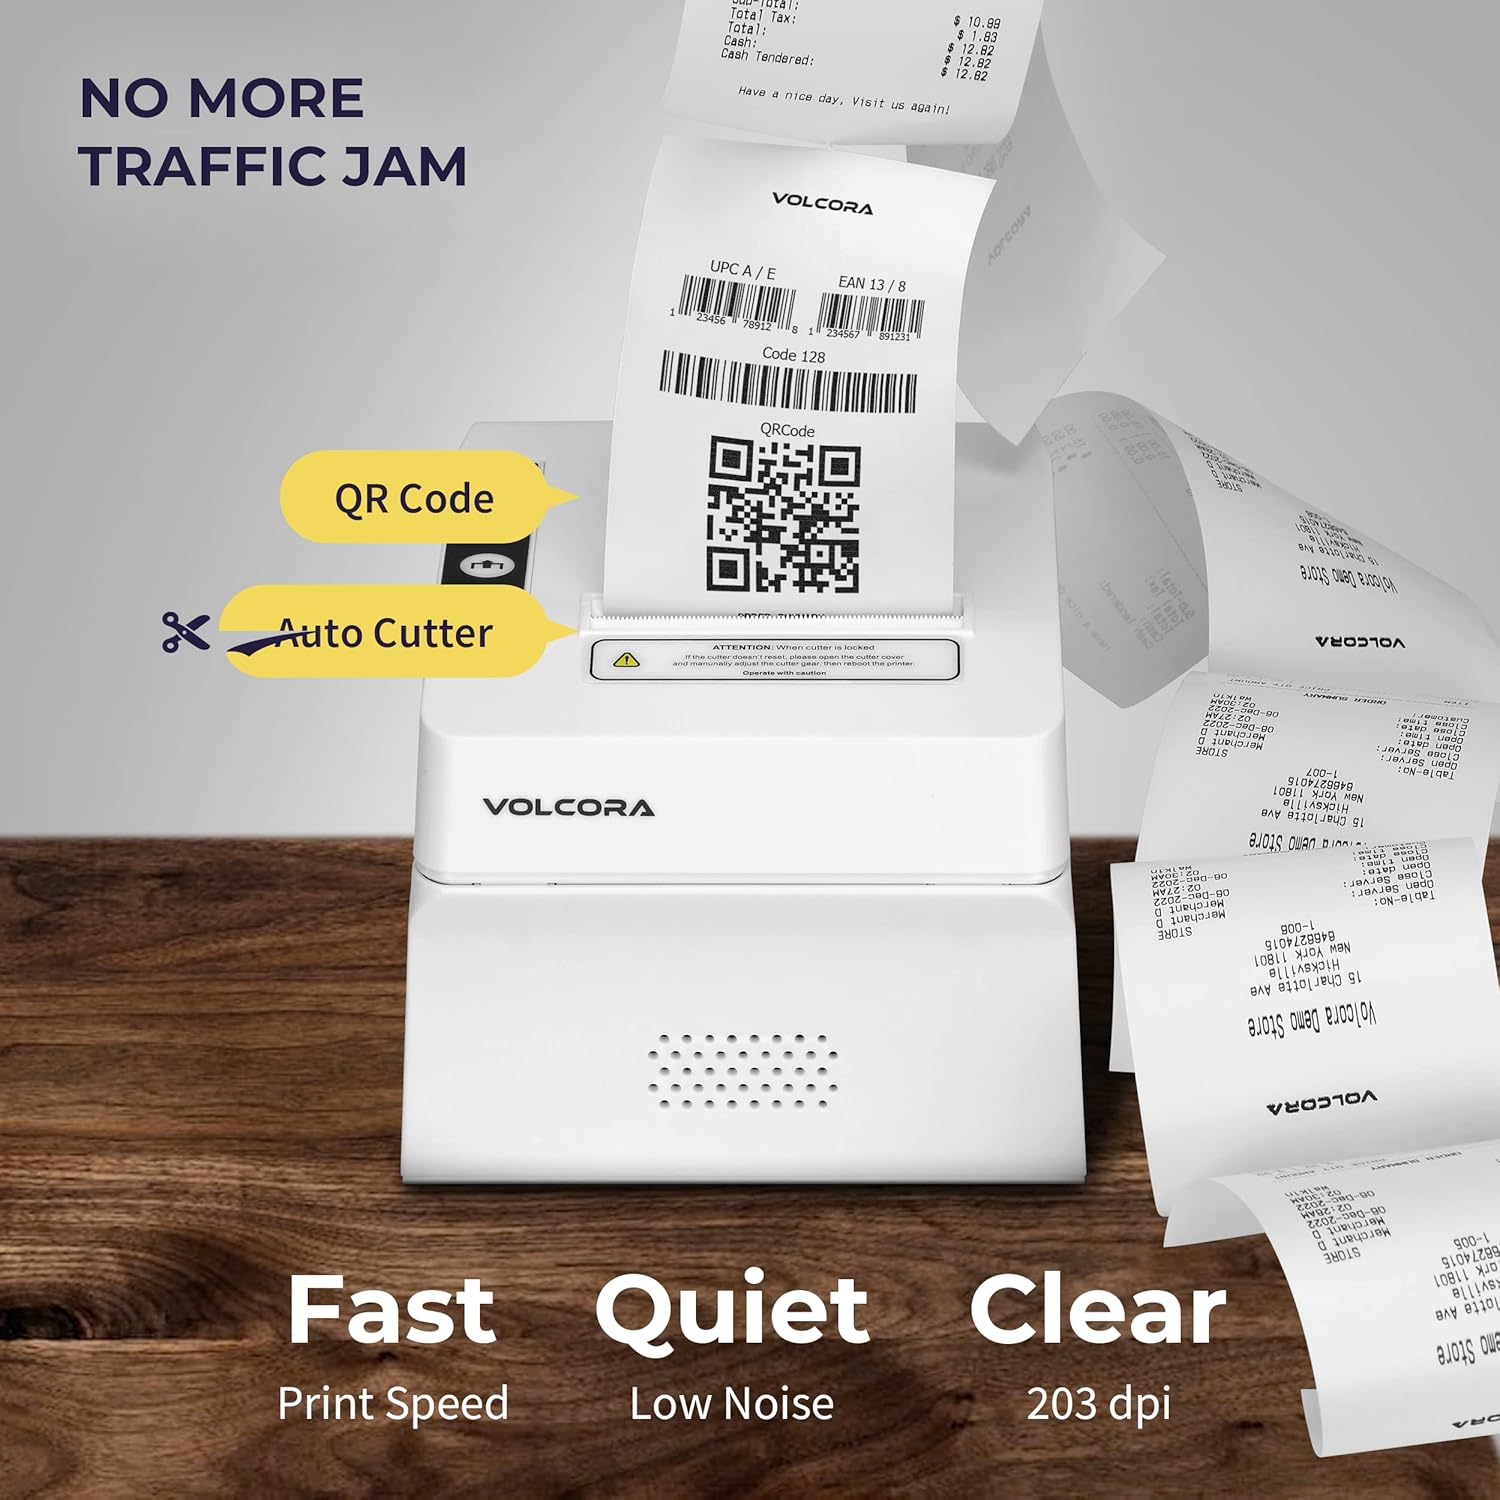
4.2-сүрөт: Key features include QR code printing, automatic cutter, fast print speed, low noise, and 203 dpi clear printing.
4.1 Порттор жана баскычтар

4.3-сүрөт: Rear ports include Power Supply, Cash Drawer Port (6Pin RJ11), and USB Port. Front panel features Power LED, Error LED, Paper LED, Feed Button, and Cover Open Button.
4.2 Жайгаштыруу параметрлери

4.4-сүрөт: The printer supports both wall mounting (as a kitchen printer) and counter placement (as a receipt printer).
5. Орнотуу
5.1 Initial Connection and Paper Roll Installation
- Unbox the printer and all accessories.
- Кубат адаптерин принтерге жана розеткага туташтырыңыз.
- Open the paper cover by pressing the "PUSH" button.
- Insert the 80mm thermal paper roll, ensuring the paper feeds from the bottom and the leading edge extends slightly past the cutter.
- Кагаз капкагын чыкылдагыча бекем жабыңыз.
- Connect the USB cable from the printer to your computer (for initial setup or USB printing).

5.1-сүрөт: Бүттүview of the installation process: Download drivers, Install, Connect power and USB, and Test print.
5.2 Printer Self-Test
Performing a self-test helps verify the printer's basic functionality and prints its configuration settings.
- Принтер өчүрүлгөнүн текшериңиз.
- Press and hold the "Feed" button.
- While holding the "Feed" button, power on the printer.
- Release the "Feed" button after approximately 5 seconds. The printer should print a self-test page.
For a visual guide on unboxing, connecting, and performing a self-test, please watch the video below:
Видео 5.1: Getting Started with Volcora Thermal Receipt Printer - Unboxing, Connecting, and Self-Test.
6. Driver Installation and Connectivity
The Volcora Thermal Receipt Printer supports USB and Bluetooth connectivity. Proper driver installation is crucial for seamless operation.
6.1 Системанын шайкештиги
Сураныч кайраview the compatibility chart before proceeding with driver installation:

6.1-сүрөт: Шайкештик бүттүview for USB and Bluetooth connections across various operating systems. Note that Mac OS and iOS are not supported.

6.2-сүрөт: List of compatible and non-compatible POS software applications.
6.2 Windows Driver Installation (USB)
For Windows users, download the latest drivers from the official Volcora support website. The installation CD also contains the necessary drivers.
- Windows үчүн драйверди жүктөп алыңыз volcora.com/support.
- Жүктөлгөндү ачыңыз file and open the driver application.
- Follow the on-screen prompts, select your printer model (500204), and complete the installation.
- After installation, the printer should be recognized in your Windows "Printers & Scanners" settings, allowing you to print a test page.
Refer to Video 5.1 for initial connection steps. The video also demonstrates driver installation and testing tools for Windows.
6.3 Bluetooth Connection with Windows PC
This section outlines two methods for connecting your printer via Bluetooth to a Windows PC.
Method 1: Driver Pre-installed with USB Connection
- Ensure the printer driver has been installed using a USB cable connection (refer to Section 6.2).
- Go to Windows Settings > Bluetooth & devices > Add device > Bluetooth.
- Select the printer (e.g., "500203" or "Volcora Thermal Printer") from the list of available devices and pair it. Enter the default PIN (usually "0000" or "1234").
- After pairing, check the printer's properties in "Devices and Printers" to identify the assigned COM port (e.g., COM4).
- Use the Setting Tool (available from volcora.com/support) to select the correct COM port and perform a test print.
Method 2: Driver Installation After Bluetooth Connection
- Start by pairing the printer via Bluetooth directly (Windows Settings > Bluetooth & devices > Add device > Bluetooth). Enter the default PIN.
- Open Device Manager (search in Windows) and expand "Ports (COM & LPT)" to find the COM port used by the Bluetooth printer (e.g., COM3 or COM4).
- Install the printer driver (from volcora.com/support or CD), selecting the identified COM port during the installation process. If the first COM port doesn't work, try the other one listed.
- Once the driver is installed, the printer should appear in "Printers & Scanners" and be ready for use.
Видео 6.3: How to connect your Volcora Thermal Receipt Printer via Bluetooth to a Windows PC.
6.4 Bluetooth Connection with Android Tablets
To connect your printer to an Android tablet, follow these steps:
- Go to your Android tablet's Settings and enable Bluetooth.
- Издөө new devices and select your printer (e.g., "500203"). Pair the device using the default PIN (usually "0000" or "1234").
- Download the "PrintDemo Tool" from volcora.com/support.
- Open the PrintDemo Tool, go to "Setting", select "Bluetooth" as the interface, and search for your paired printer.
- Perform a "print test" to confirm connectivity.
- For POS applications like Loyverse POS or W&O POS, navigate to their printer settings, select "Bluetooth" as the interface, and choose your Volcora printer to perform a test print.
Видео 6.4: How to connect your Volcora Thermal Receipt Printer via Bluetooth to an Android Tablet.
7. Иштөө нускамалары
Once the printer is successfully connected and drivers are installed, it will function as a standard printer for your compatible system or POS application. Ensure your application is configured to use the Volcora Thermal Printer for receipt printing.
- Басып чыгаруу: Send print commands from your software. The printer will automatically feed and cut the receipt.
- Paper Feed: Press the "Feed" button on the front panel to manually advance the paper.
- Ката көрсөткүчү: The "Error" LED will illuminate if there is a paper jam, paper out, or other issues. Refer to the troubleshooting section.
8. Техникалык тейлөө
Үзгүлтүксүз тейлөө оптималдуу иштешин камсыз кылат жана принтериңиздин иштөө мөөнөтүн узартат.
- Басып чыгаруу башын тазалоо: Жумшак, түксүз кездемени колдонуңуз dampened with isopropyl alcohol to gently wipe the thermal print head. Ensure the printer is off and cooled down before cleaning.
- Пластина роликтерин тазалоо: Rotate the platen roller and wipe it with an alcohol-dampened cloth to remove paper dust or adhesive residue.
- Тышкы тазалоо: Wipe the exterior of the printer with a soft, dry cloth. Avoid abrasive cleaners.
9. Техникалык шарттар
Detailed technical specifications for the Volcora Thermal Receipt Printer Model 500204:

9.1-сүрөт: Visual representation of printer dimensions and key specifications.
| Өзгөчөлүк | Деталь |
|---|---|
| Продукциянын өлчөмдөрү | 4"D x 8"W x 8"H |
| Басып чыгаруу ылдамдыгы | 220мм/сек |
| Paper Width | 80 mm (79.5 millimeters) |
| Print Width | 72 мм |
| Чекит тыгыздыгы | 8 dot/mm, 576 dot/line |
| Print Resolution | 203 dpi (203 x 203 DPI) |
| Принтердин буйругу | ESC/POS |
| Штрих-код түрлөрү | UPC-A/ UPC-E/ EAN13/ EAN8/ CODE39/ ITF25/ CODABAR/ CODE93/ CODE128/ QRCODE/ PDF417/ Data matrix |
| Киргизүү күчү | AC 110V/240V, 50-60Hz |
| Чыгуу күчү | DC 24V/2A |
| Auto Cutter Life | 1.5 миллион кыскартуу |
| Байланыш технологиясы | Bluetooth, USB |
| Басма технологиясы | Термикалык |
| Шайкеш түзмөктөр | Ноутбуктар, компьютерлер, планшеттер |
| Эстутум сактоо сыйымдуулугу | 64 KB |
| Элемент Салмагы | 3.76 фунт (1.71 килограмм) |
| Модель номери | 500204 |
| UPC | 810041565044 |
10. Кыйынчылыктарды
If you encounter issues with your Volcora Thermal Receipt Printer, consider the following common solutions:
- Принтер жооп бербей жатат:
- Электр байланыштарын текшерип, принтер күйгүзүлгөнүн текшериңиз.
- Verify USB or Bluetooth connection status.
- Perform a printer self-test (Section 5.2) to confirm internal functionality.
- Reinstall drivers if necessary.
- Начар басып чыгаруу сапаты:
- Жогорку сапаттагы термо кагаз колдонуп жатканыңызды текшериңиз.
- Clean the thermal print head (Section 8).
- Check printer settings for print density or speed adjustments.
- Кагаз тыгылыштары:
- Turn off the printer and carefully open the paper cover.
- Remove any jammed paper or debris.
- Ensure the paper roll is correctly installed and not too tight.
- Bluetooth туташуу маселелери:
- Принтерде да, түзмөгүңүздө да Bluetooth иштетилгенин текшериңиз.
- Unpair and re-pair the printer.
- Verify the correct COM port is selected in your driver or application settings.
Көбүрөөк жардам алуу үчүн, 11-бөлүмдөгү колдоо маалыматын караңыз.
11. Кепилдик жана колдоо
All Volcora products are backed by a limited lifetime warranty. Our US-based customer support team is available to assist with any issues regarding setup, connection, compatibility, or other product-related concerns.
- Visit Help Portal: https://help.volcora.com
- Download Support Center: https://volcora.com/support
- Кардарларды колдоо кызматы менен байланыш: support@volcora.com

11.1-сүрөт: Volcora offers US-based customer support for product assistance.