
1. Киришүү
This manual provides detailed instructions for assembling, operating, and maintaining your Gikfun Mini Amplifier Electronic Stereo Speaker Box DIY Kit. This kit is designed for enthusiasts to build a functional stereo speaker system, offering both an educational experience in electronics and a practical audio device. Please read all instructions carefully before beginning assembly.
2. Коопсуздук маалыматы
Please observe the following safety precautions during assembly and operation:
- Чоңдордун көзөмөлү: This kit contains small parts and requires soldering. Adult supervision is recommended for younger users.
- Soldering Safety: Use appropriate ventilation when soldering. Wear safety glasses to protect your eyes from solder splatter. Avoid touching hot soldering iron tips or recently soldered components.
- Электр коопсуздугу: Ensure all connections are correct before applying power. Incorrect wiring can damage components or pose a fire hazard.
- Компонент менен иштөө: Handle electronic components carefully to avoid damage from static electricity or physical stress.
- Кубат булагы: Use only the specified USB power source. Do not exceed the recommended voltage же учурдагы.
- Жайгашкан жери: Place the assembled speakers on a stable, dry surface, away from water or excessive heat.
3. Пакеттин мазмуну
Verify that all components listed below are present in your kit before starting assembly. Refer to the image below for a visual representation of the kit contents.

Сүрөт: бүттүview of all components included in the DIY kit. This includes circuit boards, speakers, acrylic panels, resistors, capacitors, LEDs, wires, screws, and a USB cable.
- 2x PCB (Printed Circuit Boards)
- 2x 4Ohm 3W 40mm Diameter Full Range Audio Speakers
- Acrylic panels for speaker enclosures
- Ар кандай резисторлор, конденсаторлор жана диоддор
- LEDs for music spectrum display
- Интегралдык схемалар (ICs)
- USB кубат кабели
- 3.5mm audio input cable
- Зымдарды туташтыруу
- Nuts, screws, and standoffs for assembly
- Башка кичинекей электрондук компоненттер
4. Орнотуу жана монтаждоо нускамалары
Follow these steps carefully to assemble your stereo speaker kit. Basic soldering skills are required.
4.1. Component Identification and Preparation
Before soldering, identify all components. Resistors are color-coded, and capacitors have values printed on them. Ensure you have a clean workspace and your soldering iron is heated to the appropriate temperature.

Image: Technical drawing showing the dimensions of one of the 40mm speakers.

Image: Two 4Ohm 3W 40mm diameter full-range audio speakers.
4.2. Soldering Components to PCBs
Carefully solder all resistors, capacitors, diodes, ICs, and other small components onto the two provided PCBs according to the circuit diagram. Pay attention to component polarity where applicable (e.g., electrolytic capacitors, diodes, LEDs, ICs).
- Insert each component into its designated holes on the PCB.
- Bend the leads slightly to hold the component in place.
- Solder each lead, ensuring a good, shiny solder joint.
- Trim excess leads with flush cutters.
4.3. Зымдарды туташтыруу
Connect the speakers, USB power cable, and 3.5mm audio input cable to the PCBs as shown in the wiring diagram. Ensure secure and correct connections to avoid malfunction.
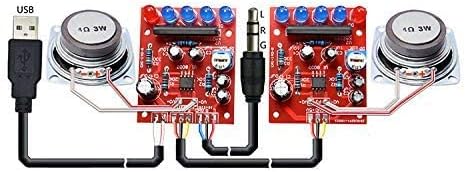
Image: Detailed wiring diagram illustrating how to connect the USB power, 3.5mm audio input, circuit boards, and speakers.
- Connect the speaker wires to the designated speaker output terminals on each PCB.
- Connect the USB power cable to the power input on one of the PCBs.
- Connect the 3.5mm audio input cable to the audio input on the appropriate PCB.
- Connect the two PCBs together using the provided interconnecting wires, ensuring correct left (L) and right (R) channel connections.
4.4. Enclosure Assembly
Assemble the transparent acrylic enclosures for each speaker. The PCBs and speakers will fit into these enclosures.
- Peel off any protective film from the acrylic panels.
- Mount the speakers into the front panel of each enclosure using the provided screws and nuts.
- Mount the assembled PCBs into the enclosure, aligning them with the designated standoffs.
- Secure all acrylic panels together using the remaining screws and nuts to form the complete speaker boxes.

Image: Fully assembled stereo speakers with transparent acrylic enclosures and illuminated LEDs.
5. Иштөө нускамалары
Once assembled, your Gikfun Mini Amplifier speakers are ready for use.
- Туташуу кубаты: Plug the USB cable into a standard USB power source (e.g., computer USB port, USB wall adapter). The LEDs on the circuit boards should illuminate.
- Аудио булагын туташтыруу: Plug the 3.5mm audio jack into the headphone output of your audio device (e.g., smartphone, tablet, laptop, MP3 player).
- Аудио ойнотуу: Start playing music or audio on your connected device. The speakers will output sound, and the LEDs will react to the music spectrum.

Image: Assembled speakers connected to a smartphone, illustrating typical usage.
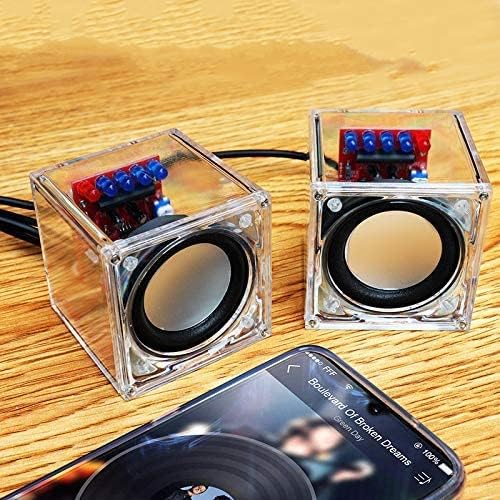
Image: The speakers in operation, connected to a mobile device.
6. Техникалык тейлөө
To ensure the longevity and optimal performance of your Gikfun Mini Amplifier speakers, follow these simple maintenance guidelines:
- Тазалоо: Use a soft, dry cloth to wipe the acrylic enclosures. Avoid abrasive cleaners or solvents that could scratch or damage the plastic.
- Чаң: Keep the speakers free from dust. A soft brush or compressed air can be used to clean crevices.
- Сактагыч: When not in use for extended periods, store the speakers in a cool, dry place.
- Нымдуулуктан качыңыз: Do not expose the speakers to water or high humidity, as this can damage the electronic components.
7. Кыйынчылыктарды
If you encounter issues with your Gikfun Mini Amplifier speakers, refer to the following troubleshooting tips:
| Көйгөй | Мүмкүн себеп | Чечим |
|---|---|---|
| Үн чыгышы жок |
|
|
| Distorted or low sound |
|
|
| Светодиоддор күйбөйт |
|
|
8. Техникалык шарттар
Key technical specifications for the Gikfun Mini Amplifier Electronic Stereo Speaker Box DIY Kit:
- Бренд: Гикфун
- Модель аты: Mini Ampөмүрлүү
- Динамиктин максималдуу чыгаруу күчү: Ар бир динамикке 3 Вт
- Динамик түрү: Woofer (Full Range Audio Speaker)
- Динамик өлчөмү: 40 Millimeters Diameter
- Аудио каналдардын саны: 2.0 (Стерео)
- Аудио чыгаруу режими: Стерео
- Байланыш технологиясы: USB (for power), 3.5mm Audio Jack (for input)
- Туташуу протоколу: USB
- Кубат булагы: Зымдуу электр (USB аркылуу)
- Башкаруу ыкмасы: Touch (refers to the nature of the DIY kit, not a physical touch control on the device)
- Шайкеш түзмөктөр: Компьютер, ноутбук, MP3 ойноткуч, смартфон, планшет, телевизор
- Монтаж түрү: Plug Mount (refers to component mounting on PCB)
- Суу өткөрбөйт: ЖАЛГАН
9. Кепилдик маалыматы
This Gikfun product comes with a limited warranty. The warranty typically covers individual components prior to assembly for a specified period from the date of purchase. Damage resulting from improper assembly, misuse, or modification is not covered. For specific warranty terms and conditions, please refer to the product packaging or contact Gikfun customer support.
10. Кардарларды колдоо кызматы
For further assistance, technical support, or inquiries regarding your Gikfun Mini Amplifier Electronic Stereo Speaker Box DIY Kit, please contact Gikfun customer service. You can typically find contact information on the Gikfun official webсайт же продукт сатылып алынган сатуучу аркылуу.
Онлайн ресурстар: зыярат кылыңыз Amazon'догу Gikfun дүкөнү продукт маалымат жана жаңыртуу үчүн.