1. Киришүү
This Wireless PIR Motion Sensor (Model: GD-MS08) is designed to detect human movement within its detection area and send an alarm signal to a compatible alarm host. It features high stability and anti-false alarm capabilities, making it suitable for various security applications. The sensor is compatible with G90B, Kerui, PGST, and other 433 MHz EV1527 alarm systems.
2. Коопсуздук маалыматы
- Орнотуудан жана колдонуудан мурун бардык нускамаларды кылдат окуп чыгыңыз.
- Аппаратты нымдуулуктан жана экстремалдык температурадан алыс кармаңыз.
- Аппаратты өз алдынча бөлүүгө же оңдоого аракет кылбаңыз. Тейлөө үчүн квалификациялуу кызматкерлерге кайрылыңыз.
- Уюлдук белгилерге ылайык батареянын туура орнотулушун камсыз кылыңыз.
- Колдонулган батарейкаларды жергиликтүү эрежелерге ылайык таштаңыз.
- This device is intended for indoor use only. Outdoor use may lead to false alarms due to environmental factors.
3. Пакеттин мазмуну
Пакет, адатта, төмөнкүлөрдү камтыйт:
- 1 x Wireless PIR Motion Sensor (GD-MS08)
- 1 x 9V 6F22 Battery
- Mounting accessories (screws, wall plugs, double-sided adhesive)
- User Manual

Figure 1: Typical product packaging and contents.
4. Продукт бүтүп калдыview
The GD-MS08 PIR Motion Sensor is a compact and efficient device designed for reliable intrusion detection. It incorporates advanced features for optimal performance and ease of use.
Негизги өзгөчөлүктөрү:
- MCU microsystem control for stable operation.
- Pyroelectric infrared detection.
- Tamper switch support for enhanced security.
- Төмөн үнtage battery alert.
- Pet immunity for small animals (under 5 kg).
- Wireless RF transmitter: EV1527, 433 MHz.
- LED signal light can be turned on/off.
- Adjustable detection sensitivity (high/low) and time (5s/5min).
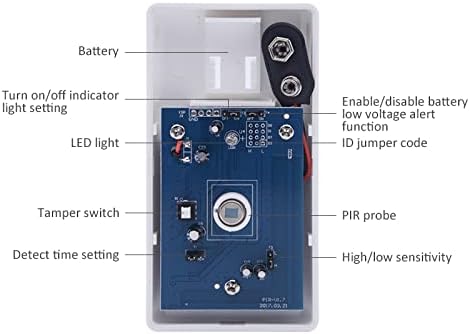
2-сүрөт: Ички view of the sensor showing battery compartment, tamper switch, PIR probe, LED light, and settings.
5. Орнотуу
5.1. Батареяны орнотуу
- Сенсорду ачыңыз casing батарейка бөлүмүнө жетүү үчүн.
- Insert the provided 9V 6F22 battery, ensuring correct polarity.
- Сенсорду жабуу casing коопсуз.
Video 1: Demonstrates battery installation and basic mode selection for a similar KERUI sensor. The sensor can be powered by 9-15V power supply or 3 AAA batteries (as shown in video, though product specs state 9V battery).
5.2. Сенсорду орнотуу
The sensor can be mounted using screws or double-sided adhesive. Choose a location that provides optimal detection coverage.
- Сунушталган орнотуу бийиктиги: 1.7 - 2.5 meters (suggested 2.2 meters) from the floor.
- аныктоо бурчу: 110° горизонталдуу.
- аныктоо аралык: 10 метрге чейин.

Figure 3: Detection angle and recommended mounting height diagram.

4-сүрөт: Каптал view of the sensor with its mounting bracket.
5.3. Pairing with an Alarm Host System
To integrate the PIR sensor with your wireless alarm system (e.g., G90B, Kerui, PGST), you need to pair it with the central unit. The process typically involves putting the alarm host into pairing mode and then triggering the sensor.
- Ensure your alarm host is powered on and in pairing/learning mode (refer to your alarm host's manual for specific instructions).
- Press the pairing button on the back of the PIR sensor (often a small button or tamper switch) to send a signal to the central unit.
- The alarm host should confirm successful pairing (e.g., a beep, display message).
- Маанилүү: When pairing a new component, ensure all other accessories are in an OFF or closed state to avoid interference.
Video 2: Demonstrates pairing various accessories, including a PIR detector, with a PG103 alarm system. The pairing button for the PIR sensor is shown at approximately 3:14 in the video.
6. Иштөө нускамалары
Once installed and paired, the PIR sensor operates by detecting movement and sending signals to the alarm host. The sensor itself may have different modes depending on the model and integration with the host.
6.1. Sensor Modes (when used with a compatible host)
The sensor typically supports different operational modes, which are usually configured via the alarm host:
- Ойготкуч режими: Triggers an alarm (siren, notification) when movement is detected.
- Эшиктин режими: Plays a welcome chime when movement is detected (e.g., for entryways).
- Кош келүү режими: Similar to doorbell mode, often with different chimes or voice prompts.
Video 3: Demonstrates the sensor operating in Doorbell, Alarm, and Welcome modes, showing how it reacts to detected movement.
6.2. Орнотууларды тууралоо
The sensor may have internal jumpers or switches to adjust sensitivity and detection time. Refer to the internal component diagram (Figure 2) for locations.
- Сезимталдуулук: High / Low options.
- Аныктоо убактысы: 5 seconds / 5 minutes adjustable.
- LED Signal Light: Can be enabled or disabled.
- Low Voltage эскертүү: Optional to enable/disable.
7. Техникалык тейлөө
7.1. Батареяны алмаштыруу
The sensor uses a 9V 6F22 battery with an average lifespan of 2 years. When the low voltage alert is triggered, replace the battery promptly to ensure continuous operation.
- Сенсорду ачыңыз casing.
- Эски 9V батареясын алып салыңыз.
- Insert a new 9V 6F22 battery, observing polarity.
- в жабууasing коопсуз.
7.2. Үзгүлтүксүз текшерүү
It is recommended to test the functionality of the detector every few months to ensure it is working correctly.
- Arm your alarm system.
- Walk through the detection area of the PIR sensor.
- Verify that the alarm system triggers as expected.
8. Кыйынчылыктарды
If you encounter issues with the PIR motion sensor, consider the following common problems and solutions:
8.1. Pairing Issues with Alarm Host
- Батарея аз: Ensure the sensor battery is not low. Replace if necessary.
- Аралык: The distance between the sensor and the alarm host might be too far. Try pairing closer to the host.
- Интерференция: Check for signal interference around the sensor or host. Move other wireless devices if possible.
- Hardware Problems: Accessories may lose launch function due to hardware reasons. The host might also exclude accessories due to hardware problems.
- Жупташтыруу ыкмасы: Ensure the alarm host is in the correct pairing mode and the sensor is triggered correctly.
8.2. False Alarms
- Үй жаныбарларынын иммунитети: Ensure the sensor is installed at the recommended height and settings for pet immunity if you have small pets.
- Экологиялык факторлор: Avoid installing the sensor near heat sources, direct sunlight, or areas with strong air currents (e.g., vents, open windows) that could cause false triggers.
- Кыймыл: Ensure there are no objects (curtains, plants) that might move within the detection area.
9. Техникалык шарттар
| Өзгөчөлүк | Спецификация |
|---|---|
| Модель номери | GD-MS08 |
| Батарея | 9V 6F22 (included) |
| Күтүү агымы | 23μA |
| Ойготкуч ток | < 23мА |
| Орнотуу бийиктиги | 1.7 - 2.5 m (suggested 2.2 m) |
| Detection Distance | 10 м |
| Detection Angle | 110° |
| Сезимталдуулук | High / Low (adjustable) |
| Аныктоо убактысы | 5 s / 5 min (adjustable) |
| Чыгуу Аралыгы | 120 м (ачык аянт) |
| Нымдуулук | ≤95% RH (non-freezing) |
| Иштөө температурасы | -10 ℃ ~ 55 ℃ |
| Anti-EMI | 0.1 - 500 MHz / 30 V/m |
| Жыштык | 433 MHz, EV1527 |
| Үй жаныбарларынын иммунитети | For small animals (less than 5 kg) |
| Өлчөмдөр | 9 x 5 x 0.4 см |
10. Кепилдик
This product comes with a standard manufacturer's warranty. Please retain your proof of purchase for any warranty claims. The warranty covers defects in materials and workmanship under normal use. It does not cover damage caused by misuse, accident, unauthorized modification, or improper installation.
11. Колдоо
For technical support, troubleshooting assistance, or further information regarding your Wireless PIR Motion Sensor, please contact your retailer or the manufacturer's customer service. Refer to the product packaging or manufacturer's webбайланыш маалыматы үчүн сайт.


