Introduction
This user manual provides comprehensive instructions for the installation, operation, and maintenance of your new 8-channel Full High Definition CCTV Camera Kit. This system is designed to provide reliable surveillance for your home or business, offering high-quality video recording and remote monitoring capabilities.
Please read this manual thoroughly before attempting to install or operate the system. Keep this manual for future reference.
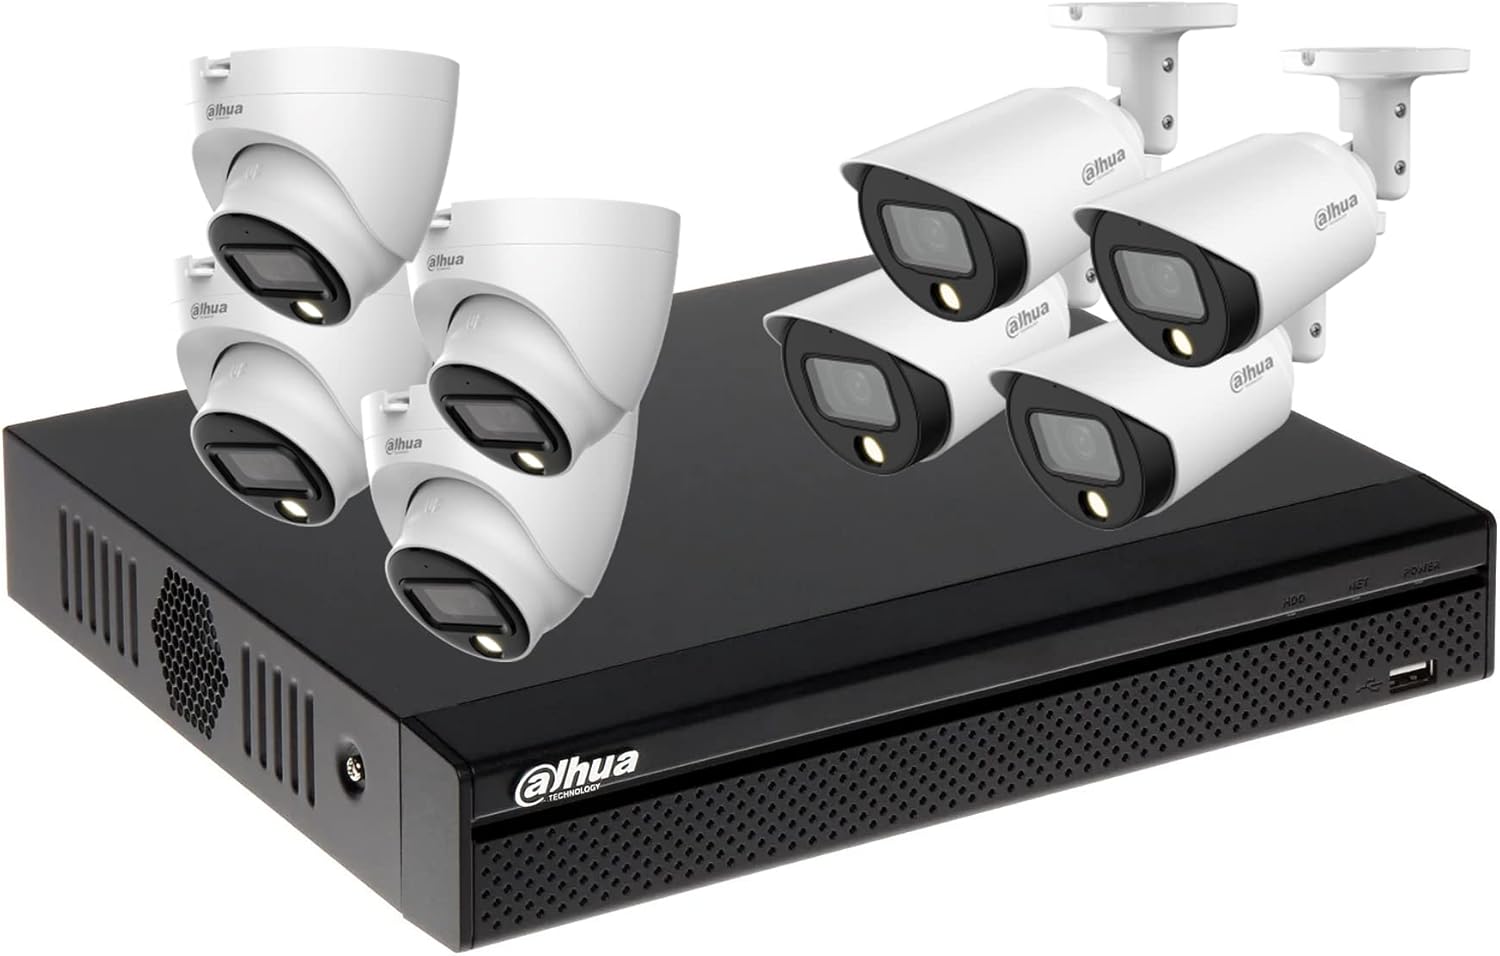
Сүрөт: бүттүview of the 8-channel CCTV camera system kit, showing the DVR unit, four bullet cameras, and four dome cameras.
Пакеттин мазмуну
Төмөндө тизмеленген нерселердин баары пакетиңизге камтылганын текшериңиз. Эгерде кандайдыр бир нерселер жок болсо же бузулса, кардарларды колдоо менен байланышыңыз.
- 1x Dahua 8 Channel XVR (Digital Video Recorder)
- 4x Dahua Full HD Full-Color Bullet Cameras (for outdoor use)
- 4x Dahua Full HD Full-Color Dome Cameras (for indoor use)
- 1x Hard Disk Drive (2TB HDD, pre-installed or separate depending on variant)
- 1x 100m CCTV Cable
- 1x 12V 10A кубат адаптери
- 1x 1-to-8 DC Power Splitter Cable
- 1x USB чычкан
- Necessary mounting screws and accessories
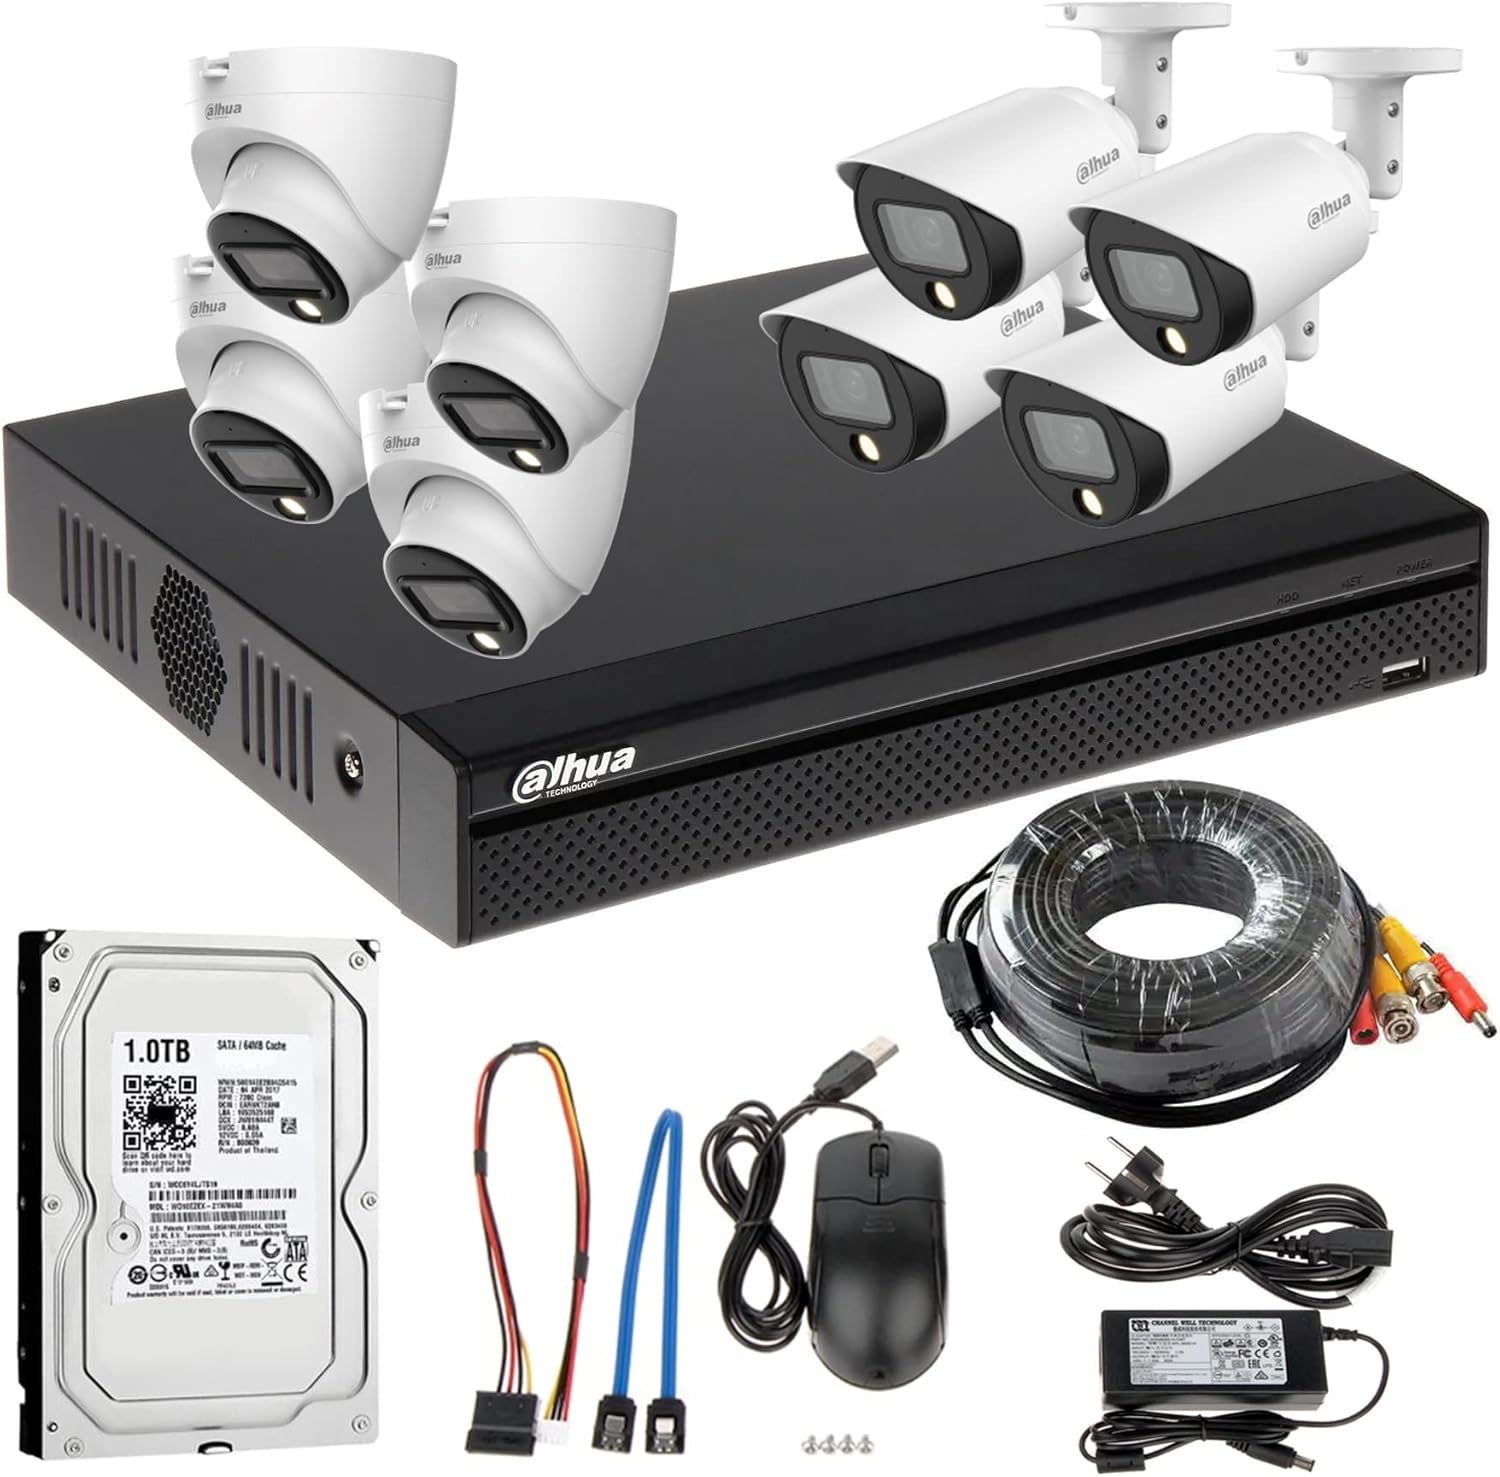
Image: All components of the CCTV kit laid out, including the DVR, eight cameras, 1TB HDD, CCTV cable reel, power adapter, DC power splitter, and USB mouse. Note: The HDD shown is 1TB, but the product variant is 2TB.
For information regarding the Hard Disk Drive, please visit http://qr.wdc.com/wdblue.
Орнотуу колдонмосу
1. DVR Hard Disk Drive (HDD) Installation (if not pre-installed)
- Unplug the DVR from power.
- DVRдин арткы жана капталдарындагы бурамаларды бурап алып салуу менен үстүнкү капкагын алып салыңыз.
- Connect the SATA data cable and power cable from the DVR to the HDD.
- Secure the HDD inside the DVR chassis using the provided screws.
- Үстүнкү капкакты ордуна коюп, бурама менен бекитиңиз.

Сүрөт: алдыңкы view of the Dahua 8-channel Digital Video Recorder (XVR) unit.
2. Камераны жайгаштыруу жана орнотуу
- Bullet Cameras: Ideal for outdoor use, mounted on walls or eaves to cover specific areas.
- Dome Cameras: Suitable for indoor use, often mounted on ceilings or walls for a wider, less obtrusive view.
Choose strategic locations that provide optimal coverage and are protected from direct weather exposure (for outdoor cameras).

Image: Dahua Full HD Full-Color Bullet Camera.

Image: Dahua Full HD Full-Color Dome Camera.

Image: Packaging for Dahua Full-Color Bullet Camera, highlighting features like High Definition and Full-Color.
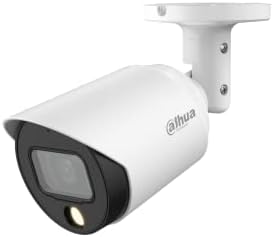
Image: Packaging for Dahua Full-Color Eyeball Camera (Dome Camera), highlighting features like High Definition and Full-Color.
3. Зымдарды туташтыруу
- Connect one end of the CCTV cable (BNC connector) to the video input port on the back of the DVR.
- Run the cable to your chosen camera location.
- Connect the other end of the CCTV cable (BNC connector) to the video output of the camera.
- Use the 1-to-8 DC power splitter cable to connect all cameras to the 12V 10A power adapter. Ensure each camera receives power.
- Кубат адаптерин электр розеткасына туташтырыңыз.

Image: A reel of CCTV cable and a close-up of the cable's cross-section, showing the coaxial video line and power wires.
4. Баштапкы күйгүзүү
- Connect a monitor to the DVR's HDMI or VGA output.
- Connect the USB mouse to a USB port on the DVR.
- Connect the DVR to power using its dedicated power adapter.
- The system will boot up, and you should see the Dahua logo on the monitor.
Иштөө нускамалары
1. Биринчи жолу орнотуу устасы
Upon the first boot, the DVR will guide you through a setup wizard. Follow the on-screen prompts to:
- Set a strong administrator password.
- Күн жана убакыт жөндөөлөрүн конфигурациялаңыз.
- Format the Hard Disk Drive (HDD) if prompted. This is crucial for recording.
- Configure network settings (DHCP recommended for ease of use).
- Enable P2P (Peer-to-Peer) for remote access via mobile app.
2. Түз эфир View
After setup, the system will display the live feed from all connected cameras. You can switch between single-camera view, multi-camera view (e.g., 4-channel, 8-channel), and sequence view экрандагы башкаруу элементтерин же чычкандын оң баскычын чыкылдатуу менюсун колдонуу.
3. Жаздыруу
The system is typically configured for continuous recording by default. You can adjust recording schedules, motion detection settings, and alarm recording options through the DVR's main menu (right-click on the live view screen and select "Main Menu").
- Тынымсыз жаздыруу: Рекорддор 24/7.
- Кыймылды аныктоо жазуусу: Камерада кыймыл аныкталганда гана жаздырат view.
- Ойготкуч жаздыруу: Тышкы сигнал киргизүү ишке киргизилгенде жаздырат.
4. Ойнотуу
Кайраview foo жазылганtage:
- Түз эфирден view, right-click and select "Playback".
- Select the desired date and camera channel(s).
- Use the timeline to navigate through recordings. Green segments usually indicate continuous recording, while yellow/red might indicate motion/alarm events.
- You can pause, fast-forward, rewind, and export footage.
5. Remote Access (Mobile App)
үчүн view your cameras remotely on a smartphone or tablet:
- Download the official Dahua mobile application (e.g., DMSS) from your device's app store.
- Колдонмону ачып, эгер сизде аккаунт жок болсо, аны түзүңүз.
- Add your device by scanning the P2P QR code displayed on the DVR's network settings or by manually entering the serial number.
- Enter the DVR's username and password.
- Сиз азыр ээ болушу керек view live feeds and playback recordings remotely.
Техникалык тейлөө
- үзгүлтүксүз тазалоо: Periodically clean camera lenses and DVR vents to ensure clear images and proper airflow. Use a soft, dry cloth. Do not use harsh chemicals.
- Программалык камсыздоонун жаңыртуулары: Dahua расмий өкүлүн текшериңиз website for firmware updates for your DVR model. Updates can improve performance, add features, and enhance security. Follow update instructions carefully.
- HDD ден соолугун текшерүү: Regularly check the health status of your Hard Disk Drive through the DVR's menu. Replace the HDD if bad sectors or errors are detected to prevent data loss.
- Сырсөз коопсуздугу: Change your DVR and app passwords periodically to strong, unique combinations.
- Кабелдик текшерүү: Periodically inspect all cables for wear, damage, or loose connections, especially for outdoor installations.
Проблемаларды чечүү
| Көйгөй | Мүмкүн себеп | Чечим |
|---|---|---|
| Монитордо видео дисплей жок. | Loose HDMI/VGA cable; DVR not powered on; monitor input not selected correctly. | Check all cable connections; ensure DVR power adapter is plugged in; select correct input on monitor. |
| Белгилүү бир камерадан сүрөт тартылган эмес. | Camera power issue; video cable disconnected/damaged; camera faulty. | Check camera power connection; inspect BNC cable for damage; try connecting camera to a different DVR port. |
| DVR жаздырылбай жатат. | HDD not installed/formatted; recording schedule not set; HDD full. | Ensure HDD is installed and formatted (check DVR menu); verify recording schedule; check HDD space and enable overwrite if needed. |
| DVRга алыстан кирүү мүмкүн эмес. | Network issue; P2P disabled; incorrect app settings. | Check DVR's network connection; ensure P2P is enabled in DVR settings; verify app device details and network connectivity on phone. |
| Сүрөттүн сапаты начар. | Dirty camera lens; low light conditions; cable interference. | Clean camera lens; ensure adequate lighting for full-color cameras; check cable quality and connections. |
Техникалык шарттар
| Өзгөчөлүк | Деталь |
|---|---|
| Продукт модели | 1509TLQP-1509TP 8CH |
| Бренд | Generic (Dahua Components) |
| DVR каналдары | 8 канал |
| Камера түрү | 4x Bullet, 4x Dome (Full HD, Full-Color) |
| HDD сыйымдуулугу | 2TB (Terabyte) |
| Video Output | Сапаттуу, VGA |
| Байланыш | Wired (BNC), Ethernet (for network/remote access) |
| Power Source | DC 12V |
| Ички/тышкы колдонуу | Bullet: Outdoor, Dome: Indoor |
| Controller Type | iOS, Android (via mobile app) |
| Жарык булагы түрү | Infrared (for night vision, though cameras are full-color) |
Кепилдик жана колдоо
This product is covered by a standard manufacturer's warranty. Please refer to the warranty card included in your package for specific terms and conditions, including warranty period and coverage details.
For technical support, troubleshooting assistance, or warranty claims, please contact the seller or manufacturer directly. You may also refer to the contact information provided in the product listing or on the manufacturer's official webсайт.
For customized requirements or direct support, you may contact:
- Электрондук почта: intelligence.ae@gmail.com
- Phone or WhatsApp: +971501724008


