
Introduction
This manual provides comprehensive instructions for the setup, installation, operation, and maintenance of your Lorex 2K Wireless Smart Video Doorbell, Model B463AJD-E. Please read this manual thoroughly before using the product to ensure proper functionality and safety.
Кутуда эмне бар

Image: All components included in the Lorex 2K Wireless Smart Video Doorbell package.
- 2K Батарея эшик коңгуроосу
- Кронштейн орнотуу
- Horizontal 15° Wedge
- Vertical 5° Wedge
- USB кубат кабели
- Узартуу зымы
- Connecting Wires (2)
- Зым капкактары (3)
- Пинди чыгаруу
- Anchors and Screws (2 each)
- 1/4 дюймдук бургуч
Продукт бүттүview
Фронт View

Сүрөт: алдыңкы view of the doorbell highlighting the camera, IR lights, PIR sensor, light sensor, microphone, and smart security call button.
- Камера: Captures 2K video.
- Инфракызыл чырактар: Түнкү көрүү үчүн инфракызыл жарыктар.
- PIR сенсор: Кыймылды аныктоо үчүн пассивдүү инфракызыл сенсор.
- Жарык сенсору: Айланадагы жарыктын деңгээлин аныктайт.
- Микрофон: эки тараптуу аудио байланыш үчүн.
- Smart Security Call Button: Initiates a call to your smartphone and activates smart security features.
Артка View

Сүрөт: Артка view of the doorbell showing the release tab, charging port, power terminals, and QR code.
- Release Tab: Used to detach the doorbell from the mounting bracket.
- USB кубаттоо порту: Ички батареяны заряддоо үчүн.
- Электр терминалдары: For optional wired power connection.
- QR коду: For device pairing with the Lorex Home app.
Side View

Сүрөт: каптал view of the doorbell showing the reset button and microSD card slot.
- Калыбына келтирүү баскычы: Used to reset the device and initiate pairing.
- MicroSD картасынын уячасы: Жергиликтүү видео сактоо үчүн (32 ГБ карта алдын ала орнотулган).
Жайгашуу
1. Эшиктин коңгуроосун кубаттоо
Before initial use, fully charge your doorbell using the included USB power cable. A 5V 2A power adapter (not included) is recommended for optimal charging. Charging may take up to 3 hours. The call button will turn solid blue when fully charged.

Image: The Lorex doorbell connected to a USB cable for charging.
2. Downloading the Lorex Home App
Download the Lorex Home app from your device's app store (App Store for iOS or Google Play Store for Android). This app is essential for setting up and managing your doorbell.
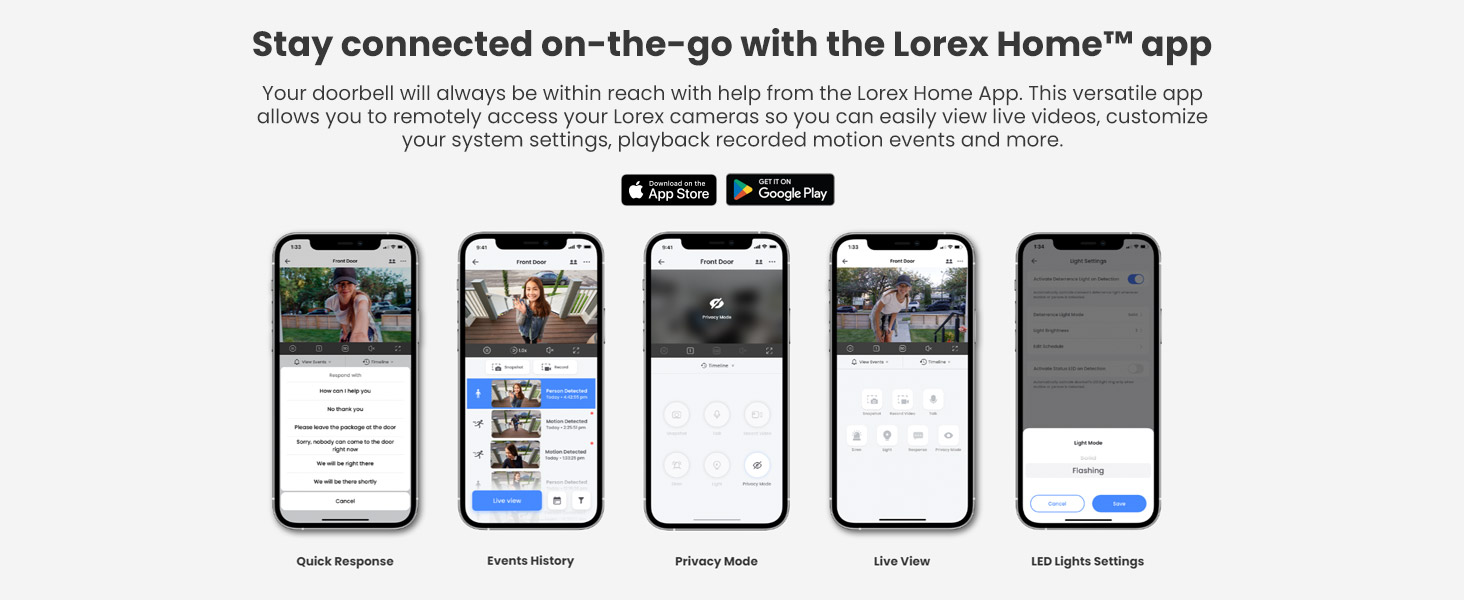
Image: Multiple screenshots of the Lorex Home app interface, showing various features like Quick Response, Events History, Privacy Mode, Live View, and LED Lights Settings.
3. Колдонмо менен жупташуу
Open the Lorex Home app and follow the in-app instructions to add your doorbell. You will need to press the reset button on the side of the doorbell to initiate the onboarding process. Wait for the audio prompts, and the call button will flash blue, indicating it's ready for pairing.
Орнотуу
Video: Official installation guide for the Lorex 2K Battery Camera Doorbell.
1. Choosing the Best Location and Angle
Use the live view feature in the Lorex Home app to determine the optimal mounting location and angle for your doorbell. This helps ensure maximum coverage and effective motion detection.

Image: A smartphone displaying the live view from the Lorex doorbell, showing a person at the front door.
2. Using Angled Wedges (Optional)
If needed, use the included horizontal 15° or vertical 5° wedges to adjust the doorbell's viewing angle for optimal coverage. Align the chosen wedge to the mounting bracket according to the desired direction. Ensure the "UP" arrow on the mounting bracket is correctly oriented.
3. Кронштейнди орнотуу
Secure the mounting bracket (and wedge, if used) to your desired surface using the included screws. For concrete, stucco, or brick surfaces, use the provided 1/4 inch drill bit to drill pilot holes and insert the anchors before securing with screws.
4. Securing the Doorbell
Once the mounting bracket is secure, place the doorbell into the bracket. You will hear a click when it is properly secured.

Image: A hand securing the Lorex doorbell onto its mounting bracket on a wooden surface.
5. Removing the Doorbell
To remove the doorbell from the bracket, hold the doorbell firmly and insert the release pin into the hole on the top of the mounting bracket until the release tab is reached. This will disengage the doorbell from the bracket.
Operating the Doorbell
2K Video Resolution and Night Vision
The doorbell provides optimal video image quality with 2K Video Resolution (HDR) and a 4:3 aspect ratio. It features both Color Night Vision (requires ambient light) and IR Night Vision (high-quality black and white video in dark settings) to ensure clear visibility day and night.

Image: A split image demonstrating the difference between Infrared Night Vision (black and white) and Color Night Vision (color, with ambient light) captured by the doorbell.
Motion Detection and Smart Security Lighting
Utilize Person Detection to receive instant notifications on the Lorex Home app when a person is detected. The Nightlight feature can be programmed to turn on automatically when motion is detected in the dark, or activated manually to deter unwanted visitors.

Image: A smartphone displaying a notification from the Lorex Home app, indicating "There is a person at your Front Door."
Two-Way Audio and Quick Response
Engage in full-duplex 2-Way audio with noise cancellation to speak directly through the doorbell to anyone at your front door. If you are busy, use the Quick Response feature to have pre-set or personalized voice messages answer for you.

Image: A woman speaking into her smartphone, demonstrating the two-way audio feature of the Lorex doorbell.
Local Storage and Privacy
Your video recordings are kept private and in your control with the pre-installed 32GB MicroSD card. This eliminates recurring monthly fees for cloud storage. The storage is upgradable to 256GB.

Image: A hand inserting a microSD card into the dedicated slot on the Lorex doorbell, emphasizing local storage.
Техникалык тейлөө
Батареянын иштөө мөөнөтү
The doorbell is battery-powered with a built-in 6200mAh battery. Battery life can vary significantly based on factors such as the number of events or notifications, recording length, camera location, ambient temperature, and specific settings on the camera. For continuous power, the doorbell can be hardwired to existing doorbell wiring.
Тазалоо
To maintain optimal performance, regularly clean the camera lens and the PIR sensor area with a soft, damp кездеме. Аппаратка зыян келтирүүчү катаал химиялык заттарды же абразивдүү материалдарды колдонуудан алыс болуңуз.
MicroSD картасын башкаруу
The pre-installed 32GB MicroSD card stores your recordings. You can manage and clear recordings directly from the Lorex Home app. Ensure the card is properly seated in its slot for continuous recording.
Проблемаларды чечүү
- Slow Notifications: Ensure your Wi-Fi connection is strong and stable. Check the Lorex Home app settings for notification delays and ensure background app refresh is enabled for the app.
- Туташуу маселелери: Verify your doorbell is within range of your Wi-Fi router. Ensure your phone is connected to a 2.4GHz Wi-Fi network during initial setup, as the doorbell operates on this frequency. If issues persist, try resetting the doorbell and re-pairing it with the app.
- Батарея заряддалбай жатат: Confirm the USB cable and power adapter are functioning correctly. Ensure the charging port is clean and free of debris. If hardwired, check the wiring connections.
- Motion Detection Inaccuracies: Adjust the motion detection zones and sensitivity settings within the Lorex Home app to minimize false alerts from car lights or other non-relevant movements.
- Doorbell Not Ringing on Phone: Check your phone's notification settings for the Lorex Home app. Ensure notifications are enabled and not silenced. The app typically sends a notification rather than a traditional phone ring.
- Түнкү көрүү начар: Ensure the camera lens is clean. For Color Night Vision, verify there is sufficient ambient light. If using IR Night Vision, ensure no obstructions are blocking the IR lights.
Техникалык шарттар
| Өзгөчөлүк | Спецификация |
|---|---|
| Модель аты | B463AJD-E |
| Video Resolution | 2K (HDR) |
| Байланыш технологиясы | Зымсыз (Wi-Fi) |
| Батарея сыйымдуулугу | 6200mAh |
| Түнкү көрүнүш | Color Night Vision (ambient light required), IR Night Vision (10 meters) |
| Аудио | Full Duplex 2-Way Audio with Noise Cancellation |
| Motion Detection | Person Detection, Motion Activated Nightlight |
| Жергиликтүү сактагыч | 32GB MicroSD (pre-installed, upgradable to 256GB) |
| Ички/тышкы колдонуу | Сыртта |
| Суу өткөрбөйт рейтинги | IP541 |
| Viewбурч | 150 градус |
| Power Source | Battery / Wired (8V-24V ~ 50/60Hz, 0.7A) |
| Өлчөмдөр | 2 x 4 x 1 дюйм |
Кепилдик жана колдоо
Кепилдик жөнүндө маалымат, техникалык колдоо жана кошумча ресурстар үчүн расмий Lorex веб-сайтына кириңиз website or contact Lorex customer service. You can also find more information on the Amazon'догу Lorex дүкөнү.