1. Киришүү
Welcome to the HyperX Armada 25 Gaming Monitor user manual. This document provides essential information for setting up, operating, maintaining, and troubleshooting your new monitor. The HyperX Armada 25 is designed for competitive gaming, featuring a 24.5-inch Full HD (1920x1080) IPS panel, a 240Hz refresh rate, and a 1ms response time, ensuring smooth and responsive visuals. It also includes NVIDIA G-SYNC compatibility to eliminate screen tearing and minimize input latency. A desk mount is included for convenient setup and to maximize desk space.
Негизги өзгөчөлүктөрү:
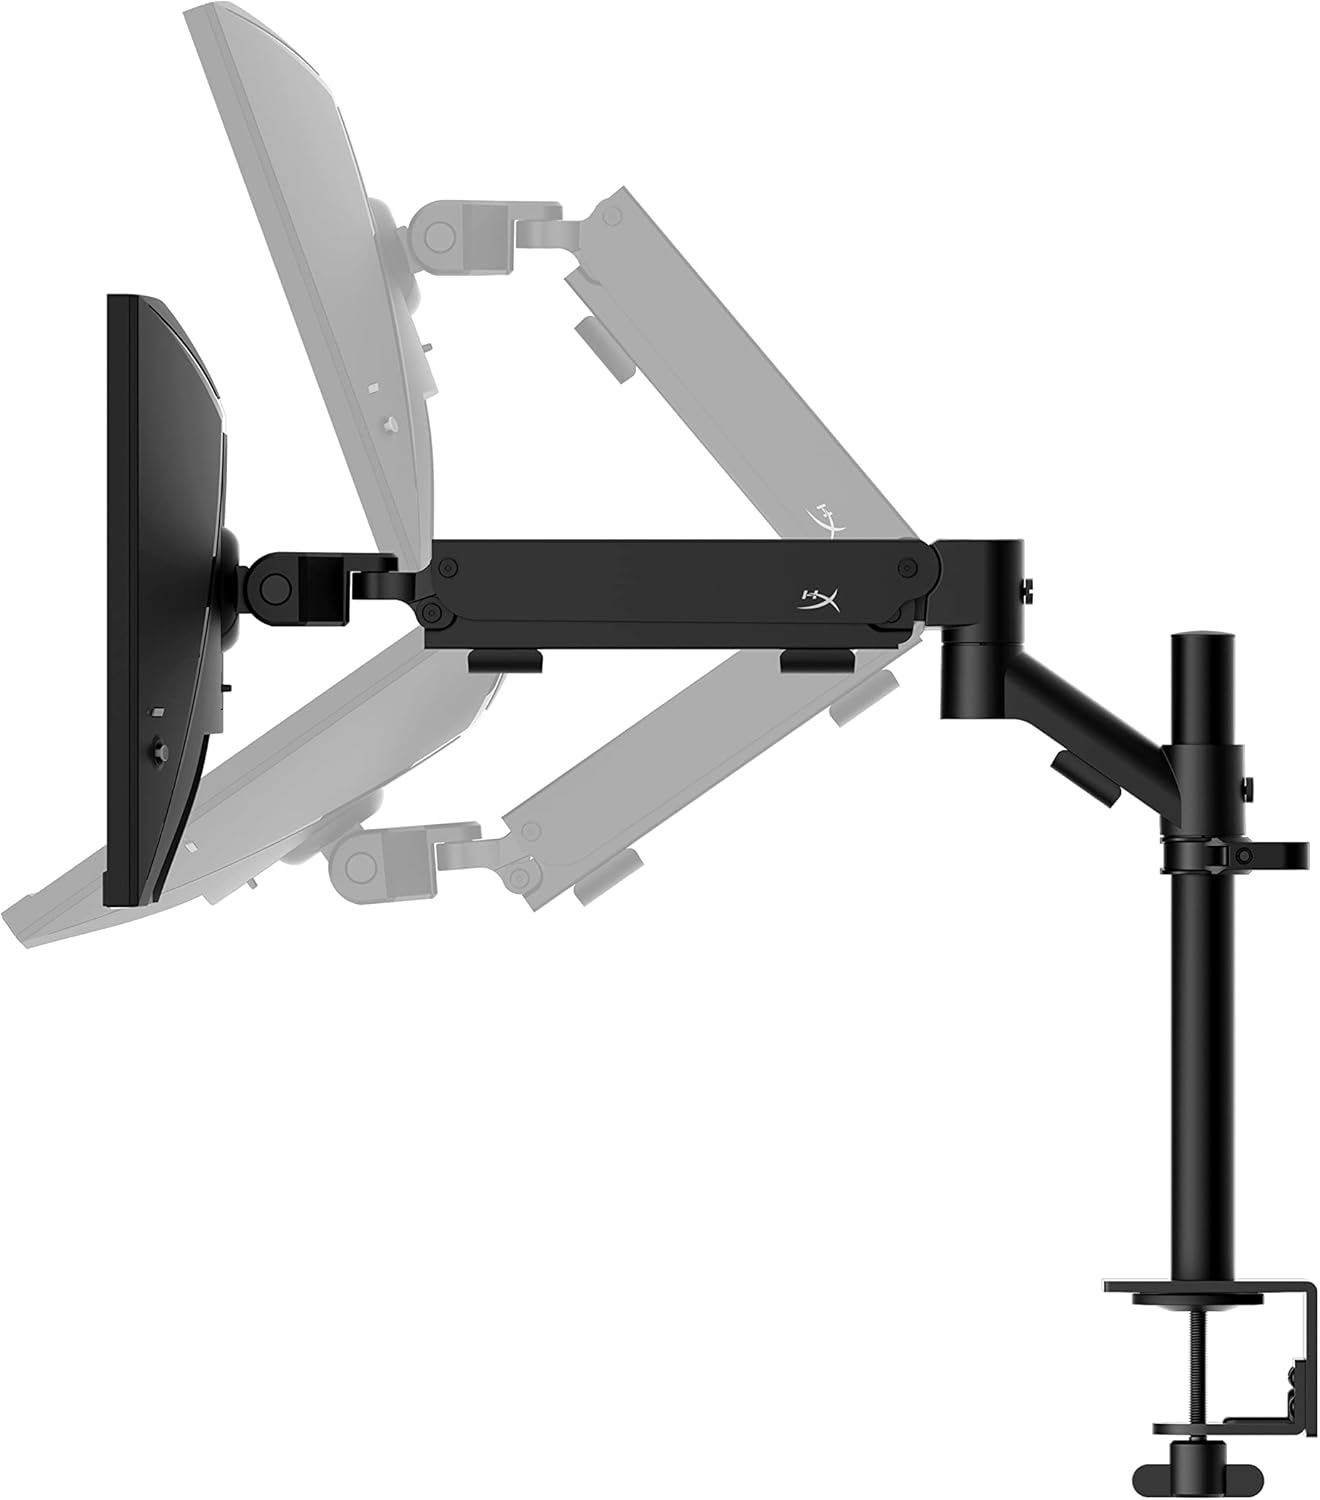
- Баары бир пакет: Includes an ergonomic arm and desk mount for easy setup and space-saving.
- Жогорку жаңыртуу ылдамдыгы жана жооп берүү убактысы: 240Hz refresh rate and 1ms response time for ultra-smooth gaming.
- Vibrant IPS Panel: 24.5-inch Full HD (1920x1080) IPS panel delivers stunning visuals with accurate colors and wide viewбурчтар.
- NVIDIA G-SYNC ылайыктуу: Eliminates screen tearing and reduces stuttering for a fluid gaming experience.

Расмий продукт Video:
2. Орнотуу
This section guides you through the initial setup of your HyperX Armada 25 Gaming Monitor, including assembly and connection to your computer.
2.1. Assembling the Desk Mount
The HyperX Armada 25 comes with an integrated ergonomic desk mount. Follow the instructions provided in the separate quick start guide for detailed assembly steps. The monitor head easily snaps into the arm, allowing for quick and secure installation.

2.2. Мониторду туташтыруу
Connect the monitor to your computer using the appropriate cables. The HyperX Armada 25 supports both HDMI and DisplayPort connections.
- HDMI же DisplayPort кабелинин бир учун компьютериңиздин графикалык картасындагы тиешелүү портко туташтырыңыз.
- Connect the other end of the cable to an available HDMI 2.0 or DisplayPort 1.4 port on the back of your monitor.
- Электр шнурун мониторго, андан кийин розеткага туташтырыңыз.
- Аны күйгүзүү үчүн монитордогу кубат баскычын басыңыз.

3. Мониторду иштетүү
This section covers basic operation and navigation of the monitor's On-Screen Display (OSD) menu.
3.1. Экрандагы дисплей (OSD) навигациясы
The OSD menu is controlled using a joystick located on the back of the monitor. This joystick allows you to power on/off the monitor and navigate through various settings.
- Джойстикти басыңыз: OSD менюсун ачуу же тандоону ырастоо үчүн.
- Move the joystick Up/Down/Left/Right: To navigate through menu options and adjust settings.
- Hold the joystick: To power off the monitor.

3.2. Монитордун абалын тууралоо
The ergonomic desk mount allows for flexible positioning of your monitor. You can adjust the height, tilt, swivel, and pivot to find your optimal viewбурч.

4. Техникалык тейлөө
Proper maintenance ensures the longevity and optimal performance of your HyperX Armada 25 Gaming Monitor.
- Экранды тазалоо: Жумшак, түксүз кездемени жеңил колдонуңуз dampened with water or a specialized screen cleaner. Avoid using harsh chemicals, abrasive materials, or direct spraying onto the screen.
- Тазалоо Casing: Мониторду сүртүңүз casing жумшак, кургак чүпүрөк менен.
- Вентиляция: Ашыкча ысып кетүүнүн алдын алуу үчүн монитордун желдетүү тешиктери жабылбагандыгын текшериңиз.
- Колдонулбаганда өчүрүү: Энергияны үнөмдөө жана анын иштөө мөөнөтүн узартуу үчүн мониторду узак убакытка колдонбогондо өчүрүңүз.
5. Кыйынчылыктарды
Мониторуңузда көйгөйлөргө туш болсоңуз, төмөнкү жалпы көйгөйлөрдү чечүү кадамдарын караңыз.
- Кубат жок:
- Электр кабели мониторго да, электр розеткасына да бекем туташтырылганын текшериңиз.
- Электр розеткасынын туура иштеп жатканын текшериңиз.
- Монитордогу кубат баскычын басыңыз.
- Сигнал жок:
- Verify that the HDMI or DisplayPort cable is securely connected to both the monitor and your computer.
- Компьютериңиз күйгүзүлүп, уйку режиминде эмес экенин текшериңиз.
- OSD менюсун колдонуп туура киргизүү булагын тандаңыз.
- Flickering Screen or Image Issues:
- Check the display cable for damage or loose connections.
- Графикалык картаңыздын драйверлери жаңыртылганын текшериңиз.
- Компьютериңиздин дисплей жөндөөлөрүнөн жаңыртуу жыштыгын тууралаңыз.
- If G-SYNC is enabled, try disabling it temporarily to see if the issue persists.
- Buttons Not Responding (OSD Joystick):
- Монитор күйгүзүлгөнүн текшериңиз.
- Try restarting the monitor by unplugging and replugging the power cable.
- Clean around the joystick to ensure no debris is obstructing its movement.
6. Техникалык шарттар
Detailed technical specifications for the HyperX Armada 25 Gaming Monitor.
| Өзгөчөлүк | Деталь |
|---|---|
| Продукциянын өлчөмдөрү | 21.94 x 25.79 x 31.12 дюйм; 16.98 фунт |
| Элемент моделинин номери | HyperX Armada 25 |
| Дата биринчи жеткиликтүү | 24-август, 2022-жыл |
| Өндүрүүчү | HP Inc. |
| ASIN | B0B2C1G356 |
| Дисплей өлчөмү | 24.5 дюймдук диагоналдык |
| Резолюция | FHD (1920x1080) |
| Жаңыртуу ылдамдыгы | 240Hz |
| Панел түрү | IPS панели |
| Жооп убактысы | 1ms |
| Синхрондоштуруу технологиясы | NVIDIA® G-SYNC® шайкеш |
| Included Mount | Desk Mount Included |
| Байланыш | HDMI and Display Port |
7. Кепилдик жана колдоо
For warranty information, technical support, or to access additional resources, please visit the official HyperX webсайтка же кардарларды тейлөөгө кайрылыңыз.
- Расмий HyperX Webсайт: www.hyperx.com
- Продукт колдоо барагы: Refer to the support section on the HyperX webСиздин конкреттүү моделиңиз үчүн сайт.