
1. Киришүү
This manual provides essential instructions for the installation, operation, and maintenance of your PowMr MPPT 60A Solar Charge Controller. This controller is designed to efficiently manage power flow from your solar panels to your battery bank, ensuring optimal charging and system protection. Please read this manual thoroughly before installation and use to ensure safe and correct operation.
Пакеттин мазмуну:
- 1 x PowMr MPPT 60A Solar Charge Controller
- 1 x Колдонуучунун колдонмосу (англисче)
2. Коопсуздук нускамалары
Always observe the following safety precautions to prevent personal injury and damage to the controller or other components:
- Электр кубатын колдонуудан мурун, бардык туташуулардын туура жана коопсуз экенин текшериңиз.
- The correct connection sequence for the solar controller is to connect the battery first, then the solar panel. Always adhere to this specific order. When disconnecting, follow the reverse order: disconnect solar panel, then battery.
- Контроллерди өз алдынча бөлбөңүз же оңдоого аракет кылбаңыз. Тейлөө үчүн квалификациялуу кызматкерлерге кайрылыңыз.
- Контроллерди күйүүчү материалдардан жана тике күндүн нурунан алыс, жакшы желдетилген жерге орнотуңуз.
- The solar charge controller is equipped with electronic protections against overcharge, over-discharge, overload, and short circuit. It also features battery temperature compensation, enhancing overall operational safety.
- Use appropriate circuit breakers or fuses for all connections to prevent damage from overcurrent.
3. Продукциянын өзгөчөлүктөрү
- Өркүндөтүлгөн MPPT технологиясы: The 60A MPPT solar charge controller features automatic battery voltage detection for 12V, 24V, 36V, and 48V systems. It utilizes advanced Maximum Power Point Tracking (MPPT) technology, ensuring a tracking efficiency of no less than 99.5% and a maximum conversion efficiency of up to 97%.
- Универсалдуу Батарея шайкештиги: Supports various battery types for charging, including sealed, gel, flooded, LiFePO4, and Li(NiCoMn)O2 cells. User-defined battery parameters are available for custom battery types.
- Комплекстүү коргоо: Equipped with electronic protections against overcharge, over-discharge, overload, and short circuit. Includes battery temperature compensation for enhanced safety and battery longevity.
- Multifunctional LCD Display: Provides real-time system information, including solar panel voltage/power, charging current, battery voltage, and load status.
- Натыйжалуу муздатуу: Features forced air cooling with an aluminum alloy construction for effective heat dissipation, maintaining optimal performance even under high temperatures.
- Dual PV and Battery Connection: Designed for straightforward connection of both photovoltaic arrays and battery banks.
- Multiple Load Working Modes: Offers various load control options, including Load OFF, Load always ON, and Time Control.
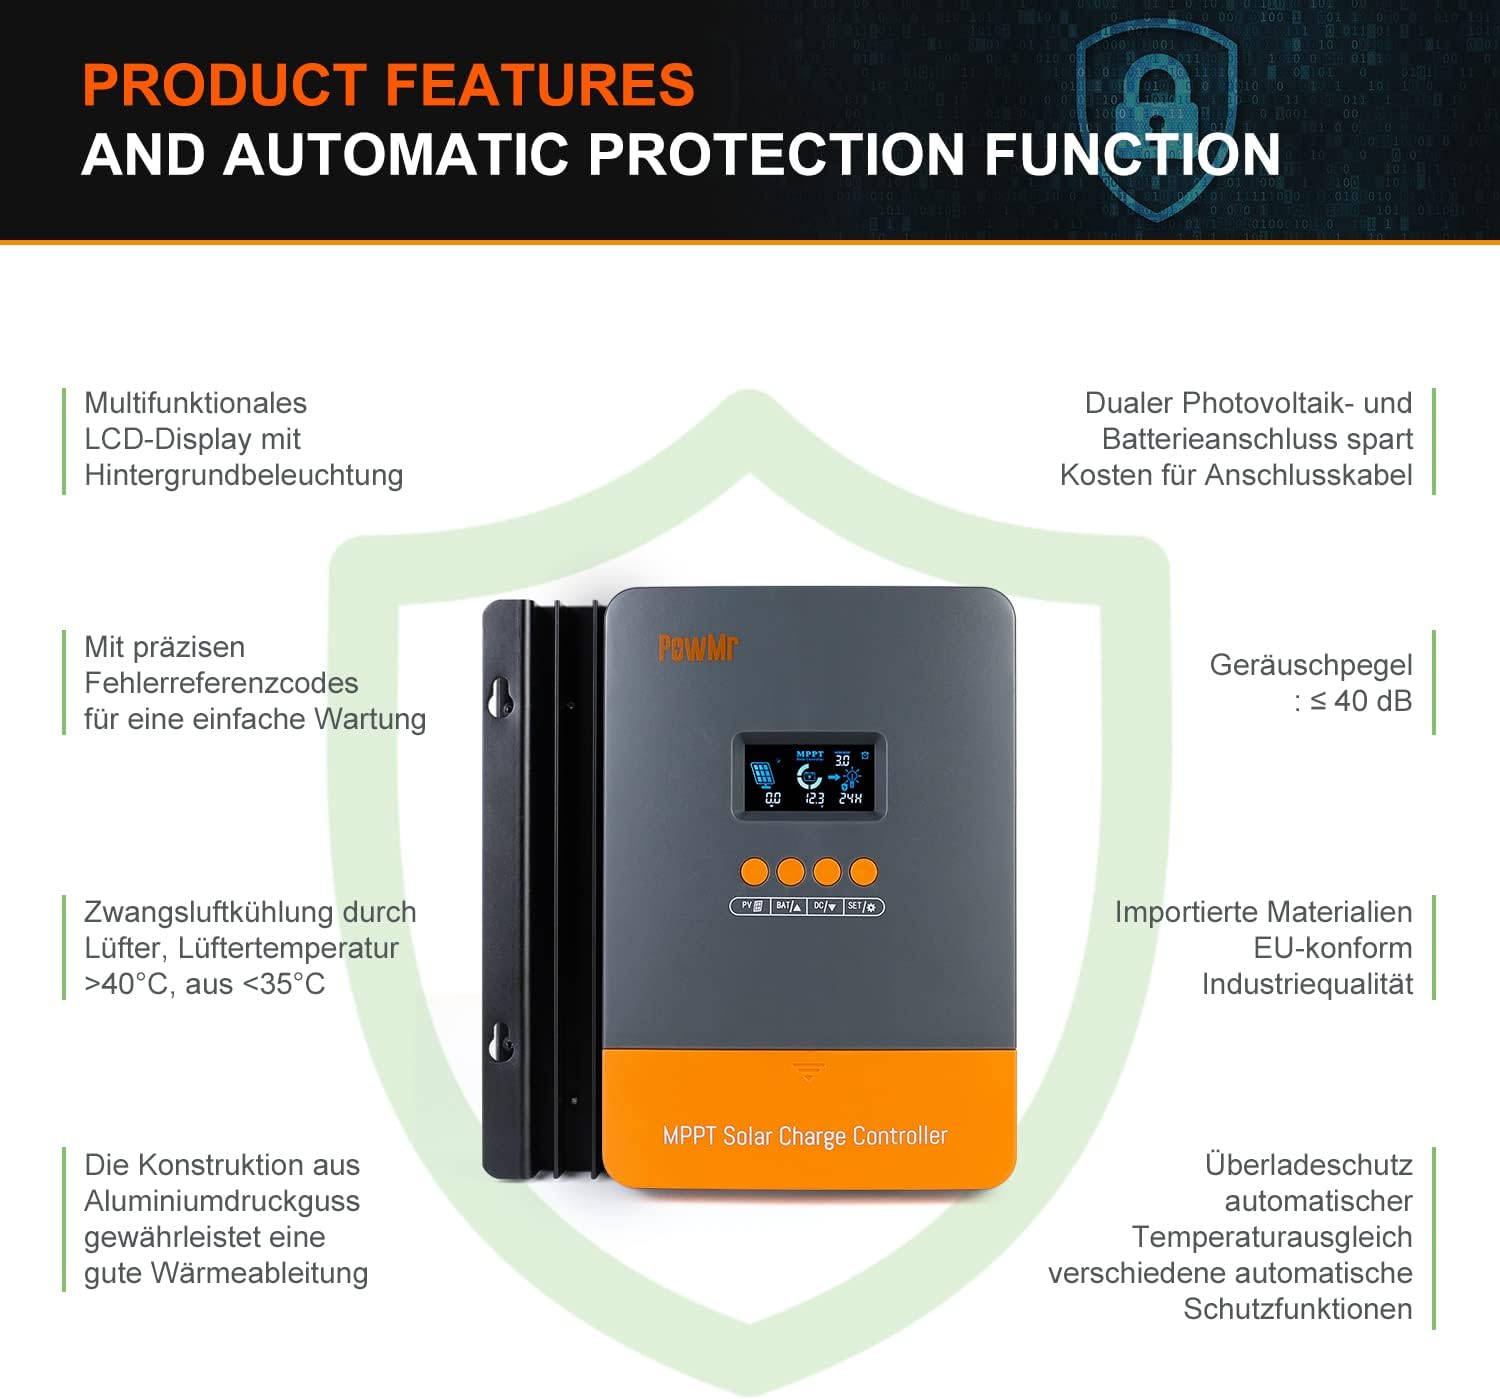
Image: Product features and automatic protection functions. Highlights include a multifunctional LCD display, dual PV and battery connection, precise error codes, forced air cooling, aluminum alloy construction for heat dissipation, and electronic protections.
4. Продукт бүтүп калдыview

Image: PowMr MPPT 60A Solar Charge Controller dimensions (165mm x 230mm x 72mm) and its LCD display interface. The display shows solar panel voltage/power, charging current, battery voltage, and load information. Key buttons for PV, Battery, DC Load, and Settings are also visible.
The controller features an intuitive LCD display and control buttons for easy monitoring and configuration. The display provides real-time data on solar input, battery status, and load output.
- Күндүз же түндү көрсөтүүчү сөлөкөт
- Battery icon and SOC (State of Charge)
- Иш режими
- State and Warning indication
- Күн панели тtage/power/current
- Charging power/charging current/battery voltage
- Load working Mode / Load power / Load current / Load voltage
5. Орнотуу жана орнотуу
5.1 Контроллерди орнотуу
- Кургак, жакшы желдетилген жерди тандаңыз, түз күн нурунан, жогорку температурадан жана суудан коргоңуз.
- Ensure there is sufficient airflow around the controller for proper cooling.
- Mount the controller vertically on a wall or suitable surface using appropriate fasteners.
5.2 Зымдарды туташтыруу
Маанилүү: Ар дайым алгач батареяны, андан кийин күн батареясын жана акырында жүктү туташтырыңыз. Тескери тартипте ажыратыңыз.
- Батареяны туташтыруу: Connect the positive and negative terminals of your battery bank to the corresponding battery terminals on the controller. Ensure correct polarity. The controller will automatically detect the battery voltage (12V/24V/36V/48V).
- Күн панелин туташтыруу: Connect the positive and negative terminals of your solar panel array to the corresponding PV input terminals on the controller. Ensure correct polarity. The maximum open circuit voltage (Voc) from the PV array should not exceed 160V.
- Connect the DC Load (Optional): If using a DC load directly from the controller, connect its positive and negative terminals to the load terminals on the controller.

Image: Diagram illustrating recommended wiring configurations for 12V, 24V, 36V, and 48V battery systems, including corresponding input solar power and voltage ranges. Also shows the three load working modes (Load OFF, Load always ON, Time control).
5.3 Батареянын түрүн тандоо
The controller supports various battery types. You can select the appropriate type through the controller's settings menu. For lithium batteries (LiFePO4, Li(NiCoMn)O2), it is essential to set the specific start and end charging voltages according to the battery manufacturer's specifications. Refer to the detailed instructions in the user manual for proper configuration.

Image: Illustration detailing the supported battery types (Sealed, GEL, Flooded, AGM, Lithium, User Custom Battery) and a graph depicting the four-stage battery charging process: Bulk Charge, Constant Charging (Boost/Equalize), and Float Charge.
6. Иштөө нускамалары
6.1 ЖК дисплей жана баскычтар
The LCD display provides real-time system status. Use the buttons (PV, BAT, DC, SET) to navigate through menus and adjust parameters. Refer to the detailed manual for specific button functions and menu navigation.
6.2 Заряддоо Сtages
The controller employs a multi-stagбатареянын иштөө мөөнөтүн жана иштешин оптималдаштыруу үчүн электрондук кубаттоо алгоритми:
- Жапырт акы: Charges the battery at maximum current until voltage rises to the absorption level.
- Constant Charging (Boost/Equalize): Туруктуу көлөмдү сактайтtage, allowing the current to gradually decrease. Equalization is a controlled overcharge for flooded batteries to balance cell voltages.
- Float акысы: Көлөмдү азайтатtage to a lower level once the battery is fully charged, maintaining it at a safe level to prevent self-discharge.
6.3 Жүктөөнүн иштөө режимдери
The DC load output can be configured with different working modes:
- Load OFF: The load output is always off.
- Load Always ON: The load output is continuously on.
- Убакытты көзөмөлдөө: The load output operates for a specified duration after sunset.
7. Техникалык тейлөө
Regular maintenance ensures optimal performance and longevity of your solar charge controller:
- Мезгил-мезгили менен бардык зымдарды туташтыргычтын бекемдигин жана коррозиясын текшерип туруңуз.
- Clean the controller's exterior with a dry cloth. Do not use liquids or solvents.
- Ensure the ventilation openings are clear of dust and debris to allow for proper heat dissipation.
- LCD дисплейди ката коддору же адаттан тыш көрсөткүчтөр үчүн көзөмөлдөңүз.
8. Кыйынчылыктарды
If you encounter issues, refer to the following common problems and solutions. For more complex issues, contact customer support.
| Көйгөй | Мүмкүн себеп | Чечим |
|---|---|---|
| Дисплей жок/Кубат жок | Батарея туташкан эмес же кубаты азtage; reversed polarity. | Батарея байланыштарын жана тtagд. Туура полярдуулукту камсыз кылыңыз. |
| Батарея заряддалбай жатат | Solar panel not connected; low solar input; PV reversed polarity; battery type misconfigured. | Check solar panel connections and polarity. Verify sufficient sunlight. Confirm correct battery type settings. |
| Жүк иштебейт | Load mode set to OFF; overload; short circuit; low battery voltage. | Check load mode settings. Reduce load. Inspect for short circuits. Charge battery. |
| Ката коду көрсөтүлдү | Атайын система катасы. | Ката коддорунун тизмеси жана алардын тиешелүү чечимдери үчүн толук колдонуучу колдонмосун караңыз. |
9. Техникалык шарттар
| Параметр | Нарк |
|---|---|
| Модель номери | POW-M60-PRO |
| Бренд | PowMr |
| Номиналдуу заряд ток | 60A |
| System Voltage | 12V/24V/36V/48V Auto-Identify |
| Макс. PV Input Voltage (Vc) | 160V DC |
| Max. Solar Panel Power (for 48V system) | 2880W (12V: 720W, 24V: 1440W, 36V: 2160W) |
| Tracking Efficiency | ≥99.5% |
| Конверсиянын эффективдүүлүгү | 97% чейин |
| Колдоого алынган батареянын түрлөрү | Sealed, Gel, Flooded, LiFePO4, Li(NiCoMn)O2, User-defined |
| Дисплей түрү | Арткы жарык менен LCD |
| Продукциянын өлчөмдөрү (L x W x Y) | 16.5 см х 7.1 см х 23.1 см |
| Продукт Салмагы | 1.3 кг |
| Иштөө температурасы | -20°C to +50°C (Max. 60°C ambient) |

Image: Universal compatibility of the PowMr 60A MPPT controller compared to other controllers. It highlights higher maximum input solar power and voltage for 12V, 24V, 36V, and 48V systems, supporting SLA, SLD, GEL, AGM, and LiFePO4 battery types.
10. Кепилдик жана колдоо
For warranty information, technical support, or any questions regarding your PowMr MPPT 60A Solar Charge Controller, please contact PowMr customer service. Refer to the product packaging or the official PowMr webбайланыш маалыматы үчүн сайт.