
Introduction
Thank you for choosing the LFF Atomic Clock. This device provides accurate time, date, indoor and outdoor temperature, and humidity readings. It features automatic time synchronization via the WWVB radio signal and a large, easy-to-read LCD display. Please read this manual thoroughly before use to ensure proper operation and to maximize the lifespan of your product.
Продукт өзгөчөлүктөрү
- Атомдук убакыт синхрондоштуруу: Automatically synchronizes with the WWVB radio signal from Fort Collins, Colorado, ensuring precise time and date.
- Чоң LCD дисплей: 15-inch display with 4.5-inch numbers for easy readability, suitable for various environments.
- Толук маалымат: Displays time (12/24H), calendar (month, date, day of week), alarm status, indoor temperature (°C/°F), indoor humidity, outdoor temperature (°C/°F), and outdoor humidity.
- Зымсыз тышкы сенсор: Transmits outdoor temperature and humidity data up to 328 feet (100 meters). The sensor has an IPX4 splash-proof rating.
- Бир нече убакыт алкагы: Supports 8 time zones: EST, CST, MST, PST, AKT, HST, AST, NST.
- Батарея менен иштейт: Main clock requires 4 AA batteries, and the outdoor sensor requires 2 AAA batteries (batteries not included).
- Ар тараптуу жайгаштыруу: Can be wall-mounted using three hanging holes or placed on a tabletop using the integrated stand.

Figure 1: ашыкview of LFF Atomic Clock features.
Пакеттин мазмуну
- 1 x LFF Atomic Clock (Model LWC100)
- 1 x Зымсыз сырткы сенсор
- 1 x Instruction Manual
Продукт бүттүview
Main Unit (Atomic Clock)

Figure 2: Rear panel of the LFF Atomic Clock.
- Батарея Case: Compartment for 4 AA batteries.
- SET баскычы: Enters setting mode for time, date, and other parameters.
- ALARM баскычы: Activates/deactivates the alarm and enters alarm setting mode.
- UP баскычы: Adjusts values upwards in setting mode.
- DOWN/RCC Button: Adjusts values downwards in setting mode. Press and hold to manually initiate WWVB signal reception.
- КАНАЛ баскычы: Switches between outdoor sensor channels (if multiple sensors are used).
- Hang Holes (x3): Дубалга орнотуу үчүн.
- Стол стенди: Үстөл үстүнө жайгаштыруу үчүн.
Зымсыз тышкы сенсор
The outdoor sensor is a compact unit designed to measure external temperature and humidity. It features a small LCD display for local readings and a battery compartment for 2 AAA batteries. The sensor is splash-proof (IPX4).
Жайгашуу
1. Батареяны орнотуу
Ensure you have 4 AA batteries for the main clock and 2 AAA batteries for the outdoor sensor (not included).
- Сырткы сенсор үчүн: Open the battery compartment cover on the back of the sensor. Insert 2 AAA batteries, observing the correct polarity (+/-). Close the cover securely.
- Негизги саат үчүн: Open the battery compartment cover on the back of the clock. Insert 4 AA batteries, observing the correct polarity (+/-). Close the cover securely.
Upon battery insertion, the clock will power on and perform an initial self-check. The display will illuminate, and it will begin searching for the WWVB atomic time signal.
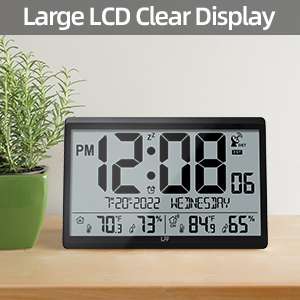
Figure 3: Battery requirements for the clock and sensor.
2. Atomic Time Synchronization (WWVB)
The clock will automatically attempt to receive the WWVB signal after battery installation. A signal tower icon will flash on the display, indicating it is searching. This process can take several minutes to several hours, depending on your location and environmental conditions. For best reception, place the clock near a window, away from electronic interference.
Once the signal is successfully received, the signal tower icon will become solid, and the clock will display the correct time and date for the default time zone (PST).

Figure 4: Atomic time synchronization via WWVB signal.
3. Manual Time Zone Setting
If the clock does not automatically set to your local time zone, or if you wish to change it:
- басып, кармап туруңуз SET Орнотуу режимине өтүү үчүн баскычын болжол менен 3 секунд басыңыз.
- The time zone will begin to flash. Use the UP or DOWN/RCC buttons to select your desired time zone (EST, CST, MST, PST, AKT, HST, AST, NST).
- Басыңыз SET ырастоо жана кийинки жөндөөлөргө өтүү үчүн кайра басыңыз.
4. Температура бирдигин тандоо (°C/°F)
To switch between Celsius and Fahrenheit for temperature display:
- баскычын кыскача басыңыз DOWN/RCC button while in normal display mode. The temperature unit will toggle between °C and °F.
5. Сырткы сенсорлорду жайгаштыруу
For accurate outdoor readings, place the wireless sensor in a sheltered location that is protected from direct sunlight and rain. The transmission range is up to 328 feet (100 meters) in open air. Avoid placing it near large metal objects or other electronic devices that could interfere with the signal.

Figure 5: Wireless transmission range and sensor placement.
Иштөө нускамалары
1. Маалыматты көрсөтүү
Чоң LCD дисплей төмөнкү маалыматтарды көрсөтөт:
- Жогорку сап: PM indicator, Time (hours:minutes), Zz (snooze icon), DST (Daylight Saving Time) indicator, Atomic signal icon, Time Zone.
- Орто сап: Date (month-day-year), Day of the week.
- Төмөнкү сап: Indoor temperature, Indoor humidity, Channel indicator, Outdoor temperature, Outdoor humidity.
2. Ойготкуч функциясы
Ойготкучту коюу үчүн:
- басып, кармап туруңуз АЛАРМ button for 3 seconds. The alarm hour will flash.
- колдонуу UP or DOWN/RCC саатты тууралоо үчүн баскычтар. Басыңыз АЛАРМ ырастоо үчүн.
- The alarm minute will flash. Use the UP or DOWN/RCC мүнөттү тууралоо үчүн баскычтар. Басыңыз АЛАРМ ырастоо жана сигнал орнотуудан чыгуу.
Ойготкучту иштетүү/өчүрүү үчүн:
- баскычын кыскача басыңыз АЛАРМ button. The alarm icon will appear or disappear on the display, indicating its status.
To use the snooze function:
- Ойготкуч чыкканда каалаган баскычты басыңыз (башка АЛАРМ) to activate snooze. The alarm will sound again after approximately 5 minutes.
- Ойготкучту толугу менен токтотуу үчүн басыңыз АЛАРМ баскычы.
3. Manual Time Setting (If WWVB Signal is Unavailable)
In areas where the WWVB signal cannot be received, you can manually set the time and date:
- басып, кармап туруңуз SET орнотуу режимине өтүү үчүн 3 секунд баскычын басыңыз.
- кайра-кайра басыңыз SET to cycle through the settings (Time Zone, DST ON/OFF, 12/24H format, Hour, Minute, Year, Month, Day, Temperature Unit).
- колдонуу UP or DOWN/RCC buttons to adjust the flashing value for each setting.
- Басыңыз SET to confirm each adjustment and move to the next.
- After setting the last parameter, press SET орнотуу режиминен чыгуу үчүн кайра.
Техникалык тейлөө
1. Батареяны алмаштыруу
When the battery indicator appears on the display, it is time to replace the batteries. Replace all batteries in the main clock and/or outdoor sensor simultaneously with new ones of the same type. Do not mix old and new batteries or different battery types.
For outdoor sensors in temperatures below -4°F, lithium batteries are recommended for optimal performance.
2. Тазалоо
Wipe the clock and sensor with a soft, dry cloth. Do not use abrasive cleaners or solvents, as they may damage the display or casing.
Проблемаларды чечүү
| Көйгөй | Мүмкүн себеп | Чечим |
|---|---|---|
| Clock not receiving WWVB signal. | Interference, distance from transmitter, weak signal. | Relocate the clock near a window, away from electronics. Manually initiate signal search by holding DOWN/RCC button. Allow several hours for synchronization. |
| Сырткы температура/нымдуулук көрсөтүлгөн эмес же так эмес. | Sensor out of range, low sensor batteries, interference, improper sensor placement. | Ensure sensor is within 100m (328ft) of the main unit. Replace sensor batteries. Relocate sensor away from direct sunlight/rain and metal objects. Press КАНАЛ button on main unit to re-establish connection. |
| Дисплей күңүрт же бош. | Low main unit batteries. | Replace all 4 AA batteries in the main clock. |
| Баштапкы орнотуудан кийин убакыт туура эмес. | Incorrect time zone set, temporary signal loss. | Verify time zone setting. Manually initiate WWVB signal search. If signal is consistently poor, manually set the time. |
Техникалык шарттар
| Өзгөчөлүк | Спецификация |
|---|---|
| Модель номери | LWC100 |
| Дисплей түрү | Санарип LCD |
| Clock Dimensions | 14.2" W x 9.4" H x 1.2" D |
| Негизги блоктун кубаттуулугу | 4 x AA батарейкалар (киргизилген эмес) |
| Сенсор күчү | 2 x AAA батарейкалар (киргизилген эмес) |
| Жабык температура диапазону | 14.1°F – 122.0°F (-9.9°C – 50.0°C) |
| Тышкы температура диапазону | -58.0°F – 158.0°F (-50.0°C – 70.0°C) |
| нымдуулук колому | 1% to 99% RH (Indoor & Outdoor) |
| Зымсыз берүү диапазону | Up to 328 feet (100 meters) in open area |
| Тышкы сенсордун сууга туруктуулугу | IPX4 (чачууга каршы) |
| Материал | Пластик |
| Монтаждоо параметрлери | Дубалга монтаждоо, стол |
Кепилдик жана колдоо
LFF products are designed for quality and reliability. If you encounter any quality problems with your LFF Atomic Clock, please contact our customer support team for assistance. Please refer to your purchase documentation for specific warranty terms and contact information.
For further support, visit the official LFF store on Amazon: LFF Store