1. Киришүү
This manual provides detailed instructions for the setup, operation, and maintenance of your Abovsare Digital Wall Clock. Please read this manual thoroughly before using the product to ensure proper function and longevity.
2. Продукт бүтүп калдыview
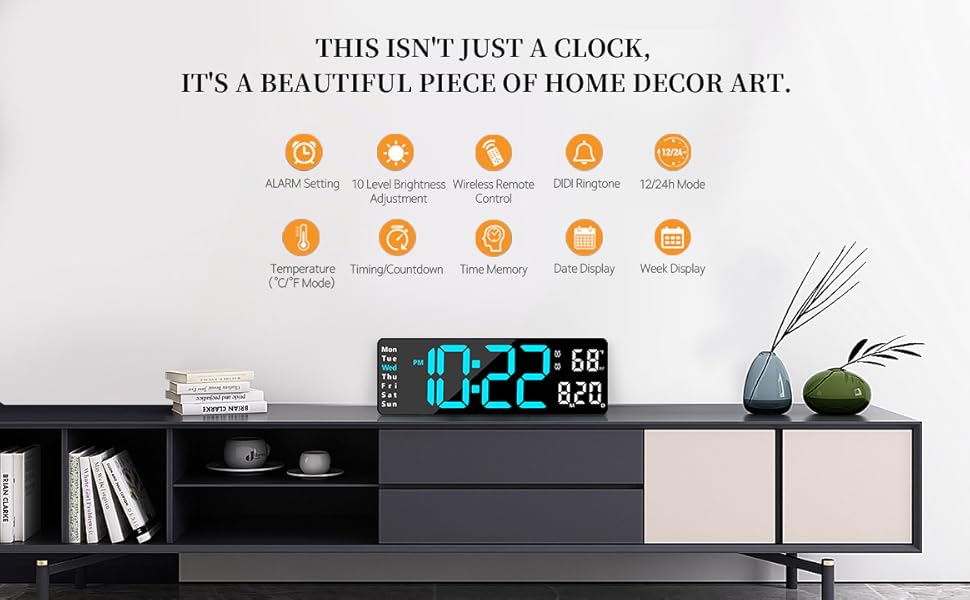
The Abovsare Digital Wall Clock features a 13-inch large LED display with high-contrast digits, making it easily readable from various distances and angles. It displays time, date, day of the week, and temperature. The clock includes a remote control for convenient adjustments and offers automatic brightness dimming. It is designed for both wall-mounted and desktop use.
Негизги өзгөчөлүктөрү:
- 13 дюймдук чоң LED дисплей: 3.5-inch high contrast jumbo digits for clear visibility.
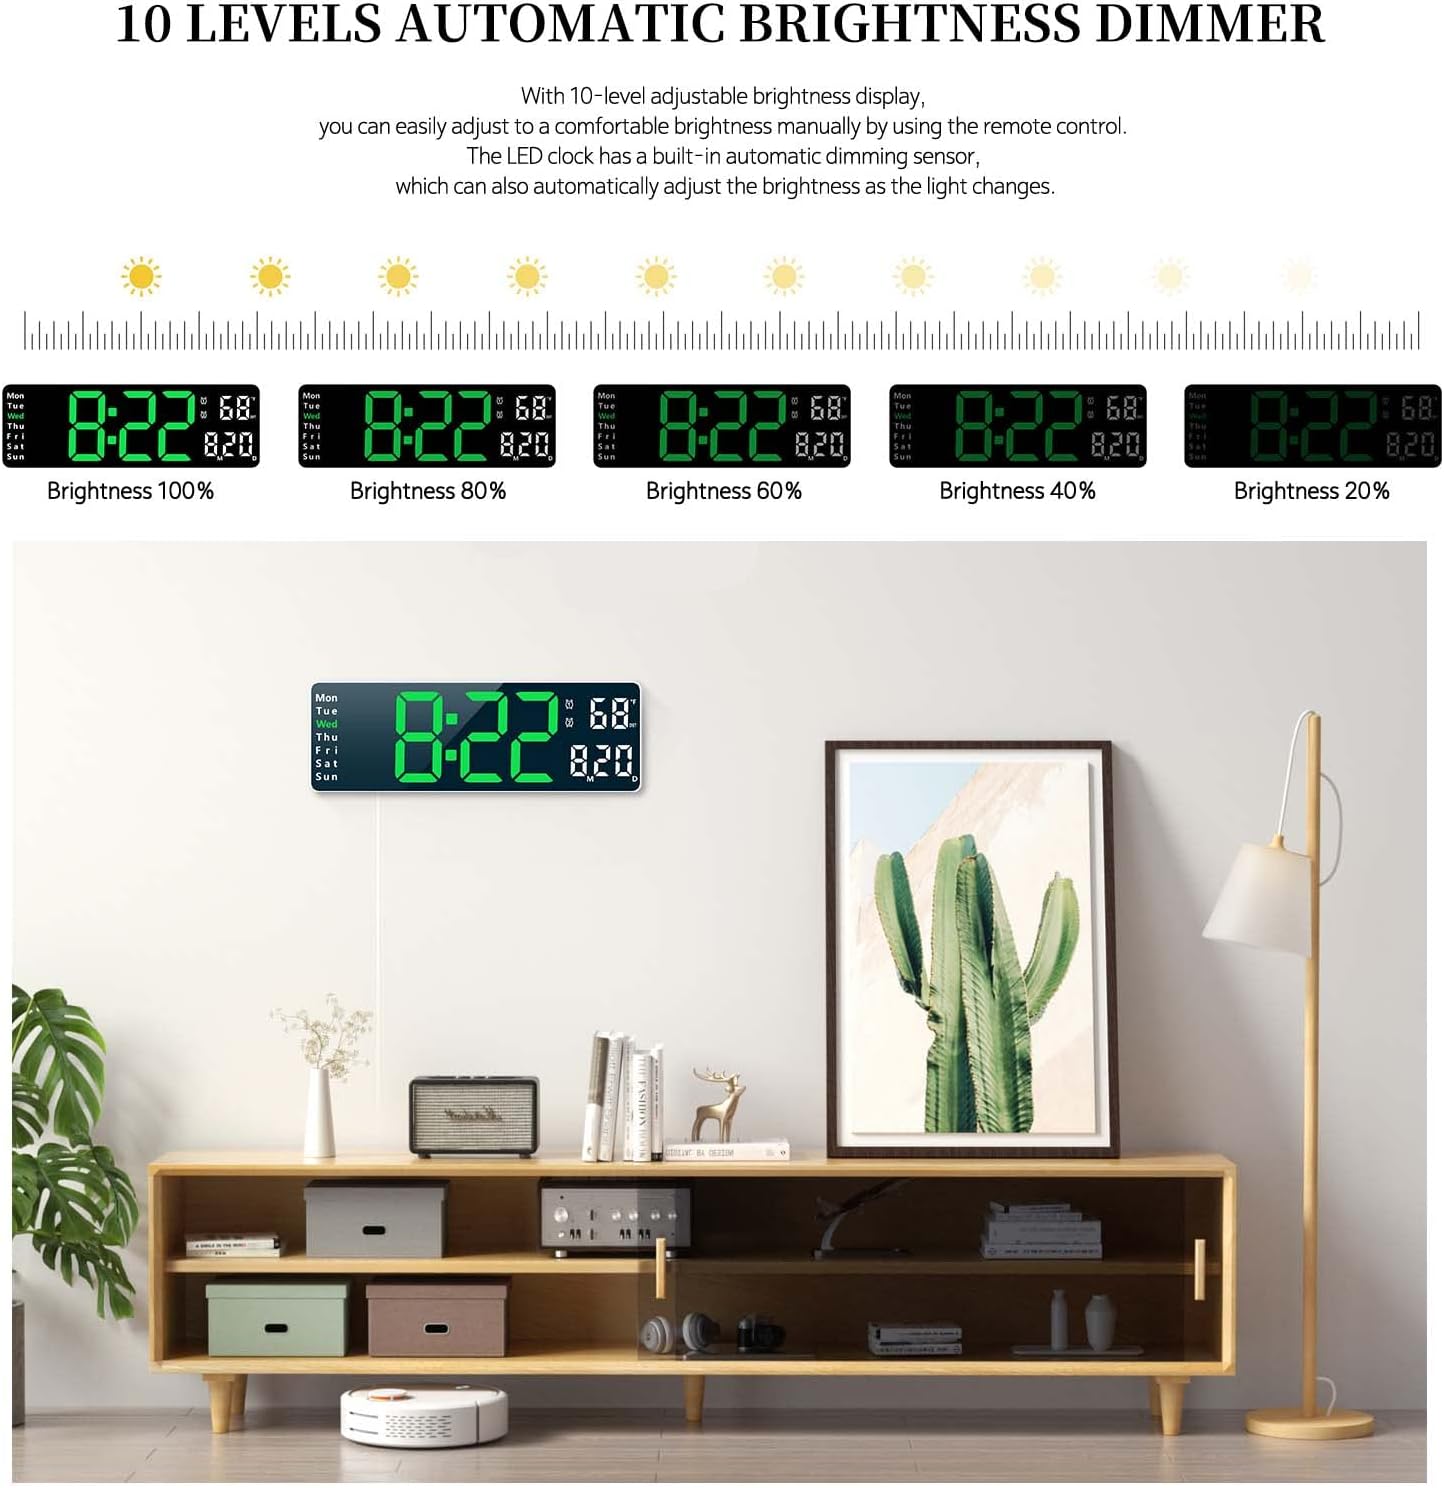
- 10 деңгээлдеги автоматтык жарыктыкты күңүрттөөчү: Adjustable brightness manually via remote or automatically based on ambient light.
- Ар тараптуу жайгаштыруу: Suitable for wall mounting or desktop placement.
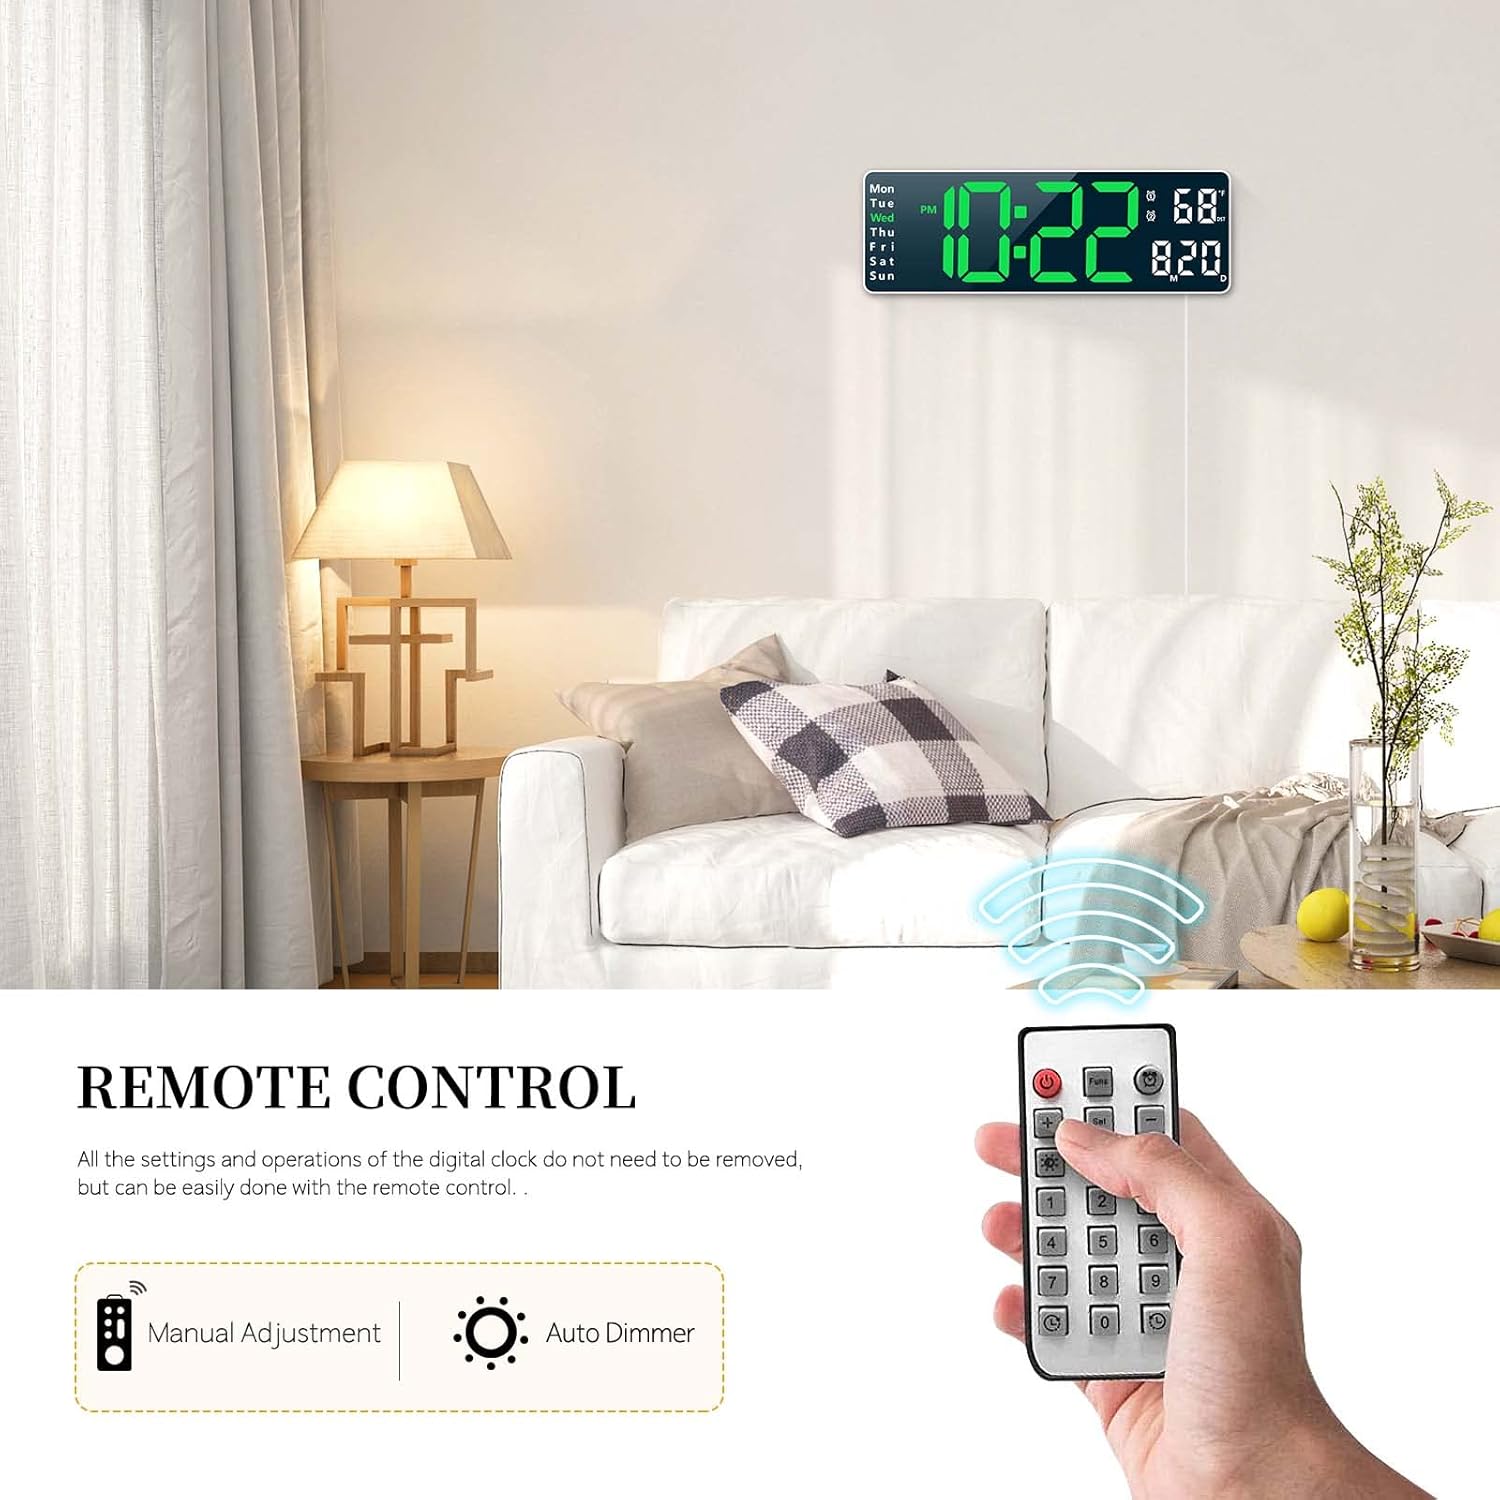
- Алыстан башкаруу: All settings and operations can be managed conveniently with the included remote.
- Эстутум функциясы: Built-in memory retains time data even if power is disconnected.
- Кош ойготкуч функциясы: Ар кандай графиктер үчүн эки башка ойготкучту коюңуз.
- Count-up/Count-down Timer: Supports timing up to 99 minutes and 99 seconds.
- Дисплейлер: Time (12/24H), Date, Week, and Temperature (°C/°F).

3. Пакеттин мазмуну
Сураныч, пакетте төмөнкү нерселерди текшериңиз:
- Abovsare Digital Wall Clock Unit
- Алыстан башкаруу
- USB Power Cable (Note: Power adapter not included, requires 5V/1A or 5V/2A adapter)
- User Manual
4. Орнотуу
4.1 Кубат туташтыруу
The clock requires continuous power to operate. Connect the provided USB cable to the clock and plug it into a 5V/1A or 5V/2A USB power adapter (not included) or a USB port. The clock is not battery operated for its main function.
4.2 Эстутум батареясын орнотуу
For the memory function to work during power outages, install 2 AAA batteries (not included) into the battery compartment located on the back of the clock. These batteries only store time data and do not power the main display.

5. Иштөө нускамалары
All settings and operations can be performed using the included remote control.
5.1 Убакытты жана датаны орнотуу
- Press the 'SET' button on the remote control.
- Use the arrow keys (Up/Down) to adjust the hour, then press 'SET' to confirm.
- Мүнөт, жыл, ай жана күн үчүн кайталаңыз.
- Орнотуу режиминен чыгуу үчүн кайрадан 'SET' баскычын басыңыз.
- To switch between 12-hour and 24-hour format, press the '12/24H' button on the remote.
5.2 Сигнал орнотуу
The clock supports two separate alarms.
- Press the 'ALARM' button on the remote control.
- Select Alarm 1 or Alarm 2 using the arrow keys.
- Adjust the alarm hour and minutes using the arrow keys, pressing 'SET' after each adjustment.
- To activate/deactivate an alarm, press the 'ON/OFF' button when the alarm is selected. An alarm icon will appear/disappear on the display.
- To snooze, press any button on the remote when the alarm sounds.
5.3 Жарыктыкты жөндөө
The clock offers 10 levels of brightness and an automatic dimming feature.
- Кол менен тууралоо: Press the 'BRIGHTNESS' button on the remote repeatedly to cycle through 10 brightness levels.
- Автоматтык караңгылатуу: The built-in sensor automatically adjusts display brightness according to ambient light conditions. This feature is enabled by default.
5.4 Timer Function (Count-up/Count-down)
The clock can function as a timer for up to 99 minutes and 99 seconds.
- Артка санауу: Press the 'TIMER' button, then use the number keys on the remote to input the desired time. Press 'START' to begin.
- Эсептөө: Press the 'TIMER' button, then press 'START' without inputting a time to begin counting up from zero.
- Press 'STOP' to pause and 'RESET' to clear the timer.

5.5 Алыстан башкарууну колдонуу
The remote control allows for easy adjustment of all clock functions from a distance. Ensure there is a clear line of sight between the remote and the clock's sensor.
6. Монтаждоо параметрлери
The Abovsare Digital Wall Clock can be placed on a desktop or mounted on a wall.
6.1 Иш столунда жайгаштыруу
Simply place the clock on any flat surface such as a desk, shelf, or nightstand. Ensure it is stable and not prone to falling.
6.2 Дубалга орнотуу
The clock features integrated keyholes on the back for easy wall mounting.
- Measure the distance between the keyholes on the back of the clock.
- Mark two corresponding spots on the wall where you wish to mount the clock.
- Install two screws (not included) into the wall at the marked spots, leaving a small portion of the screw head protruding.
- Align the keyholes on the back of the clock with the screw heads and slide the clock down to secure it.


7. Техникалык тейлөө
To ensure the longevity and optimal performance of your digital clock, follow these maintenance guidelines:
- Тазалоо: Дисплейди жана башкаларды сүртүү үчүн жумшак, кургак чүпүрөктү колдонуңуз.asing. Avoid abrasive cleaners or solvents that may damage the surface.
- Күч: Always use a 5V/1A or 5V/2A USB power adapter. Incorrect power sources may damage the device.
- Курчап турган чөйрө: Саатты түз күн нурунан, өтө жогорку нымдуулуктан жана өтө жогорку температурадан алыс кармаңыз.
- Батареяны алмаштыруу: Replace the AAA memory batteries annually or when the memory function appears to fail during power outages.
8. Кыйынчылыктарды
If you encounter any issues with your Abovsare Digital Wall Clock, please refer to the following common problems and solutions:
| Көйгөй | Мүмкүн себеп | Чечим |
|---|---|---|
| Сааттын дисплейи өчүк. | Электр менен камсыздоо жок же туташуу бузук. | Ensure the USB cable is securely connected and the power adapter is working. Use a 5V/1A or 5V/2A adapter. |
| Пульт иштебей жатат. | Batteries in remote are dead or incorrect orientation; obstacle between remote and clock. | Replace remote control batteries. Ensure clear line of sight to the clock's sensor. |
| Time/Date not saving after power off. | Memory batteries are dead or not installed. | Install 2 new AAA batteries in the memory battery compartment. |
| Дисплей өтө күңүрт же өтө жарык. | Brightness setting needs adjustment or automatic dimming sensor is obstructed. | Manually adjust brightness using the remote. Ensure the light sensor on the clock is not covered. |
9. Техникалык шарттар
| Өзгөчөлүк | Деталь |
|---|---|
| Бренд | Абовсаре |
| Model (Color) | White Case+green Digit |
| Дисплей түрү | Digital LED |
| Продукциянын өлчөмдөрү | 1.2"W x 4.1"H (Note: This seems to be a partial dimension, the display is 13-inch diagonal) |
| Power Source | Corded Electric (USB, 5V/1A or 5V/2A adapter required) |
| Эс тутумдун батареясы | 2 x AAA (киргизилген эмес) |
| Монтаж түрү | Стол же дубалга орнотулган |
| Материал | Акрилонитрил бутадиен стирол (ABS) |
| Өзгөчөлүктөр | Large LED display, automatic brightness dimmer, count-up or count-down function, memory function, remote control, dual alarm, date, week, temperature display. |
10. Кепилдик жана колдоо
For warranty information and customer support, please refer to the product packaging or contact Abovsare customer service through the retailer where the product was purchased. Keep your purchase receipt as proof of purchase.