
Alinco DJ-CRX-7
PNI Alinco DJ-CRX-7 VHF/UHF Portable Radio User Manual
Model: DJ-CRX-7
Introduction
This manual provides detailed instructions for the safe and efficient operation of your PNI Alinco DJ-CRX-7 VHF/UHF Portable Radio. Please read this manual thoroughly before using the device to ensure proper functionality and to prevent damage.
Кутуда эмне бар
Таңгактан чыгаргандан кийин, төмөнкү нерселердин бардыгы камтылганын текшериңиз:
- PNI Alinco DJ-CRX-7 Portable Radio Unit
- Антенна
- Li-Ion 1800 mAh 7.4V Battery
- Иш тактасынын кубаттагычы
- Дубал заряддагыч адаптер
- Билек боо
- User Manual
Сүрөт: All components included with the PNI Alinco DJ-CRX-7 portable radio.
Жайгашуу
1. Батареяны орнотуу
- Радио өчүрүлгөнүн текшериңиз.
- Align the Li-Ion battery pack with the battery compartment on the back of the radio.
- Батареяны бекем чыккыча ордуна жылдырыңыз.
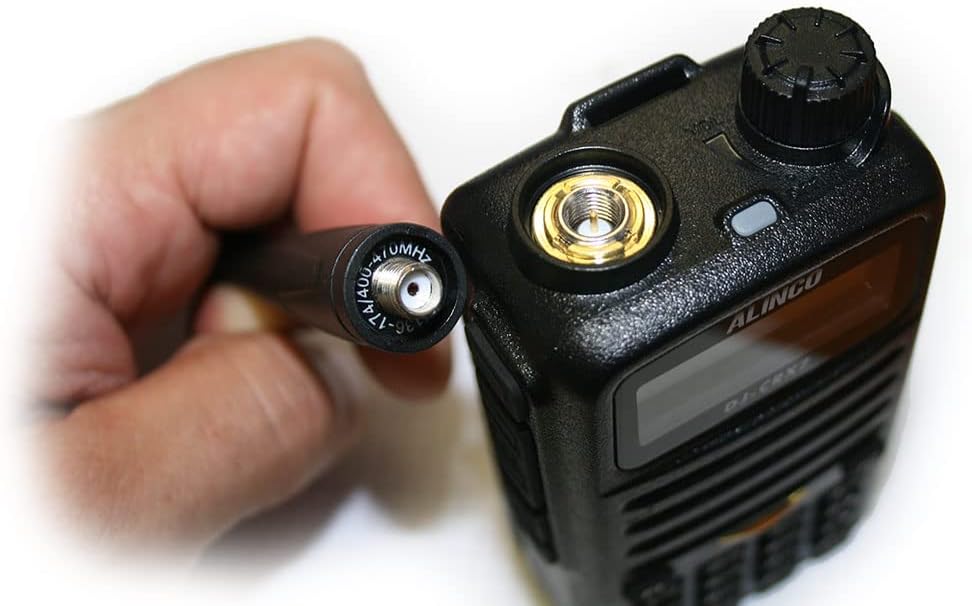
2. Антеннаны тиркөө
- Locate the SMA connector on the top of the radio.
- Screw the antenna clockwise onto the SMA connector until it is finger-tight. Do not overtighten.

Сүрөт: Proper connection of the antenna to the radio's SMA connector.
3. Батареяны заряддоо
- Connect the wall charger adapter to the desktop charger.
- Дубалдагы заряддагычты стандарттуу электр розеткасына сайыңыз.
- Place the radio (with battery installed) into the desktop charger. The charging indicator light will illuminate.
- Charge the battery fully before first use. A full charge typically takes several hours.
Иштөө нускамалары
1. Негизги башкаруу элементтери

Сүрөт: Фронт view of the PNI Alinco DJ-CRX-7 radio, showing the display and keypad.
- Күйгүзүү/өчүрүү: Rotate the top knob clockwise to power on and counter-clockwise to power off.
- Үндү көзөмөлдөө: Adjust the same top knob to increase or decrease the volume.
- Канал тандоо: Use the up/down arrow keys on the keypad or the rotary encoder (if present) to select channels. The radio supports 200 channels.
- Жыштык тилкелери: The radio operates on VHF (136-174 MHz) and UHF (400-470 MHz) bands.
- Жөнгө салынуучу кубаттуулук: The transmission power can be set to High, Medium, or Low (VHF: 5W/2W/1W; UHF: 4W/2W/1W). Refer to the menu for power adjustment.
2. Негизги өзгөчөлүктөрү
- FM радиосу: The device includes an FM radio function. Consult the manual for specific activation steps.
- Каналды сканерлөө: Activate channel scan to automatically search for active frequencies.
- Ачкыч кулпусу: Use the key lock feature to prevent accidental button presses.
- Шашылыш чалуу: The radio is equipped with an emergency call function. Refer to the manual for programming and activation.
- Voice (VOX): Voice-activated transmission allows hands-free operation.
- Time-out Timer (TOT): Prevents a channel from being occupied for too long by limiting transmission time.
- DTMF (Dual-Tone Multi-Frequency): For signaling and control functions.
- Scrambler: Encrypts voice transmissions for privacy.
- Compander: Improves audio quality by compressing and expanding the dynamic range of the voice signal.
- Тыюу: Eliminates background noise when no signal is received. Adjust the squelch level for optimal performance.
- Айланада сүйлөшүү: Allows direct communication between two radios on a repeater output frequency, bypassing the repeater.
- BCL (Бош эмес каналдардын кулпуланышы): Prevents transmission on an already occupied channel.
- CTCSS/DCS (Үзгүлтүксүз үн менен коддолгон басуу системасы / Санариптик коддолгон басуу): Sub-audible tones used to filter out unwanted communications and allow only specific groups to hear each other.
Техникалык тейлөө
1. Тазалоо
- Радионун бетин жумшак, гamp кездеме. Катуу химиялык заттарды же абразивдүү тазалагычтарды колдонбоңуз.
- Колдонуудан же кубаттоодон мурун радионун кургак экенин текшериңиз.
2. Батареяга кам көрүү
- Батареянын иштөө мөөнөтүн узартуу үчүн бат-баттан толук зарядсыздануудан качыңыз.
- Батареяны узак убакыт бою колдонбогон учурда салкын, кургак жерде сактаңыз.
- Батареяны экстремалдык температурага же түз күндүн нуруна калтырбаңыз.
Проблемаларды чечүү
Жалпы маселелер жана чечимдер
- Радио күйбөй жатат: Check if the battery is properly installed and charged. Ensure the power/volume knob is turned clockwise.
- Үн жок: Adjust the volume knob. Check the squelch level. Ensure the antenna is securely attached.
- Cannot transmit: Verify you are on an allowed frequency. Check if BCL (Busy Channel Lockout) is active. Ensure the battery has sufficient charge.
- Poor reception/transmission: Check antenna connection. Ensure you are within range. Adjust squelch level.
Бул жерде каралбаган туруктуу маселелерге туш болсоңуз, кардарларды колдоо кызматына кайрылыңыз.
Техникалык шарттар
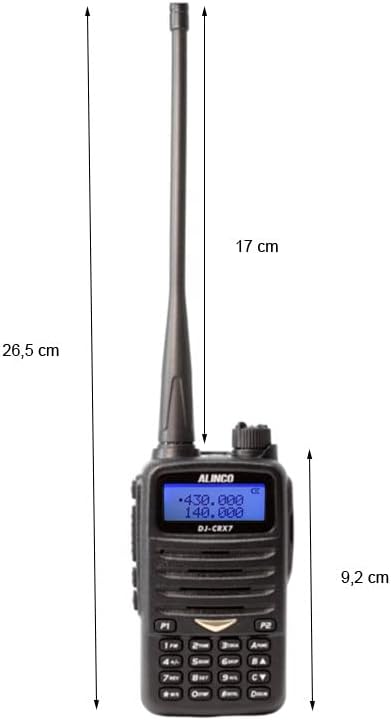
Сүрөт: Dimensions of the PNI Alinco DJ-CRX-7 portable radio.
| Өзгөчөлүк | Деталь |
|---|---|
| Модель номери | DJ-CRX-7 |
| Жыштык тилкелери | VHF (136-174 MHz), UHF (400-470 MHz) |
| Каналдар | 200 |
| Өткөрүү күчү | VHF: 5W/2W/1W, UHF: 4W/2W/1W |
| Батарея | Li-Ion 1800 mAh, 7.4V |
| Иштөө температурасы | -26°Cден +80°Cге чейин |
| Өлчөмдөрү (P x L x H) | 5.7 x 26.3 x 3.4 см (2.24 x 10.35 x 1.34 дюйм) |
| Салмагы (батарея менен) | 213 грамм (0.47 фунт) |
| Суу каршылык | IP67 rated (Dust tight and protected against temporary immersion up to 1m for 30 minutes). Note: While IP67 rated, the device is not designed for prolonged submersion. |
| Макс диапазон | 10 Miles (approximate, depends on terrain and conditions) |
| Шайкеш түзмөктөр | Other VHF/UHF radios (144-146 MHz / 430-440 MHz), standard headsets with 3.5/2.5 mm dual jack, external antennas with SMA connector. |
Кепилдик маалымат
The PNI Alinco DJ-CRX-7 portable radio comes with a 2 жылдык кепилдик from the date of purchase. This warranty covers manufacturing defects under normal use. It does not cover damage caused by misuse, accidents, unauthorized modifications, or natural disasters.
Кепилдик дооматтары үчүн сатып алганыңыздын далилин сактап коюңуз.
Колдоо
For technical assistance, troubleshooting beyond this manual, or warranty inquiries, please contact your retailer or the manufacturer's customer service department.
Always refer to the official Alinco website for the latest support information and software updates.
Ask a question about this manual
Ask about setup, troubleshooting, compatibility, parts, safety, or missing instructions. Manuals+ will review the question and use this page’s manual context to help answer it.