
1. Киришүү
This manual provides detailed instructions for the installation, operation, and maintenance of your XENOCAM A6504LME-5 4-Channel 5M-N/1080N Hybrid Digital Video Recorder (DVR). This DVR is a versatile 5-in-1 system compatible with AHD, TVI, CVI, analog, and IP cameras, offering advanced H.265 video compression for efficient surveillance. Please read this manual thoroughly before using the device to ensure proper setup and functionality.
2. Продукциянын өзгөчөлүктөрү
- 5-in-1 Hybrid Compatibility: Supports CVBS 5MP/4MP/1080P AHD, 1MP/2MP TVI, 1MP/2MP CVI, IP, and 960H cameras.
- Жогорку сапаттагы видео: Supports 5M-N/1080N resolution (1280x1920) for clear video capture.
- Advanced H.265 Compression: Provides smoother video recordings and optimizes hard drive storage space.
- Бир нече видео чыгаруулар: Equipped with HDMI and VGA ports, supporting up to 1080p output.
- P2P Remote Access: View live or playback video remotely via the XMeye app on Android and iOS devices by scanning a QR code.
- Кыймылды аныктоо жана эскертүүлөр: Configurable motion detection zones with instant email and app notifications.
- Flexible Recording Modes: Manual, alarm, motion detection, and scheduled recording options.
- Multiple Backup Options: Network, USB portable HDD, and USB DVD-RW.
3. Пакеттин мазмуну
Төмөндө тизмеленген нерселердин баары пакетиңизге камтылганын текшериңиз:
- 1 x XENOCAM 4-Channel 5MP-N Digital Video Recorder (HDD not included)
- 1 х кубат адаптери
- 1 х USB чычкан
- 1 x User Manual
- Mounting Screws for HDD (typically included)
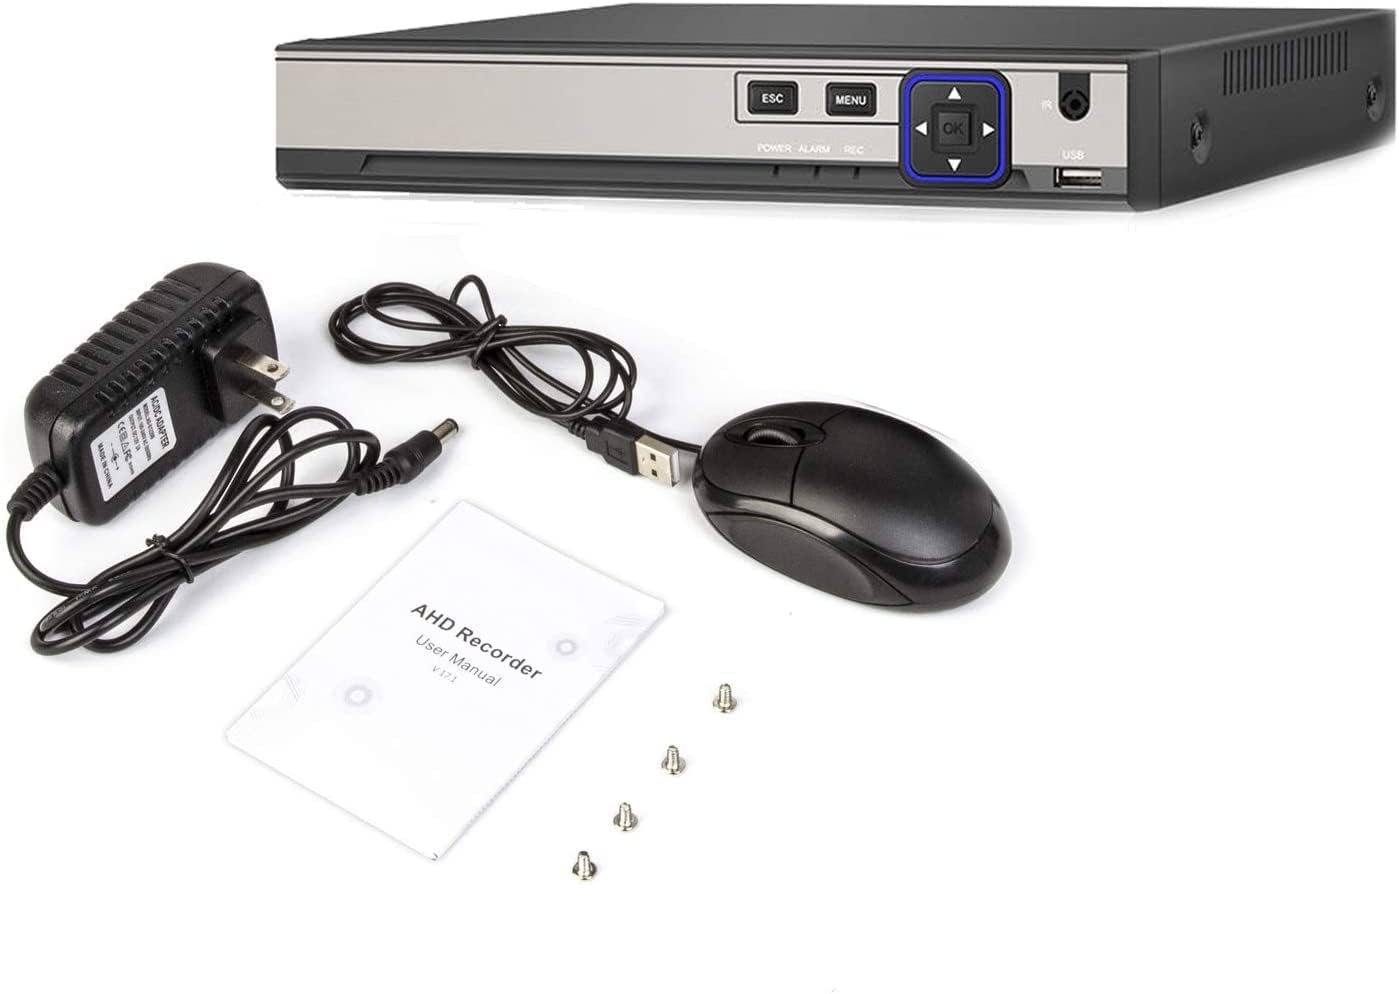
Image: The XENOCAM A6504LME-5 DVR unit shown with its power adapter, USB mouse, user manual, and mounting screws.
4. Орнотуу
4.1 Аппараттык камсыздоону орнотуу
- Install Hard Drive (HDD): DVR c ачыңызasing. Connect a SATA hard drive (up to 6TB, not included) to the internal SATA power and data cables. Secure the HDD using the provided screws.
- Камераларды туташтыруу: Connect your AHD, TVI, CVI, or analog cameras to the BNC video input ports on the rear panel. For IP cameras, ensure they are on the same network as the DVR.
- Дисплейди туташтыруу: Мониторду DVRнын HDMI же VGA чыгаруу портуна туташтырыңыз.
- Чычканды туташтыруу: USB чычканды DVRдеги USB порттордун бирине сайыңыз.
- Тармакка туташуу: For remote access and network features, connect an Ethernet cable from the DVR's RJ-45 port to your router or network switch.
- Туташуу кубаты: Plug the power adapter into the DVR's power input and then into an electrical outlet.

Сүрөт: алдыңкы жана арткы views of the XENOCAM A6504LME-5 DVR, showing control buttons, USB ports, BNC video inputs, HDMI/VGA outputs, and network port.
4.2 Баштапкы күйгүзүү жана конфигурация
- Power on the DVR. The system will boot up and display on the connected monitor.
- Upon first boot, you will be prompted to set a password for the default 'Admin' user. This is crucial for system security.
- Follow the on-screen wizard to configure basic settings such as date, time, network settings, and video output resolution.
- Format the installed hard drive through the system settings menu to ensure it is ready for recording.
5. Иштөө нускамалары
5.1 Меню Навигациясы
Use the connected USB mouse to navigate the DVR's graphical user interface (GUI). Right-click to access the main menu, and use the left-click to select options and confirm settings. The front panel buttons (ESC, MENU, OK, directional arrows) can also be used for navigation.
5.2 Жазуу режимдери
DVR ар кандай жазуу режимдерин колдойт:
- Кол менен жаздыруу: Жазууну кол менен баштоо жана токтотуу.
- Пландаштырылган жаздыруу: Үзгүлтүксүз жаздыруу үчүн белгилүү бир убакыттарды коюңуз.
- Кыймылды аныктоо жазуусу: Камерада кыймыл аныкталганда гана жаздырат view.
- Ойготкуч жаздыруу: Тышкы сигнал киргизүү ишке киргизилгенде жаздырат.
Configure these settings in the 'Record' section of the main menu.
5.3 Ойнотуу
Жазылган footage through the 'Playback' option in the main menu. You can search by date, time, and event type (e.g., motion detection). Use the on-screen controls to play, pause, fast forward, and rewind.
5.4 Камдык көчүрмөлөө процедуралары
Маанилүү файлдын камдык көчүрмөсүн сактоо үчүнtage:
- USB камдык көчүрмөсү: Connect a USB flash drive or external hard drive to a USB port. Select the desired footage in the 'Backup' menu and transfer it to the USB device.
- Тармактын камдык көчүрмөсү: Footage can be downloaded to a PC via the network using the CMS/VMS software.
- USB DVD-RW: Connect a compatible USB DVD-RW drive for burning footage to discs.
6. Алыстан кирүү (P2P)
6.1 Мобилдик тиркемени орнотуу
To access your DVR remotely, download the 'XMeye' app on your smartphone or tablet (Android/iOS).
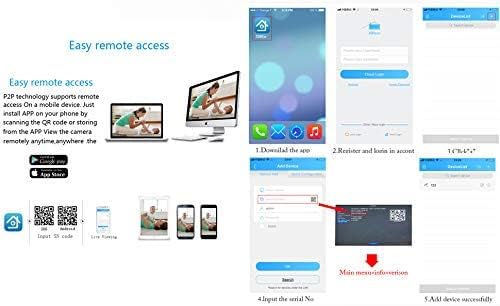
Image: Visual guide for downloading the XMeye app and the steps involved in registering an account and adding a device using a QR code.
6.2 Түзмөктү жупташтыруу
- DVR интернетке туташкандыгын текшериңиз.
- Open the XMeye app and register a new account or log in.
- Select 'Add Device' and choose the option to scan a QR code.
- Locate the unique QR code on your DVR (usually found in the network settings or device info menu) and scan it with the app.
- Follow the prompts to add the device. Once successfully added, you can view live feeds and playback recordings from your mobile device.
7. Кыймылды аныктоо жана эскертүүлөр
7.1 Кыймылды аныктоону конфигурациялоо
To set up motion detection:
- Navigate to the 'Alarm' or 'Motion Detection' settings in the main menu.
- Select the camera channel you wish to configure.
- Define the motion detection area by drawing a grid on the camera's view. You can customize sensitivity levels.
- Enable motion detection recording for the selected channel.

Image: Illustration showing how motion detection triggers recording, with a timestamp indicating the start of recording upon detecting movement.
7.2 Setting Up Alerts
Once motion detection is configured, you can set up alerts:
- Электрондук почта эскертүүлөрү: Enter your email address and SMTP server details in the network settings to receive email notifications with snapshots when motion is detected.
- Колдонмонун Push эскертмелери: Ensure push notifications are enabled for the XMeye app on your mobile device to receive instant alerts.
8. Техникалык тейлөө
- үзгүлтүксүз тазалоо: Keep the DVR free from dust. Use a soft, dry cloth to clean the exterior. Do not use liquid cleaners.
- Программалык камсыздоонун жаңыртуулары: Мезгил-мезгили менен өндүрүүчүнүн текшерүү website for firmware updates to ensure optimal performance and security. Follow update instructions carefully.
- Катуу дисктин ден соолугу: Monitor the health of your hard drive through the DVR's system information. Replace the HDD if signs of failure appear.
- Сырсөз коопсуздугу: Regularly change your DVR's password and use strong, unique combinations to prevent unauthorized access.
9. Кыйынчылыктарды
| Маселе | Мүмкүн себеп | Чечим |
|---|---|---|
| Монитордо дисплей жок | Loose cable connection, incorrect video output settings, monitor issue. | Check HDMI/VGA cable connections. Ensure monitor is powered on and set to correct input. Try a different monitor or cable. |
| Жаздыруу жок | No HDD installed, HDD not formatted, recording schedule not set, motion detection not configured. | Install and format an HDD. Check recording schedules and motion detection settings. |
| Алыстан кирүү мүмкүн эмес | DVR тармакка туташкан эмес, тармак жөндөөлөрү туура эмес, колдонмо туура эмес конфигурацияланган. | Ensure Ethernet cable is connected. Verify network settings (DHCP/Static IP). Re-add device in XMeye app. Check router firewall settings. |
| Паролду унутуп калдыңыз | Сырсөз жоголду. | Contact XENOCAM support for password reset procedures. Do not attempt unauthorized resets. |
| IP Camera not detected | IP camera not ONVIF compatible, incorrect network settings, camera not powered. | Ensure IP camera is ONVIF compliant. Verify camera and DVR are on the same network segment. Check camera power. |
10. Техникалык шарттар
| Өзгөчөлүк | Деталь |
|---|---|
| Модель номери | A6504LME-5 |
| Видео киргизүү | 4-channel BNC input |
| Video Output | HDMI, VGA (up to 1080p) |
| Аудио киргизүү/чыгаруу | 1-channel RCA input / 1-channel RCA output |
| Видеону кысуу | H.265 |
| Preview Резолюция | 4x5M-N@12fps (6-in-1); 4x4M-N@15fps (6-in-1); 8x1080p (6-in-1) |
| Resolution Recording | 4x5M-N@8fps (6-in-1); 4x4M-N@8fps (6-in-1); 8x1080p@15fps (6-in-1) |
| Ойнотуу чечими | 2x5M-N@8fps (6-in-1); 4x4M-N@8fps (6-in-1); 4x1080p@15fps (6-in-1) |
| HDD интерфейси | 1 SATA port (supports up to 6TB HDD) |
| Тармак интерфейси | 1 x RJ-45 10M/100Mbps Ethernet port |
| USB интерфейси | 2 x USB 2.0 порттору |
| DVR Input Modes | DVR Mode: 4x5M-N; 4x1080p Hybrid Mode: 2ch 1080p AHD + 2ch 1080p IP NVR Mode: 8x1080p; 4x5M |
| Шайкеш түзмөктөр | Smartphone, Tablet (for remote viewing) |
| PC программалык камсыздоо | CMS, VMS |
| IP Camera Compatibility | ONVIF only |

Image: Diagram illustrating the efficiency of H.265 compression compared to normal compression, showing clearer image quality with less bandwidth usage.
11. Кепилдик маалыматы
Warranty terms and conditions for the XENOCAM A6504LME-5 DVR are subject to the policies of the retailer and manufacturer at the time of purchase. Please refer to your purchase documentation or contact your seller for specific warranty details. Keep your proof of purchase for any warranty claims.
12. Колдоо
For technical assistance, troubleshooting beyond this manual, or inquiries regarding your XENOCAM A6504LME-5 DVR, please contact the seller or manufacturer directly. Refer to the contact information provided with your product packaging or on the official XENOCAM webсайт.