
1. Киришүү
This manual provides detailed instructions for the installation, operation, and maintenance of your Amio TFT01 4.3" Parking Sensor System with HD-501-IR 4 Sensors. Please read this manual thoroughly before installation and use to ensure proper function and safety. This system is designed to assist drivers in parking by detecting obstacles behind the vehicle and providing visual and audible alerts.
2. Коопсуздук маалыматы
- Кесиптик орнотуу сунушталат: Installation of this system may require electrical and mechanical knowledge. If you are unsure, seek professional assistance.
- Электр энергиясын өчүрүү: Кыска туташууларды жана электр тогуна урунууну болтурбоо үчүн ар кандай электр иштерин жасоодон мурун унаанын аккумуляторун дайыма сууруп алыңыз.
- Зымдар: Ensure all wiring is properly insulated and secured to prevent damage from vibration, heat, or moisture. Avoid routing cables near moving parts or sharp edges.
- Бургулоо: When drilling holes in the bumper, ensure there are no existing wires, fuel lines, or other critical components behind the drilling area.
- Унаа токтотуучу жардам: This system is a parking aid and should not be solely relied upon. Always check your surroundings visually before and during parking maneuvers.
- Экологиялык шарттар: Extreme weather conditions (heavy rain, snow, ice) or certain types of surfaces (e.g., very soft materials) may affect sensor performance.
3. Пакеттин мазмуну
Сураныч, орнотууну баштоодон мурун бардык компоненттер бар экендигин текшериңиз:
- 4 x Parking Sensors with Cables
- 1 x Main Control Unit
- 1 x 4.3" TFT Display Monitor
- 1 x Power Cable for Control Unit
- 1 x Hole Saw for Sensor Installation
- Mounting Accessories (screws, adhesive pads, etc.)
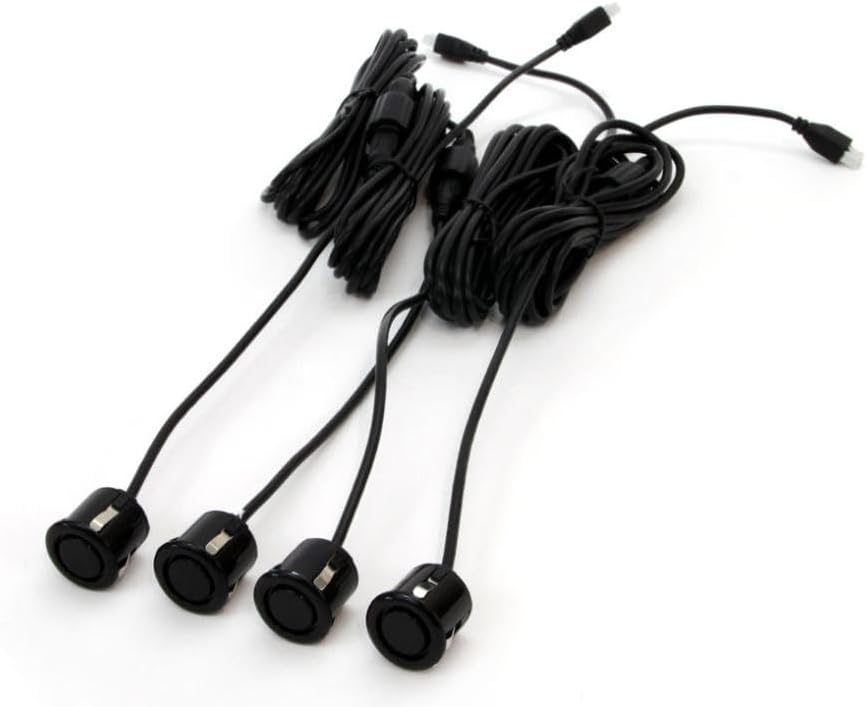
Сүрөт 3.1: Four black parking sensors with wiring harnesses. This image shows the four ultrasonic parking sensors, each connected to a wiring harness, ready for installation. The cables are neatly bundled.

Сүрөт 3.2: Close-up of a single black parking sensor with its cable. A detailed view of one black parking sensor, highlighting its compact design and the attached cable for connection to the control unit.
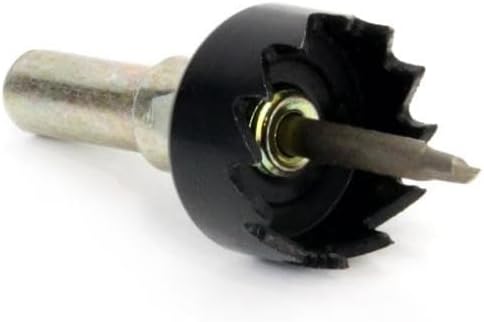
Сүрөт 3.3: Black hole saw with a pilot drill bit. This image displays the included hole saw, designed for creating the precise diameter holes required for mounting the parking sensors into the vehicle's bumper.
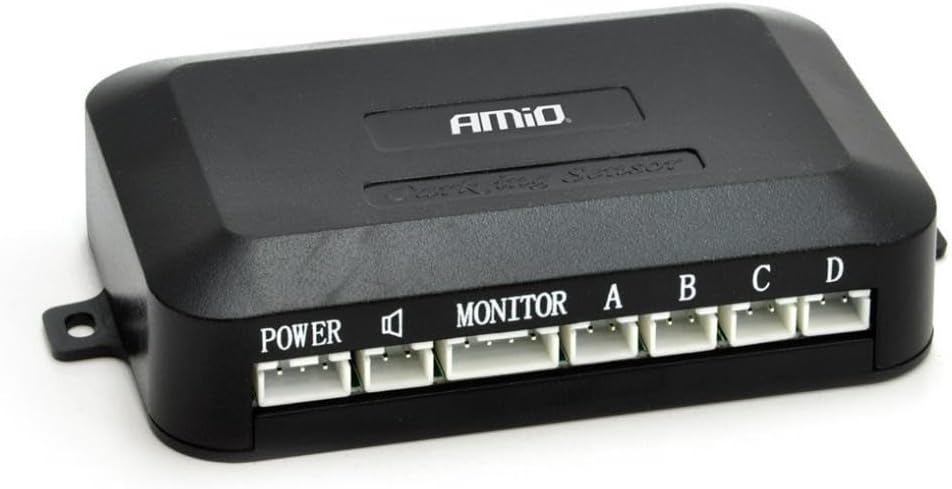
Сүрөт 3.4: Black control unit for the parking sensor system with labeled ports. The central control unit, featuring ports labeled 'POWER', 'MONITOR', and 'A', 'B', 'C', 'D' for connecting the sensors and display. It processes sensor data and manages alerts.

Сүрөт 3.5: 4.3-inch TFT display monitor for parking assist. The 4.3-inch TFT display monitor, shown in an open position, which provides visual feedback on obstacle distance and direction. It includes RCA input cables (yellow, white, red).

Сүрөт 3.6: 4.3-inch TFT display monitor in a closed, compact state. The 4.3-inch TFT display monitor in its folded, compact state, suitable for discreet placement on the dashboard when not in use.
4. Орнотуу жана орнотуу
Туура орнотуу үчүн бул кадамдарды кылдаттык менен аткарыңыз:
4.1 Сенсорду орнотуу
- Choose Sensor Locations: Determine the optimal positions for the four sensors on your vehicle's rear bumper. Ensure they are evenly spaced and at a consistent height, typically between 50-70 cm from the ground. Avoid placing them too close to the exhaust pipe or other heat sources.
- Бургулоо тешиктери: Use the provided hole saw (Image 3.3) to drill the sensor mounting holes. Apply masking tape to the bumper surface before drilling to prevent paint damage. Drill slowly and carefully.
- Mount Sensors: Insert each sensor into its respective hole. Ensure the sensor is flush with the bumper surface and oriented correctly (if applicable, check for an 'UP' marking). Secure them firmly.
- Маршруттук кабелдер: Carefully route the sensor cables through the bumper and into the vehicle's interior, typically through an existing grommet or a newly drilled, sealed hole. Ensure cables are protected from sharp edges and heat.
4.2 Башкаруу блогун орнотуу
- Монтаждоо бирдиги: Find a secure, dry location inside the vehicle (e.g., in the trunk or under the dashboard) for the main control unit (Image 3.4). Use screws or adhesive pads to fix it in place.
- Сенсорлорду туташтыруу: Connect each sensor cable to the corresponding port (A, B, C, D) on the control unit. Ensure a firm connection.
- Кубат туташуу: Connect the control unit's power cable to the vehicle's reverse light circuit. This ensures the system activates automatically when reverse gear is engaged. Connect the red wire to the positive (+) lead of the reverse light and the black wire to a good chassis ground (-).
4.3 Display Monitor Installation
- Дисплейди орнотуу: Choose a suitable location on your dashboard or rearview mirror for the 4.3" TFT display monitor (Image 3.5, 3.6). Ensure it does not obstruct your view and is easily visible. Use the provided adhesive pad or mounting bracket.
- Дисплейди туташтыруу: Connect the display monitor's video input cable (typically yellow RCA) to the 'MONITOR' output on the main control unit. Connect the display's power cable to a 12V accessory power source that turns on with the ignition, or directly to the control unit's power output if available.
5. Иштөө нускамалары
Once installed, the parking sensor system operates automatically:
- Системаны активдештирүү: The system will automatically activate when you shift your vehicle into reverse gear. The display monitor will power on, and the sensors will begin detecting obstacles.
- Тоскоолдуктарды аныктоо: As you reverse, the sensors will detect objects behind your vehicle. The detection range typically varies from 0.3 meters to 2.5 meters.
- Визуалдык эскертүүлөр: The 4.3" TFT display will show the distance to the nearest obstacle, often with graphical indicators (e.g., colored bars or segments) representing the proximity and direction of the object.
- Укулган эскертүүлөр: The system will emit audible beeps. The frequency of the beeps will increase as you get closer to an obstacle. A continuous tone usually indicates a very close proximity (e.g., less than 0.3 meters).
- Interpreting Display: Pay attention to both the visual distance readings and the audible tones. The display may also indicate which specific sensor (A, B, C, D) is detecting the obstacle.
6. Техникалык тейлөө
To ensure optimal performance and longevity of your parking sensor system, follow these simple maintenance guidelines:
- Clean Sensors Regularly: Keep the sensor surfaces clean from dirt, mud, snow, ice, and other debris. Use a soft cloth and mild cleaning solution. Do not use abrasive cleaners or high-pressure water jets directly on the sensors.
- Зымдарды текшерүү: Periodically inspect all visible wiring for any signs of wear, fraying, or damage. Ensure all connections are secure.
- Монитор дисплей: Ensure the display monitor is clean and free from obstructions.
- Катуу химиялык заттардан алыс болуңуз: Do not expose the control unit or display to harsh chemicals or extreme temperatures.
7. Кыйынчылыктарды
If you encounter issues with your parking sensor system, refer to the following troubleshooting guide:
- No Power to Display/Control Unit:
- Check the power connection to the control unit and display. Ensure the reverse light is functioning.
- Verify that the vehicle's battery is charged.
- Check for any blown fuses in the vehicle's electrical system related to the reverse lights or accessory power.
- Inaccurate or Constant Beeping:
- Ensure sensors are clean and free from dirt, ice, or water droplets.
- Check if any object (e.g., a tow hitch, bicycle rack) is within the sensor's detection range.
- Verify that sensors are securely mounted and facing straight outwards, not angled towards the ground or sky.
- Inspect sensor cables for damage or loose connections to the control unit.
- Үндүү эскертүү жок:
- Ensure the speaker on the control unit or display is not obstructed.
- Check the connection between the display and the control unit.
- Display Not Showing Image:
- Verify the video cable (RCA) connection between the control unit and the display.
- Ensure the display is receiving power.
If the problem persists after following these steps, contact customer support or a qualified technician.
8. Техникалык шарттар
- Модел: TFT01 4.3" HD-501-IR
- Бөлүмдүн номери: AMI-02670
- Өндүрүүчү: Amio
- Дисплей өлчөмү: 4.3 дюйм
- Сенсордун саны: 4
- Product Dimensions (Control Unit): Approximately 1 x 150 x 10 cm (This dimension seems to be for the entire package or a component, not just the control unit. Please refer to actual product for precise control unit dimensions.)
- Элемент Салмагы: 300 grams (Total package weight)
- Электр камсыздоо: 12V DC (Vehicle electrical system)
- аныктоо диапазону: Typically 0.3m - 2.5m (may vary)
- Иштөө температурасы: -20°C to +70°C (Approximate, typical for automotive electronics)
9. Кепилдик жана колдоо
This Amio product is designed for durability and reliable performance. For information regarding warranty coverage, please refer to the warranty card included with your purchase or contact your retailer. For technical support or assistance with installation and troubleshooting, please reach out to Amio customer service through their official webсайт же продукт документациясында берилген байланыш маалыматы.