
1. Киришүү
This user manual provides comprehensive instructions for the DORHEA ESP32 Development Board, featuring the CP2102 chip and a 38-pin narrow design. This board integrates WiFi and Bluetooth capabilities, making it suitable for a wide range of Internet of Things (IoT) and embedded system projects. Please read this manual thoroughly before using the device to ensure proper setup and operation.
2. Продукт бүтүп калдыview
The DORHEA ESP32 Development Board is designed for ease of use and integration into various projects. Its narrow form factor allows for convenient placement on breadboards and within compact enclosures. The board is powered by a dual-core Tensilica LX6 processor, offering robust performance for complex applications.
Негизги өзгөчөлүктөрү:
- Компакт дизайн: Narrow 38-pin layout, compatible with standard breadboards.
- Интегралдык байланыш: Supports 802.11bgn Wi-Fi and Bluetooth (Classic and LE).
- Күчтүү процессор: Dual Tensilica LX6 cores, clocked up to 240 MHz.
- Эстутум: 512 KB SRAM for efficient program execution.
- USB интерфейси: Type-C port for power and data communication via the CP2102 USB-to-UART bridge.
- Ийкемдүү программалоо: Supports Lua programming and FreeRTOS operating system.
- Иштөө режимдери: Functions in AP (Access Point), STA (Station), and AP+STA modes.
- Колдонуучунун көзөмөлү: Equipped with Reset and Boot buttons for easy firmware flashing.
Компоненттин идентификациясы:
Refer to the images below for a visual guide to the development board's components and pinout.
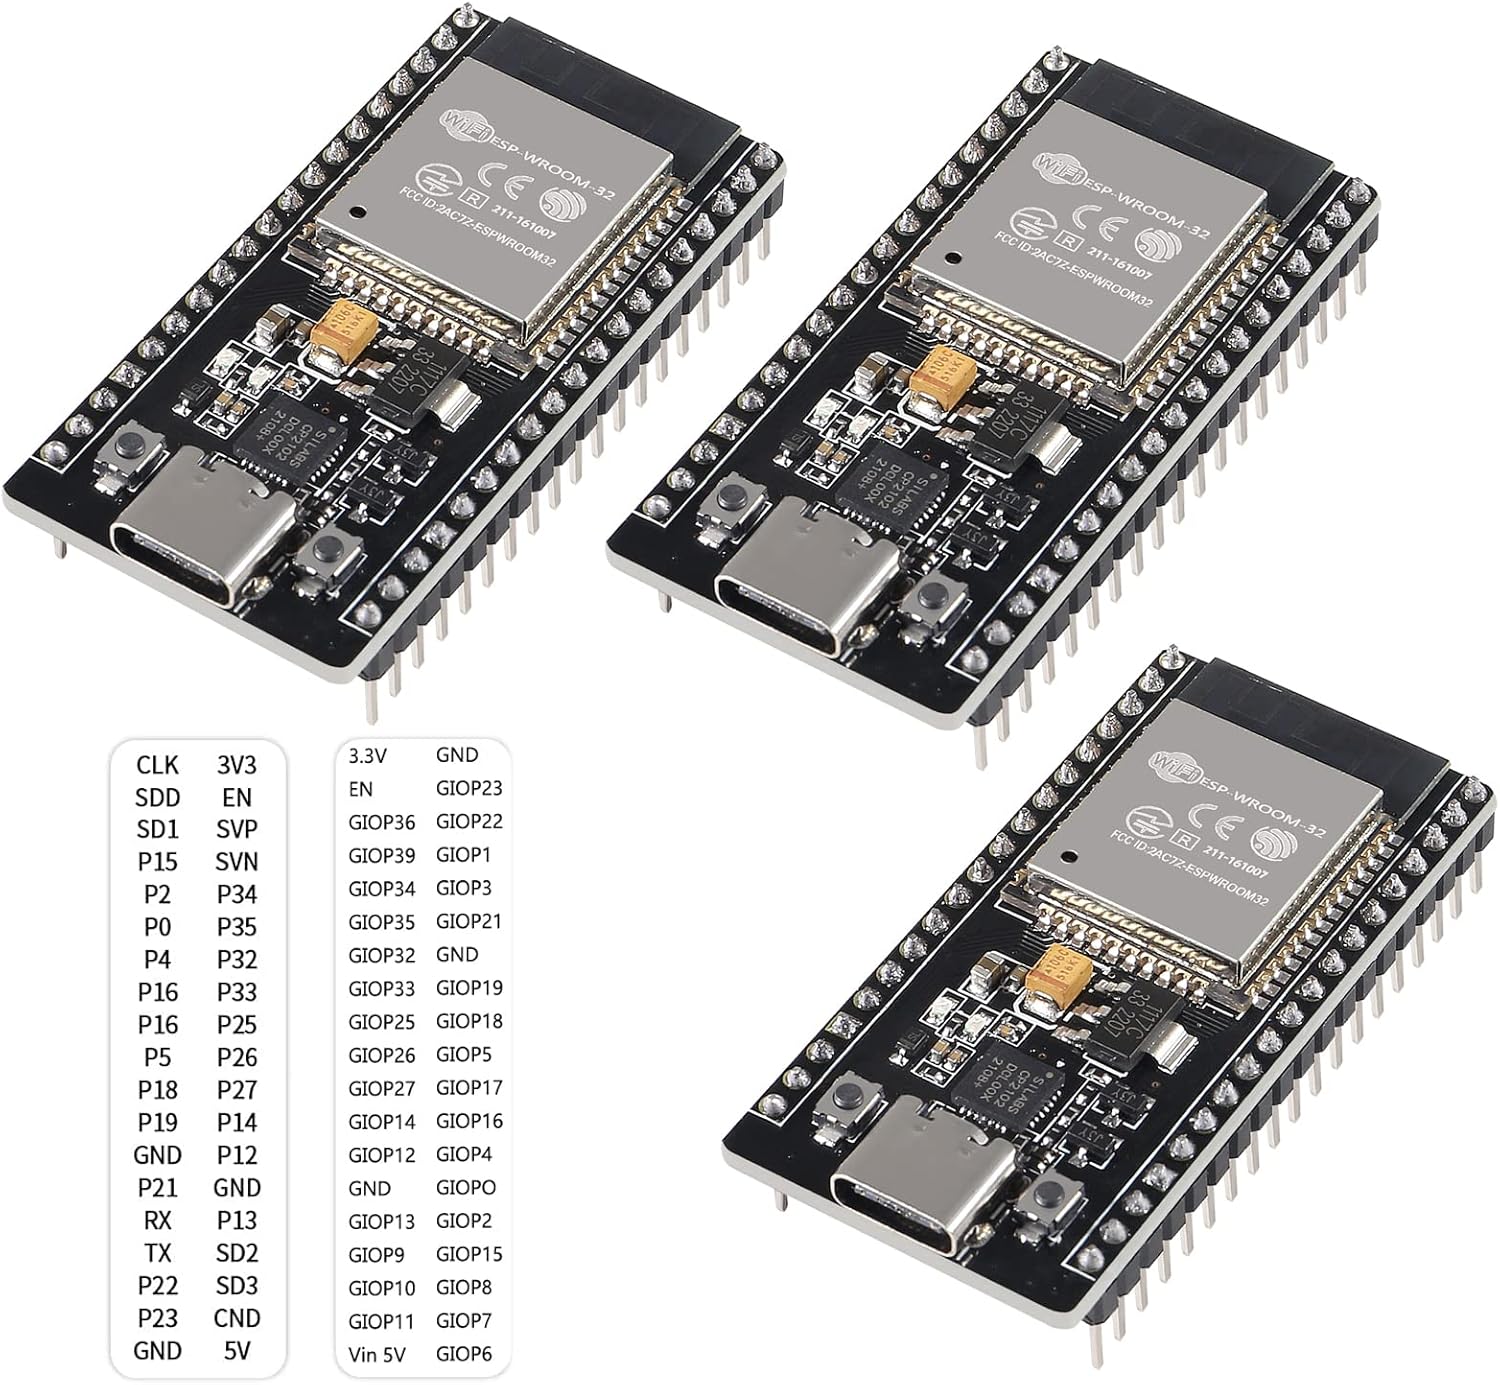
Сүрөт 2.1: Бүттүview of three DORHEA ESP32 Development Boards and their pin assignments.

Сүрөт 2.2: Жогорку view showing the ESP-WROOM-32 module, CP2102 chip, USB-C port, and buttons. Bottom view showing solder points and additional pin labels.

Сүрөт 2.3: Detailed close-up images highlighting the ESP-WROOM-32 module, USB-C connector, and pin headers.
3. Техникалык шарттар
| Өзгөчөлүк | Спецификация |
|---|---|
| Процессор | Dual-core Tensilica LX6, up to 240 MHz |
| RAM | 512 КБ SRAM |
| Зымсыз байланыш | Wi-Fi (802.11bgn), Bluetooth (Classic and LE) |
| USB интерфейси | USB Type-C (via CP2102 chip) |
| Операциялык системаны колдоо | FreeRTOS |
| Иштөө режимдери | AP, STA, AP+STA |
| Өлчөмдөрү (такта) | Болжол менен 51 мм x 25.5 мм (2.00 дюйм x 1.00 дюйм) |
| Pin саны | 38-пин |
| Салмагы | Approx. 1.13 ounces (per board) |

Сүрөт 3.1: Physical dimensions of the ESP32 Development Board.
4. Орнотуу
4.1 Driver Installation (CP2102)
The board uses a CP2102 USB-to-UART bridge chip for communication with your computer. Before connecting the board, ensure you have the correct drivers installed for your operating system. Drivers can typically be found on the Silicon Labs website or through your operating system's update service.
- Windows: Download and install the CP210x Universal Windows Driver.
- MacOS: Download and install the CP210x VCP Driver for Mac OS X.
- Linux: Most modern Linux distributions include CP210x drivers by default.
4.2 Connecting the Board
- Connect one end of a USB Type-C cable to the port on the ESP32 Development Board.
- USB Type-C кабелинин экинчи учун компьютериңиздеги жеткиликтүү USB портуна туташтырыңыз.
- The board should power on, and your computer should recognize it as a serial port.
4.3 Иштеп чыгуу чөйрөсүн орнотуу
To program the ESP32 board, you will need a suitable Integrated Development Environment (IDE). Popular choices include:
- Arduino IDE: Install the ESP32 board support package through the Boards Manager.
- PlatformIO (VS Code Extension): Install PlatformIO and select the appropriate ESP32 board profile (мисалы,
ESP32 Dev ModuleorNodeMCU-32).
4.4 Тирөөч схемасы
Understanding the pinout is crucial for connecting external components and utilizing the board's full functionality.

Сүрөт 4.1: Pinout diagram illustrating GPIOs, power pins, and special functions.
5. Иштөө нускамалары
5.1 Flashing Firmware
To upload your code or firmware to the ESP32 board:
- Prepare your code in your chosen IDE (Arduino IDE, PlatformIO).
- Select the correct board and serial port in your IDE.
- Initiate the upload process.
- When the IDE indicates "Connecting...." or prompts, press and hold the "BOOT" button on the ESP32 board.
- Release the "BOOT" button once the upload process begins (e.g., when dots stop printing in the console).
- The firmware will then be uploaded to the board.
5.2 Программалоонун негизги түшүнүктөрү
The ESP32 supports various programming approaches:
- Arduino Framework: Use C++ with Arduino-style functions for easy development.
- ESP-IDF: Espressif IoT Development Framework for more advanced, low-level control using C/C++.
- MicroPython/Lua: For rapid prototyping and scripting, the board supports Lua programming.
Utilize the integrated Wi-Fi and Bluetooth capabilities to create network-connected devices, sensors, and automation projects. Refer to the extensive online documentation and community resources for specific code examples and tutorials.
6. Техникалык тейлөө
To ensure the longevity and reliable operation of your DORHEA ESP32 Development Board, follow these maintenance guidelines:
- Этияттык менен мамиле кылуу: Avoid dropping the board or applying excessive force to components.
- Статикалык разряд: Always handle the board in an anti-static environment or take precautions to prevent electrostatic discharge (ESD), which can damage sensitive electronic components.
- Кургак кармоо: Protect the board from moisture and liquids. Operate it in a dry environment.
- Тазалык: Keep the board free from dust and debris. Use a soft brush or compressed air for cleaning if necessary.
- Электр камсыздоо: Use a stable 5V power supply via the USB-C port. Avoid over-voltage же тескери полярдуулук байланыштары.
7. Кыйынчылыктарды
If you encounter issues with your ESP32 Development Board, consider the following troubleshooting steps:
- Компьютер тактаны тааныбайт:
- Ensure CP2102 drivers are correctly installed.
- Try a different USB-C cable and port.
- Компьютериңизди өчүрүп күйгүзүңүз.
- Firmware Upload Fails:
- Verify that you are pressing and holding the BOOT баскычы when prompted by the IDE during the upload process.
- IDE'ңизде туура плата жана сериялык порт тандалганын текшериңиз.
- Ensure your USB cable is capable of data transfer, not just charging.
- Weak Wi-Fi Reception:
- The ESP32's integrated antenna can be sensitive to its environment. Ensure the board is not enclosed in metal or near other strong electromagnetic interference sources.
- Test the board closer to your Wi-Fi router.
- Specific GPIO Pin Not Functioning:
- Inspect the pin's solder joint for any defects. If comfortable, a minor soldering repair might be needed.
- Verify your code correctly initializes and uses the GPIO pin.
- Плата күйбөй жатат:
- USB-C кабелин жана кубат булагын текшериңиз.
- Ensure there are no short circuits on the board or connected components.
8. Кепилдик жана колдоо
For product support, technical assistance, or warranty inquiries, please refer to the DORHEA brand's official support channels. Typically, this includes their webпродукт сатылып алынган сайт же платформа.
You can visit the DORHEA Store for more information: DORHEA Store on Amazon