
1. Киришүү
This manual provides detailed instructions for the installation, operation, and maintenance of your SOGTICPS BL912-40A-WIFI MPPT Solar Charge Controller. This advanced charge controller is designed for off-grid solar applications, compatible with 12V/24V battery systems, including Gel, Flooded, and Lithium types. It features efficient MPPT tracking, an LCD display, dual USB outputs, and WiFi connectivity for remote monitoring.
Негизги өзгөчөлүктөрү:
- Innovative MPPT (Maximum Power Point Tracking) technology for up to 99% tracking efficiency.
- Автоматтык 12V/24V система тtage аныктоо.
- Integrated LCD display for real-time monitoring of temperature, charge current, discharge current, and power generation.
- Comprehensive system protection: over-temperature, over-current, short-circuit, open-circuit, and reverse polarity.
- Compatibility with Gel, Flooded, and Lithium battery types.
- Dual 5V 2A USB outputs for charging mobile devices.
- WiFi communication for remote parameter adjustment and monitoring via a dedicated application.
- Industrial-grade main control chip with 16AD sampтактык.
- Two-way MOS tube anti-reverse circuit for high-power charging and low heat generation.
2. Коопсуздук нускамалары
Please read all instructions carefully before installation and operation. Failure to follow these instructions may result in damage to the unit, personal injury, or property damage.
- Ensure all connections are tight and correct to avoid excessive voltage drop and potential hazards.
- Install the controller indoors, away from direct sunlight, high temperatures, and moisture.
- The controller generates heat during operation; ensure adequate ventilation.
- Connect the battery first, then the solar panel, and finally the load. Disconnect in the reverse order: load, solar panel, then battery.
- Do not connect any inverter directly to the load terminals of the controller.
- Ensure the solar panel's open-circuit voltage (Voc) does not exceed the controller's maximum input voltage.
- Use appropriate circuit breakers or fuses for the battery and solar panel circuits.
- Keep children away from the solar power system.
- Контроллерди өз алдынча бөлүктөргө бөлүүгө же оңдоого аракет кылбаңыз. Тейлөө үчүн квалификациялуу адистерге кайрылыңыз.
3. Продукт бүтүп калдыview
The SOGTICPS BL912-40A-WIFI solar charge controller features a robust design with an intuitive LCD display and multiple connection points.

Сүрөт: Фронт view of the SOGTICPS BL912-40A-WIFI Solar Charge Controller, highlighting its security protection features such as short-circuit, overload, overcharge, under-voltage, жана ашык-томtage коргоо.
Компоненттери:
- LCD дисплей: Shows real-time system status and parameters.
- Башкаруу баскычтары: For navigating menus and setting parameters.
- Solar Panel Input Terminals: Күн батареяларына туташтырыңыз.
- Батарея терминалдары: Батарея банкына туташтырыңыз.
- Чыгуу терминалдарын жүктөө: DC жүктөмдөрүнө туташыңыз.
- Dual USB Ports (5V 2A): Тышкы түзмөктөрдү кубаттоо үчүн.
- WiFi антеннасы: Зымсыз байланыш үчүн.
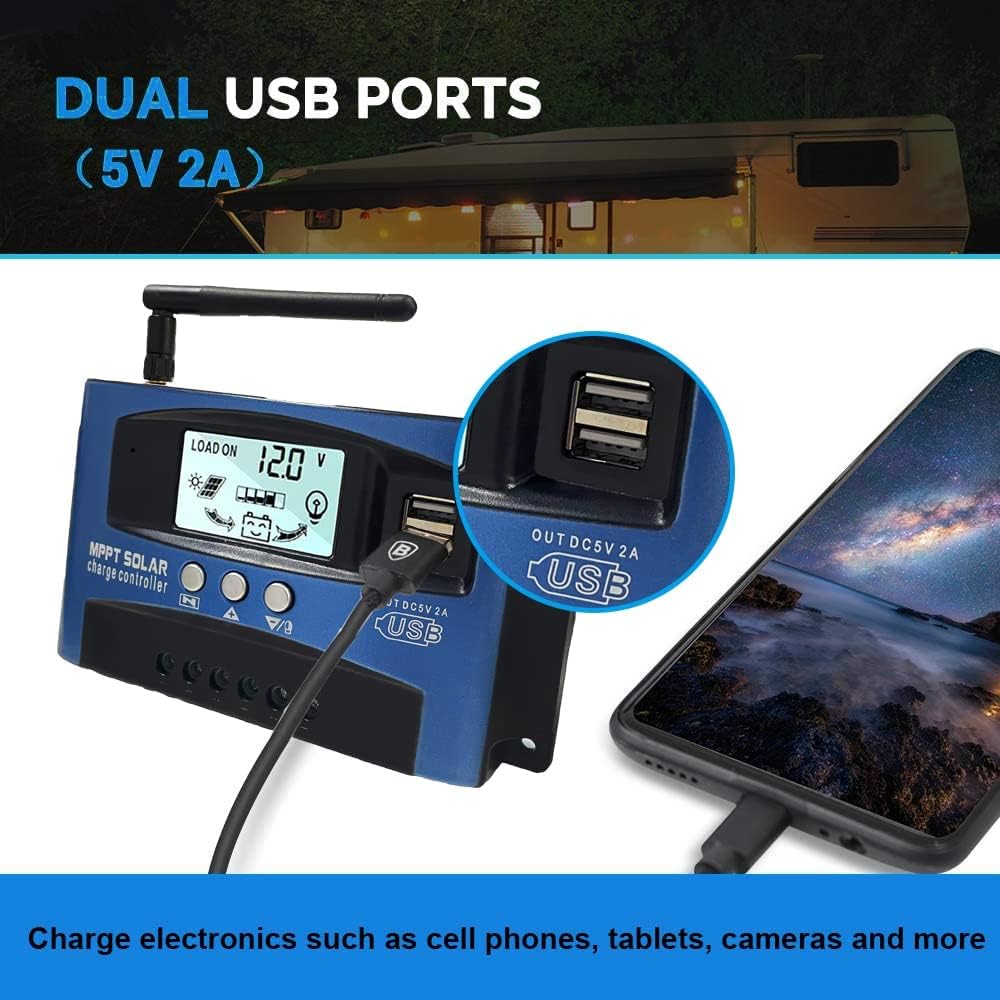
Сүрөт: Жакын план view of the SOGTICPS BL912-40A-WIFI Solar Charge Controller, showing the dual 5V 2A USB ports in use, charging a smartphone.
4. Орнотуу жана орнотуу
Proper installation is critical for the safe and efficient operation of your solar charge controller. Follow the connection order precisely.
Байланыштыруу тартиби:
- Connect the Battery First: Connect the battery to the charge controller's battery terminals. Ensure correct polarity (+ to + and - to -). The controller will automatically detect 12V or 24V system voltage.
- Күн панелдерин туташтыруу: Connect the solar panels to the charge controller's solar input terminals. Again, observe correct polarity.
- Connect DC Load (Optional): Connect your DC loads to the load output terminals.
Маанилүү: When disconnecting, reverse the order: first disconnect the load, then the solar panels, and finally the battery. Failure to follow this order may damage the controller or other components.
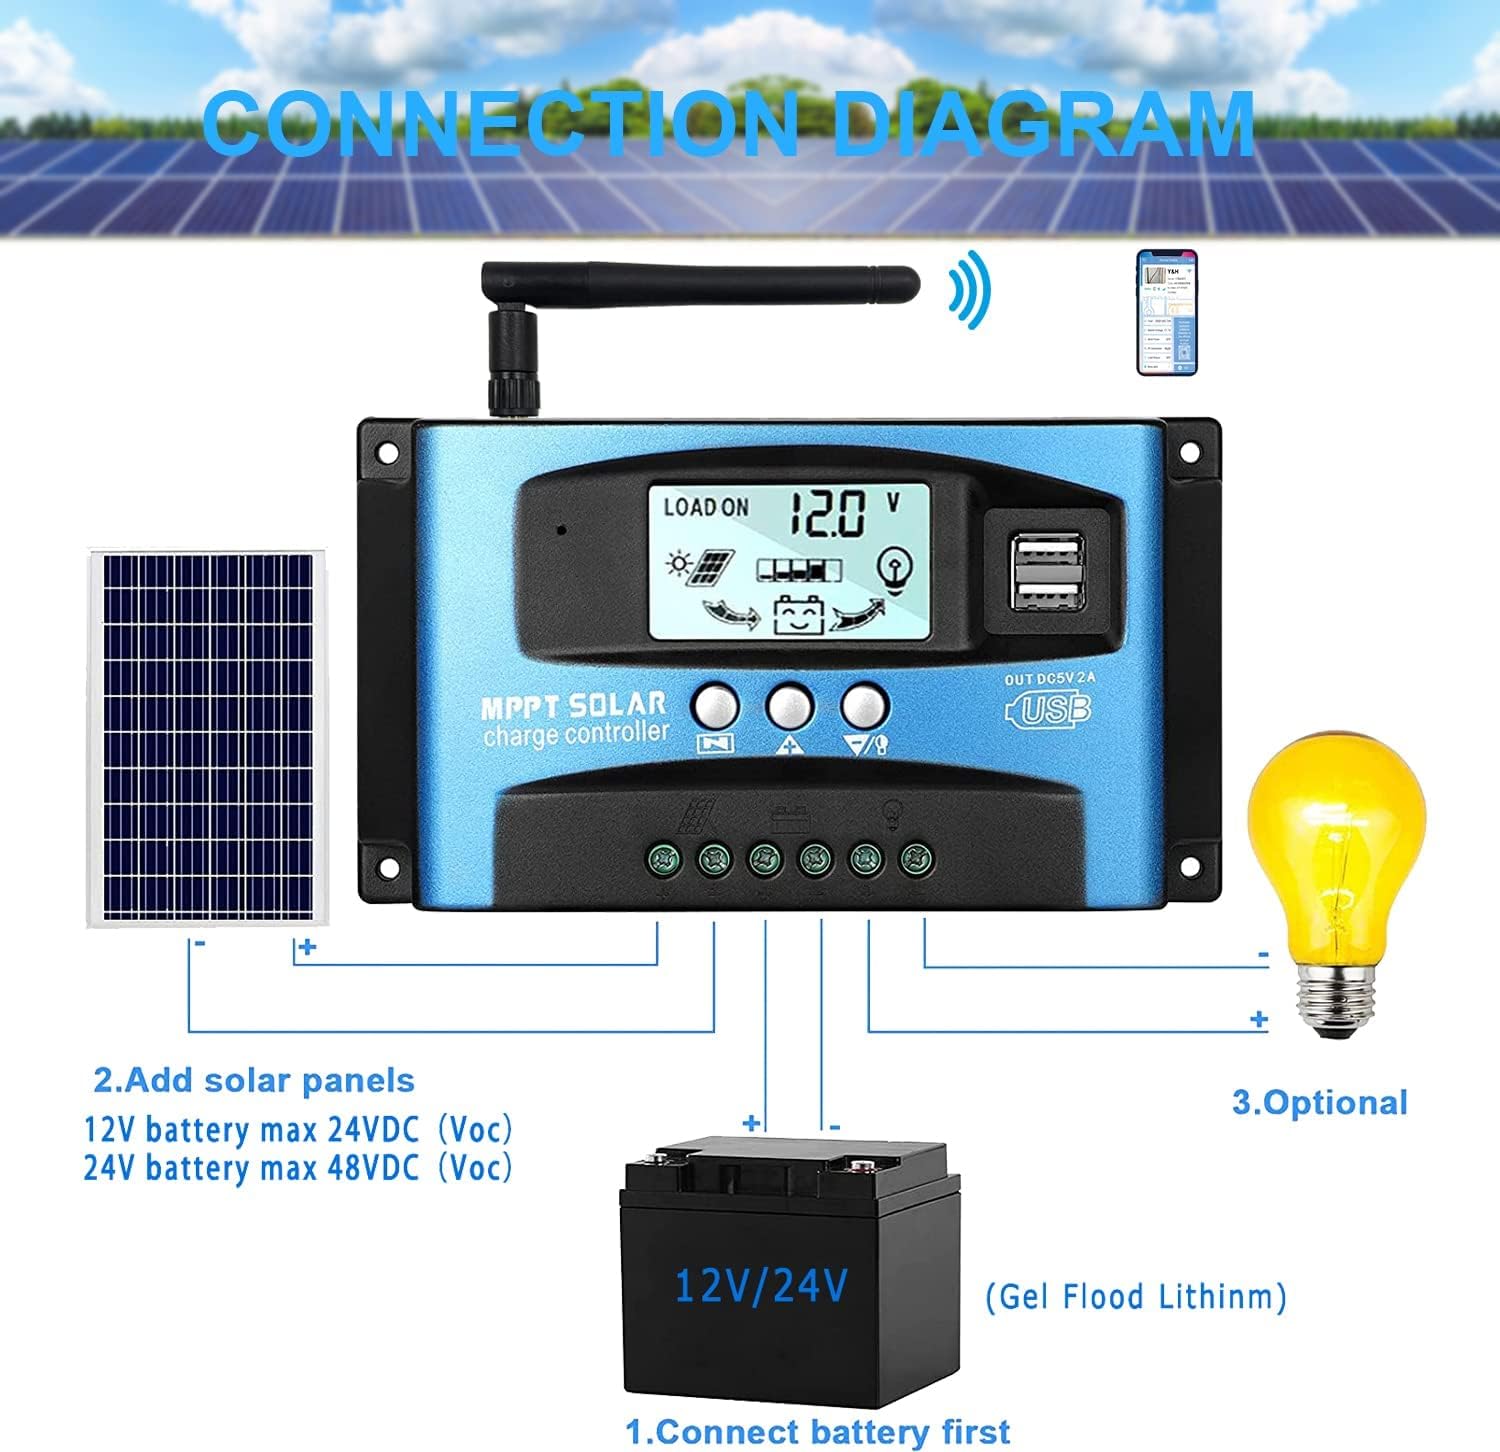
Сүрөт: A clear connection diagram illustrating the proper wiring sequence for the solar charge controller, connecting to a battery, solar panels, and an optional DC load. It emphasizes connecting the battery first.
Батарея шайкештиги:
The controller is compatible with various battery types, including Gel, Flooded (Lead-Acid), and Lithium batteries. Ensure the correct battery type is selected in the controller settings for optimal charging.

Сүрөт: Visual representation showing the SOGTICPS BL912-40A-WIFI Solar Charge Controller's compatibility with Gel, Flooded, and Lithium battery types, indicated by arrows pointing between battery icons and the controller.
5. Иштөө нускамалары
LCD Display and Navigation:
The LCD provides real-time information about your solar system. Use the control buttons to navigate through the display interfaces and adjust parameters.

Сүрөт: A series of LCD screen captures demonstrating the browsing interface and parameter setting process for the SOGTICPS BL912-40A-WIFI Solar Charge Controller. It shows main display, float voltage, discharge reconnect, discharge stop, load work mode, battery type, and work parameter display.
- Browsing Interface: басыңыз МЕНЮ button to cycle through different display interfaces, showing information such as main display, float voltage, discharge reconnect voltage, discharge stop voltage, load work mode, battery type, and other work parameters.
- Параметрлерди орнотуу: In interfaces 2-8, press the МЕНЮ button to enter the setting mode. Use the UP жана ылдый маанилерди тууралоо үчүн баскычтар. Басыңыз МЕНЮ ырастоо жана орнотуу режиминен чыгуу үчүн кайра.
WiFi мониторинги:
The controller supports WiFi connectivity, allowing you to monitor and control your solar system remotely via a smartphone application.

Сүрөт: The SOGTICPS BL912-40A-WIFI Solar Charge Controller shown alongside a smartphone displaying its monitoring application interface. This illustrates the wireless monitoring capability of the PV system.
- Колдонмо орнотуу: Download the dedicated application for your smartphone (Android). Refer to the QR code or instructions provided with the product for app download.
- Байланыш: Follow the in-app instructions to connect your controller to your local WiFi network.
- Алыстан байкоо: Туташкандан кийин, мүмкүн view real-time data such as temperature, charge current, discharge current, accumulated power generation, battery voltage, and adjust charging modes from anywhere.
6. Техникалык тейлөө
Үзгүлтүксүз тейлөө сиздин күн зарядын контроллериңиздин узак мөөнөттүү жана оптималдуу иштешин камсыз кылат.
- Байланыштарды текшерүү: Мезгил-мезгили менен бардык зымдарды байланыштарды текшерип туруңуз, алар бекем жана коррозиядан таза.
- Таза контроллер: Контроллерди чаңдан жана таштандыдан таза жана таза кармаңыз. Тазалоо үчүн кургак чүпүрөктү колдонуңуз.
- Вентиляция: Ашыкча ысып кетүүнүн алдын алуу үчүн орнотулган аймак тийиштүү вентиляцияга ээ болушун камсыз кылыңыз.
- Батареяны текшерүү: Regularly check battery terminals for corrosion and ensure battery fluid levels (for flooded batteries) are correct.
- Системанын мониторинги: Use the LCD display or the WiFi app to monitor system performance and identify any anomalies early.
7. Кыйынчылыктарды
If you encounter issues with your solar charge controller, refer to the following common problems and solutions:
| Көйгөй | Мүмкүн себеп | Чечим |
|---|---|---|
| LCD дисплей жок | Батарея туташкан эмес же кубаты азtagд; тескери полярдуулук. | Батарея байланыштарын жана тtagд. Туура полярдуулукту камсыз кылыңыз. |
| Батарея заряддалбай жатат | Solar panels not connected; insufficient sunlight; faulty solar panel; incorrect battery type setting. | Check solar panel connections and ensure adequate sunlight. Verify solar panel functionality. Confirm battery type setting. |
| Жүк иштебейт | Жүктөө ажыратылды; батареянын көлөмү азtage protection; overload protection. | Check load connections. Charge battery. Reduce load or check for short circuits. |
| WiFi app issues (connection/language) | Incorrect WiFi setup; app region/language settings; firmware issues. | Ensure correct WiFi network and password. Check app settings for language. Contact support if issues persist. |
8. Техникалык шарттар
| Параметр | Нарк |
|---|---|
| Модел | BL912-40A-WIFI |
| Номиналдуу заряд ток | 40 А |
| System Voltage | 12V/24V Auto-detection |
| Max PV Input Power (12V) | 480 Вт |
| Max PV Input Power (24V) | 960 Вт |
| Сунушталган Solar Panel Voltage | 18V for 12V battery; 36V for 24V battery |
| Өзүн-өзү керектөө | <10 мА |
| Иштөө температурасы | -14 °F менен 140 °F (-10 °C менен 60 °C) |
| Дисплей түрү | LCD |
| USB чыгышы | Кош 5V 2A |
| Байланыш | WiFi |
| Өлчөмдөрү (пакет) | 18 x 11 x 5 см |
| Салмагы (пакет) | 330 грамм |
| Өндүрүүчүнүн маалымдамасы | 2-BL912-40A-WIFI-DE |
| UPC | 732246237116 |
9. Кепилдик жана колдоо
For warranty information and technical support, please refer to the documentation included with your purchase or contact SOGTICPS customer service. Keep your purchase receipt as proof of purchase.