1. Киришүү
This manual provides detailed instructions for the installation, operation, and maintenance of your AMANSON H6 ATX Mid Tower PC Case. Please read this manual thoroughly before beginning assembly to ensure proper setup and to maximize the performance and longevity of your system components. This case is designed for gaming enthusiasts, offering a panoramic view with tempered glass and robust cooling capabilities.
2. Продукциянын өзгөчөлүктөрү
- Panoramic Tempered Glass Design: Equipped with tempered glass on the front and left side, providing a clear view of internal components and RGB lighting (fans not included).
- Broad Motherboard Compatibility: ATX, Micro-ATX жана Mini-ITX энелик платаларын колдойт.
- Кеңири муздатуу колдоо: Accommodates up to 10 x 120mm fans (fans not included) for optimal airflow. Supports top-mounted 360mm, 280mm, or 240mm integrated water cooling radiators.
- Кең ички: Maximum graphics card length of 360mm and CPU cooler height of 155mm.
- Ийкемдүү сактоо параметрлери: Features 1 x 3.5" HDD bay and 4 x 2.5" SSD bays.
- Convenient Front I/O Panel: Includes 1 x USB 3.0 port, 1 x Type-C port, and HD audio jacks for easy peripheral connectivity.
- Натыйжалуу кабелдик башкаруу: менен иштелип чыккан ample space behind the motherboard tray and a dust filter for a clean build and improved airflow.
3. Техникалык шарттар
| Өзгөчөлүк | Спецификация |
|---|---|
| Модел | H6 |
| Иштин түрү | Ара Tower |
| Өлчөмдөрү (L x W x Y) | 420mm x 272.5mm x 399mm (Case Body) |
| Материал | Болот, чыңдалган айнек |
| Motherboard Support | ATX, Micro ATX, Mini ITX |
| Кеңейтүү уячалары | 7 |
| 3.5" Айдоочу булуңдар | 1 |
| 2.5" Айдоочу булуңдар | 4 |
| I/O порттору | 1 x USB 3.0, 1 x Type-C, HD Audio (Mic & Headphone) |
| Максималдуу GPU узундугу | 360мм |
| CPU муздаткычынын максималдуу бийиктиги | 155мм |
| Fan Support (120mm) | Top: 3, Front: 3, Side: 3, Bottom: 3, Rear: 1 (Total up to 10 fans) |
| Радиатор колдоо | Жогорку: 360мм / 280мм / 240мм |
| Салмагы | 7.87 кг (Продукт) |
Note: Fan and ARGB components are not included with the case. Actual external dimensions may vary slightly due to feet or protrusions.

1-сүрөт: An illustration of the AMANSON H6 PC case, highlighting its overall external dimensions for reference.
4. Пакеттин мазмуну
Төмөндө тизмеленген нерселердин баары пакетиңизде бар экенин текшериңиз:
- AMANSON H6 ATX Mid Tower PC Case (1 unit)
- Кошумча кутуча (бурамаларды, тирөөчтөрдү, кабель байлагычтарды ж.б. камтыйт)
- Колдонуучунун Колдонмосу (бул документ)
Note: Cooling fans and ARGB components are sold separately and are not included with the case.
5. Орнотуу колдонмосу
Follow these steps for proper installation of your PC components into the AMANSON H6 case.
5.1. Ишти даярдоо
Before installing any components, ensure the case is placed on a stable, flat surface. Remove the side panels to gain access to the interior.

2-сүрөт: The AMANSON H6 features hinged tempered glass side panels for easy access to internal components. Gently open the side panel to begin assembly.
5.2. Motherboard орнотуу
- Identify the correct standoff positions for your ATX, Micro-ATX, or Mini-ITX motherboard. The case comes with pre-installed standoffs for standard ATX. Adjust or install additional standoffs as needed using the provided tools.
- Этияттык менен энелик платаңызды буроо тешикчелерин тегиздеп, стендтерге жайгаштырыңыз.
- Энелик платаны аксессуарлар кутучасындагы тиешелүү бурамалар менен бекитиңиз. Ашыкча бекемдебеңиз.

3-сүрөт: This diagram illustrates the compatible motherboard sizes (ITX, M-ATX, ATX) and potential fan/radiator mounting locations within the AMANSON H6 case, highlighting its versatile space system.
5.3. Storage Device Installation (HDD/SSD)
The AMANSON H6 supports 1 x 3.5" HDD and 4 x 2.5" SSDs.
- Locate the drive bays behind the motherboard tray and in the PSU shroud area.
- For 3.5" HDDs, slide the drive into the designated cage and secure it with screws.
- For 2.5" SSDs, mount them onto the dedicated brackets using screws.
- Connect SATA data and power cables to your installed drives.
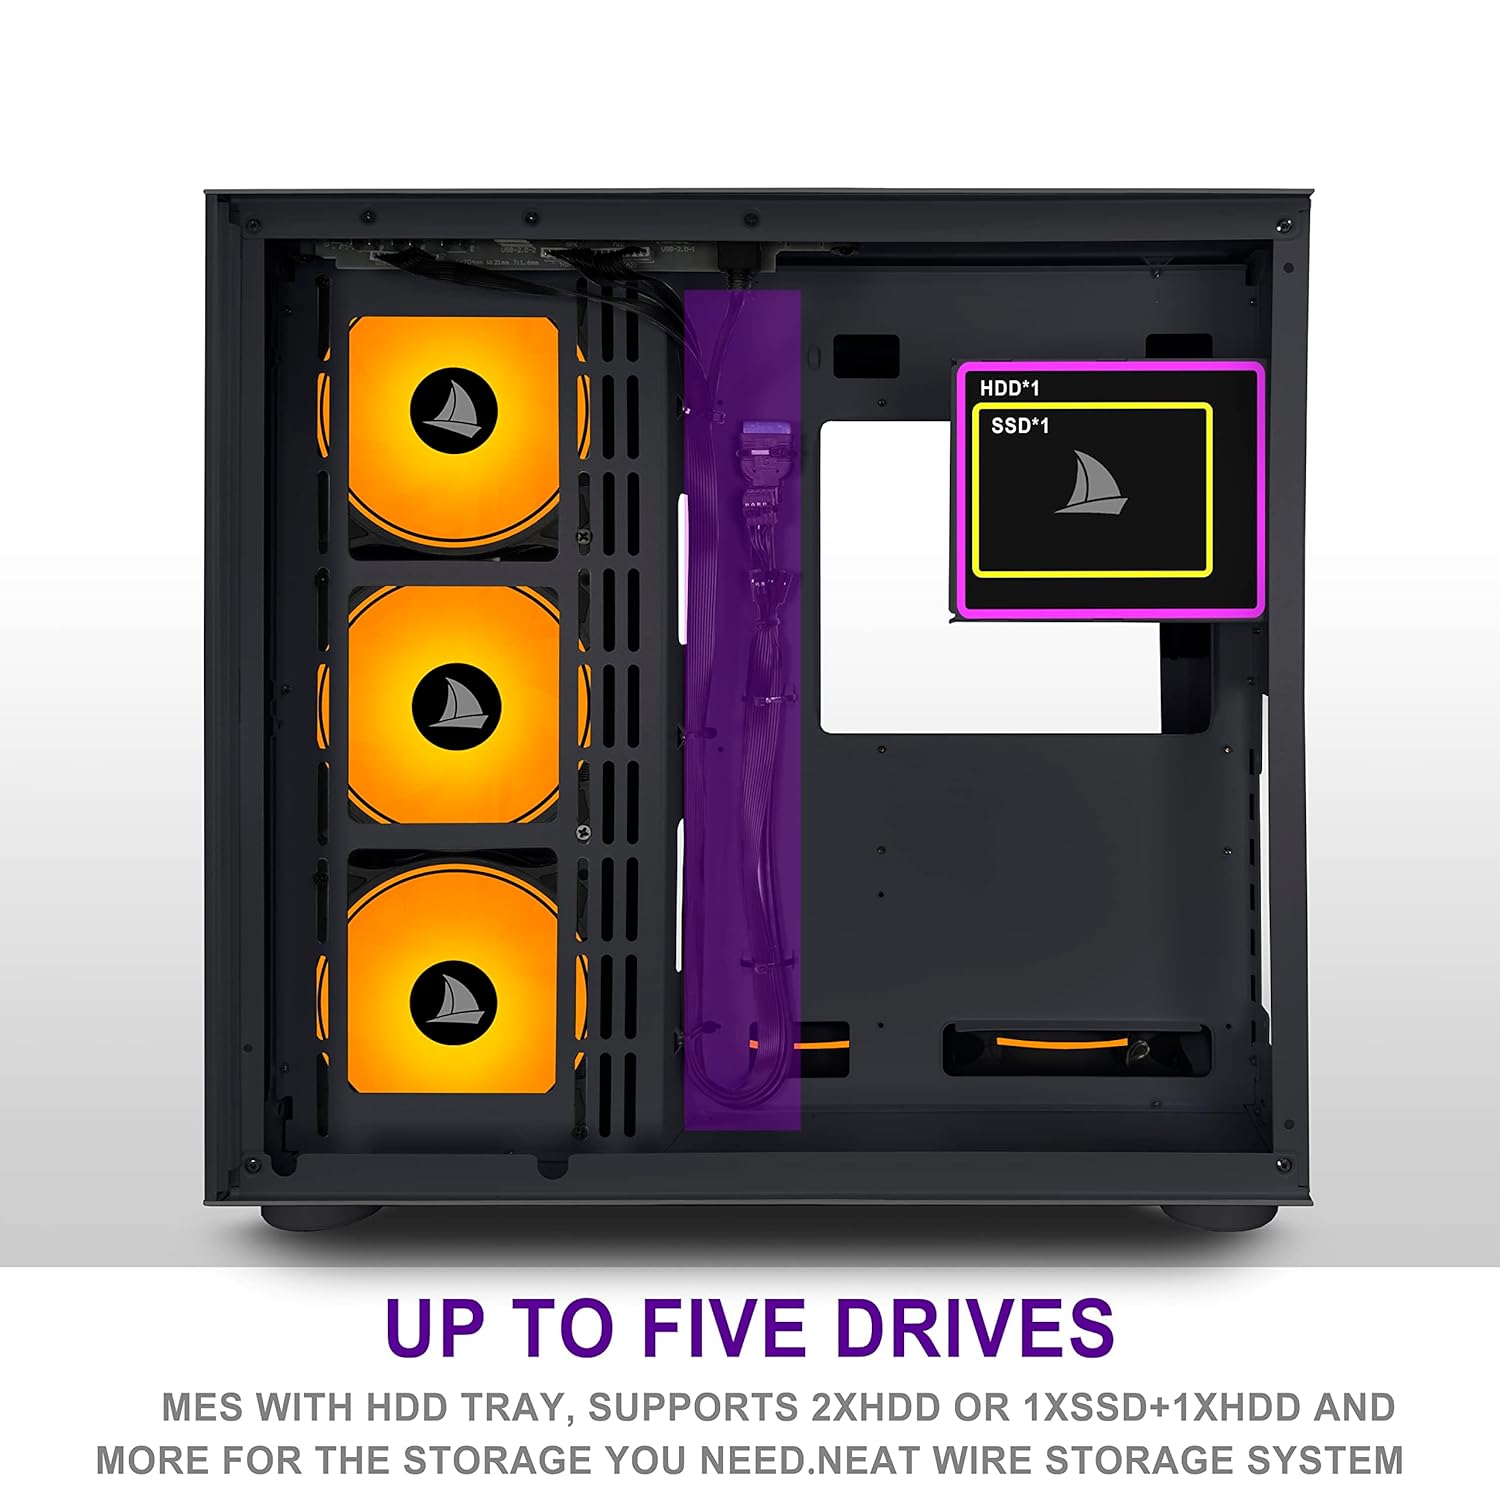
4-сүрөт: This image highlights the locations for installing up to five storage drives (1x HDD, 4x SSDs) within the AMANSON H6 case, facilitating a neat wire storage system.
5.4. Графикалык картаны орнотуу
- Корпустун артындагы керектүү кеңейтүү уячасынын капкактарын алып салыңыз.
- Insert your graphics card into the appropriate PCIe slot on your motherboard, ensuring it is fully seated.
- Графикалык картаны бурамалар менен корпуска бекитиңиз.
- Кубат булагыңыздан керектүү PCIe кубат кабелдерин графикалык картага туташтырыңыз.
5.5. Электр энергиясы менен жабдууну орнотуу
- Position your ATX power supply unit (PSU) into the dedicated compartment at the bottom rear of the case.
- Secure the PSU to the case with screws from the rear.
- Route the necessary power cables through the cable management cutouts to reach your motherboard, graphics card, and storage devices.
5.6. Кабелдик башкаруу
The AMANSON H6 offers ample space behind the motherboard tray for cable routing. Utilize the cable tie points and included cable ties to organize and secure cables, improving airflow and aesthetics.
5.7. Желдеткичти жана Радиаторду орнотуу
The case supports extensive cooling configurations. Fans are not included.
- Fan Placement: Install 120mm fans in the designated locations: Top (3), Front (3), Side (3), Bottom (3), Rear (1).
- Радиатордун жайгашуусу: A 360mm, 280mm, or 240mm radiator can be mounted at the top of the case.
- Ensure fans are oriented correctly for optimal airflow (intake or exhaust) based on your cooling strategy.

5-сүрөт: The zoning design concept of the AMANSON H6 case, viewed from the front, illustrates the internal layout optimized for component separation and efficient cooling.
6. Иштөө нускамалары
Once all components are installed and cables are connected, close the side panels. Connect your monitor, keyboard, mouse, and power cable to the system. Press the power button on the front I/O panel to start your computer.
6.1. Алдыңкы киргизүү/чыгаруу панели
- Кубат баскычы: Системаны күйгүзөт же өчүрөт.
- USB 3.0 порт: шайкеш түзмөктөр менен жогорку ылдамдыктагы маалыматтарды берүү үчүн.
- Тип-C Port: Modern reversible connector for various peripherals.
- HD Audio Jacks: Кулакчындарды жана микрофондорду туташтырыңыз.
7. Техникалык тейлөө
Үзгүлтүксүз тейлөө сиздин PC компоненттеринин оптималдуу иштешин жана узак иштөөсүн камсыз кылууга жардам берет.
- Чаңды тазалоо: Periodically clean dust filters (if applicable) and the interior of the case using compressed air or a soft brush. Dust accumulation can hinder airflow and lead to overheating.
- Тышкы тазалоо: Wipe the exterior surfaces, especially the tempered glass panels, with a soft, lint-free cloth and a mild glass cleaner (avoid abrasive materials).
- Кабель текшерүү: Бардык ички кабелдер бекем туташтырылганын жана аба агымына тоскоол болбогонун текшериңиз.
8. Кыйынчылыктарды
Эгер көйгөйлөргө туш болсоңуз, көйгөйлөрдү чечүүнүн төмөнкү негизги кадамдарын карап көрүңүз:
- Система күйбөй жатат:
- Кубат кабелинин кубат булагына жана розеткага бекем туташтырылганын текшериңиз.
- Check that the PSU switch is in the "ON" position.
- Бардык кубат туташууларынын энелик платага жана компоненттерге коопсуз туташкандыгын текшериңиз.
- Алдыңкы панелдин кубат которуштуруу кабели эне платасынын башына туура туташтырылганын ырастаңыз.
- Дисплей чыгышы жок:
- Мониторуңуз графикалык картага туташтырылганын текшериңиз (эгер сиз интеграцияланган графиканы колдонбосоңуз, энелик платанын интеграцияланган графикалык портторуна эмес).
- Графикалык картаны PCIe слотуна кайра орнотуңуз.
- Check all power cables to the graphics card.
- Ашыкча ысып кетүү маселелери:
- Verify all case fans are spinning and oriented correctly for optimal airflow.
- Clean any dust accumulation from fans, radiators, and filters.
- Ensure CPU cooler is properly seated and making good contact with the CPU.
For more complex issues, consult the manuals for your individual components (motherboard, GPU, PSU) or seek professional assistance.
9. Кепилдик жана колдоо
The AMANSON H6 PC Case comes with a standard manufacturer's warranty. Please refer to the warranty policy provided at the time of purchase or contact your retailer for specific details regarding warranty coverage and duration.
For technical support or inquiries, please contact AMANSON customer service through the official website or your point of purchase. When contacting support, please have your product model (H6) and purchase information readily available.