1. Киришүү
This manual provides essential information for the safe and efficient operation of your suevery SV240ZA 24-inch 165Hz IPS Gaming Monitor. Please read this manual thoroughly before using the product and retain it for future reference. This monitor is designed for gaming, home office, and general computing tasks, offering a Full HD 1080p resolution, a high refresh rate, and fast response time for a smooth visual experience.
2. Коопсуздук маалыматы
- Өрткө же электр тогуна урунбоо үчүн мониторду жамгырдын же нымдуулуктун таасирине дуушар кылбаңыз.
- Мониторду ачпаңыз casinг. Ичинде колдонуучу тейлей турган бөлүктөр жок. Бардык тейлөөлөрдү квалификациялуу кызматкерлерге тапшырыңыз.
- Монитор кулап калбаш үчүн аны туруктуу, тегиз бетке коюңуз.
- Монитордун айланасында туура желдетүүнү камсыз кылыңыз. Вентиляция тешиктерин жаап албаңыз.
- Монитор менен кошо берилген кубат адаптерин гана колдонуңуз.
- Монитор узак убакыт бою колдонулбай турган болсо, электр сайгычын розеткадан ажыратыңыз.
3. Пакеттин мазмуну
Пакетте бардык буюмдар бар экенин текшериңиз:
- 1 x suevery SV240ZA Monitor
- 1 x Stand Base
- 1 x HDMI кабели
- 1 x DisplayPort кабели
- 1 x User Manual
- 1 х кубат адаптери
4. Орнотуу нускамалары
4.1 Стендди чогултуу
Attach the stand base to the monitor neck, then secure the neck to the back of the monitor. Ensure all screws are tightened securely.
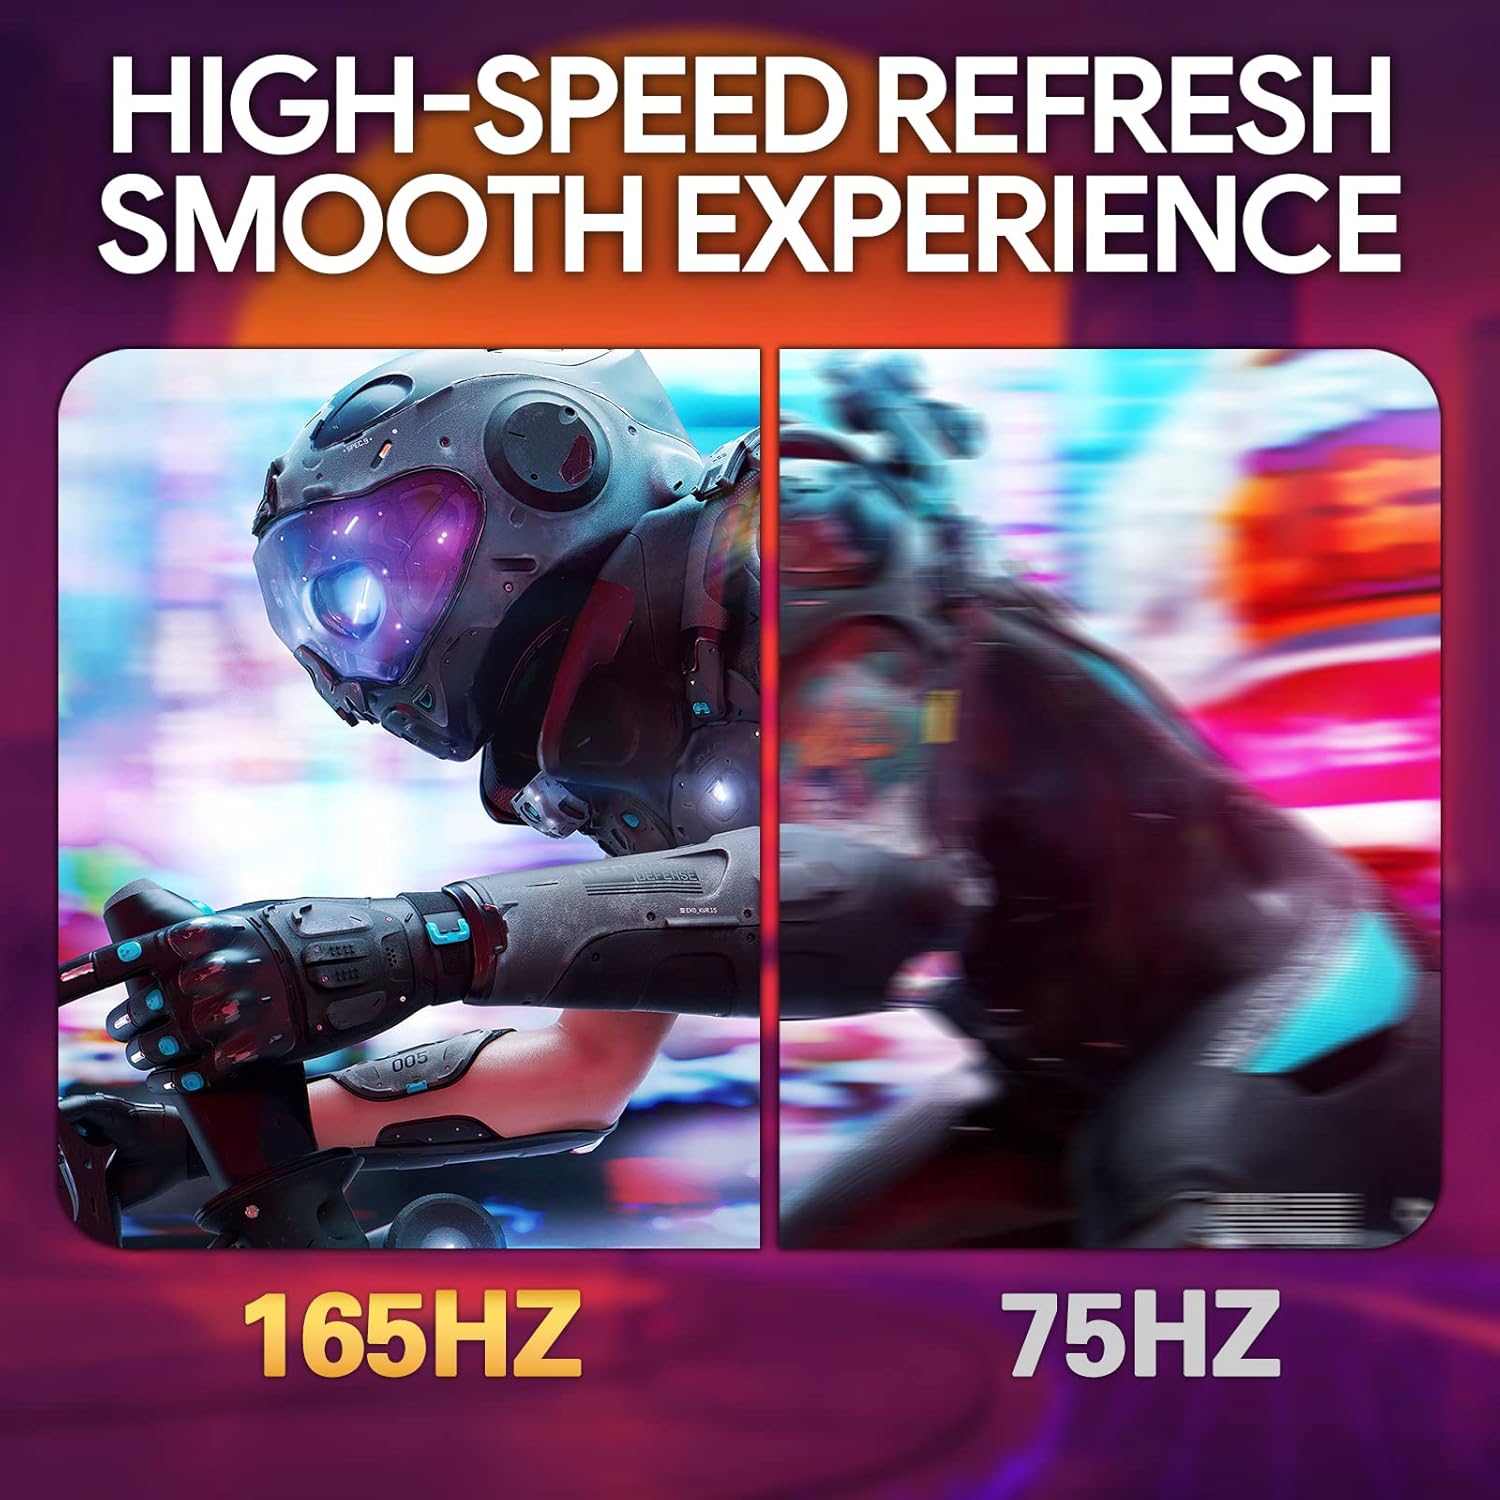
Image: The suevery SV240ZA monitor fully assembled with its desktop stand.
4.2 VESA орнотуу
The monitor supports VESA mounting with a 75mm x 75mm pattern. Remove the stand if attached, and use appropriate VESA screws to mount the monitor to a compatible wall mount or desk arm.

Image: Rear of the monitor illustrating the 75mm x 75mm VESA mount compatibility.
4.3 Туташтыруучу кабельдер
Connect the power adapter to the monitor and a power outlet. Use either the HDMI or DisplayPort cable to connect the monitor to your computer or gaming device. For audio output, connect headphones or external speakers to the 3.5mm audio out port.

Сүрөт: бүттүview of the monitor's rear ports including USB, HDMI, DisplayPort, and Audio out.
4.4 Баштапкы күйгүзүү
Press the power button located on the monitor to turn it on. The monitor will automatically detect the input signal. If no signal is detected, ensure your source device is powered on and connected correctly.
5. Иштөө нускамалары
5.1 Экрандагы дисплей (OSD) менюсу
The OSD menu allows you to adjust various monitor settings. Typically, buttons on the back or bottom of the monitor are used to navigate and select options within the OSD.
5.2 Дисплей орнотууларын тууралоо
- Жаңыртуу ылдамдыгы: The monitor supports up to 165Hz. Ensure your graphics card settings are configured to utilize the maximum refresh rate for a smoother experience.
- Жооп убактысы: With a 1ms GTG response time, motion blur is significantly reduced. This setting is often managed automatically or through specific OSD options.
- FreeSync: Enable AMD FreeSync in the OSD menu and your graphics card control panel to synchronize the monitor's refresh rate with your GPU's frame rate, eliminating screen tearing and stuttering.
- Түс жөндөөлөрү: Adjust brightness, contrast, color temperature, and gamma for optimal visual quality. The IPS panel provides 99% sRGB color gamut and 8-bit color depth for rich and vibrant colors.
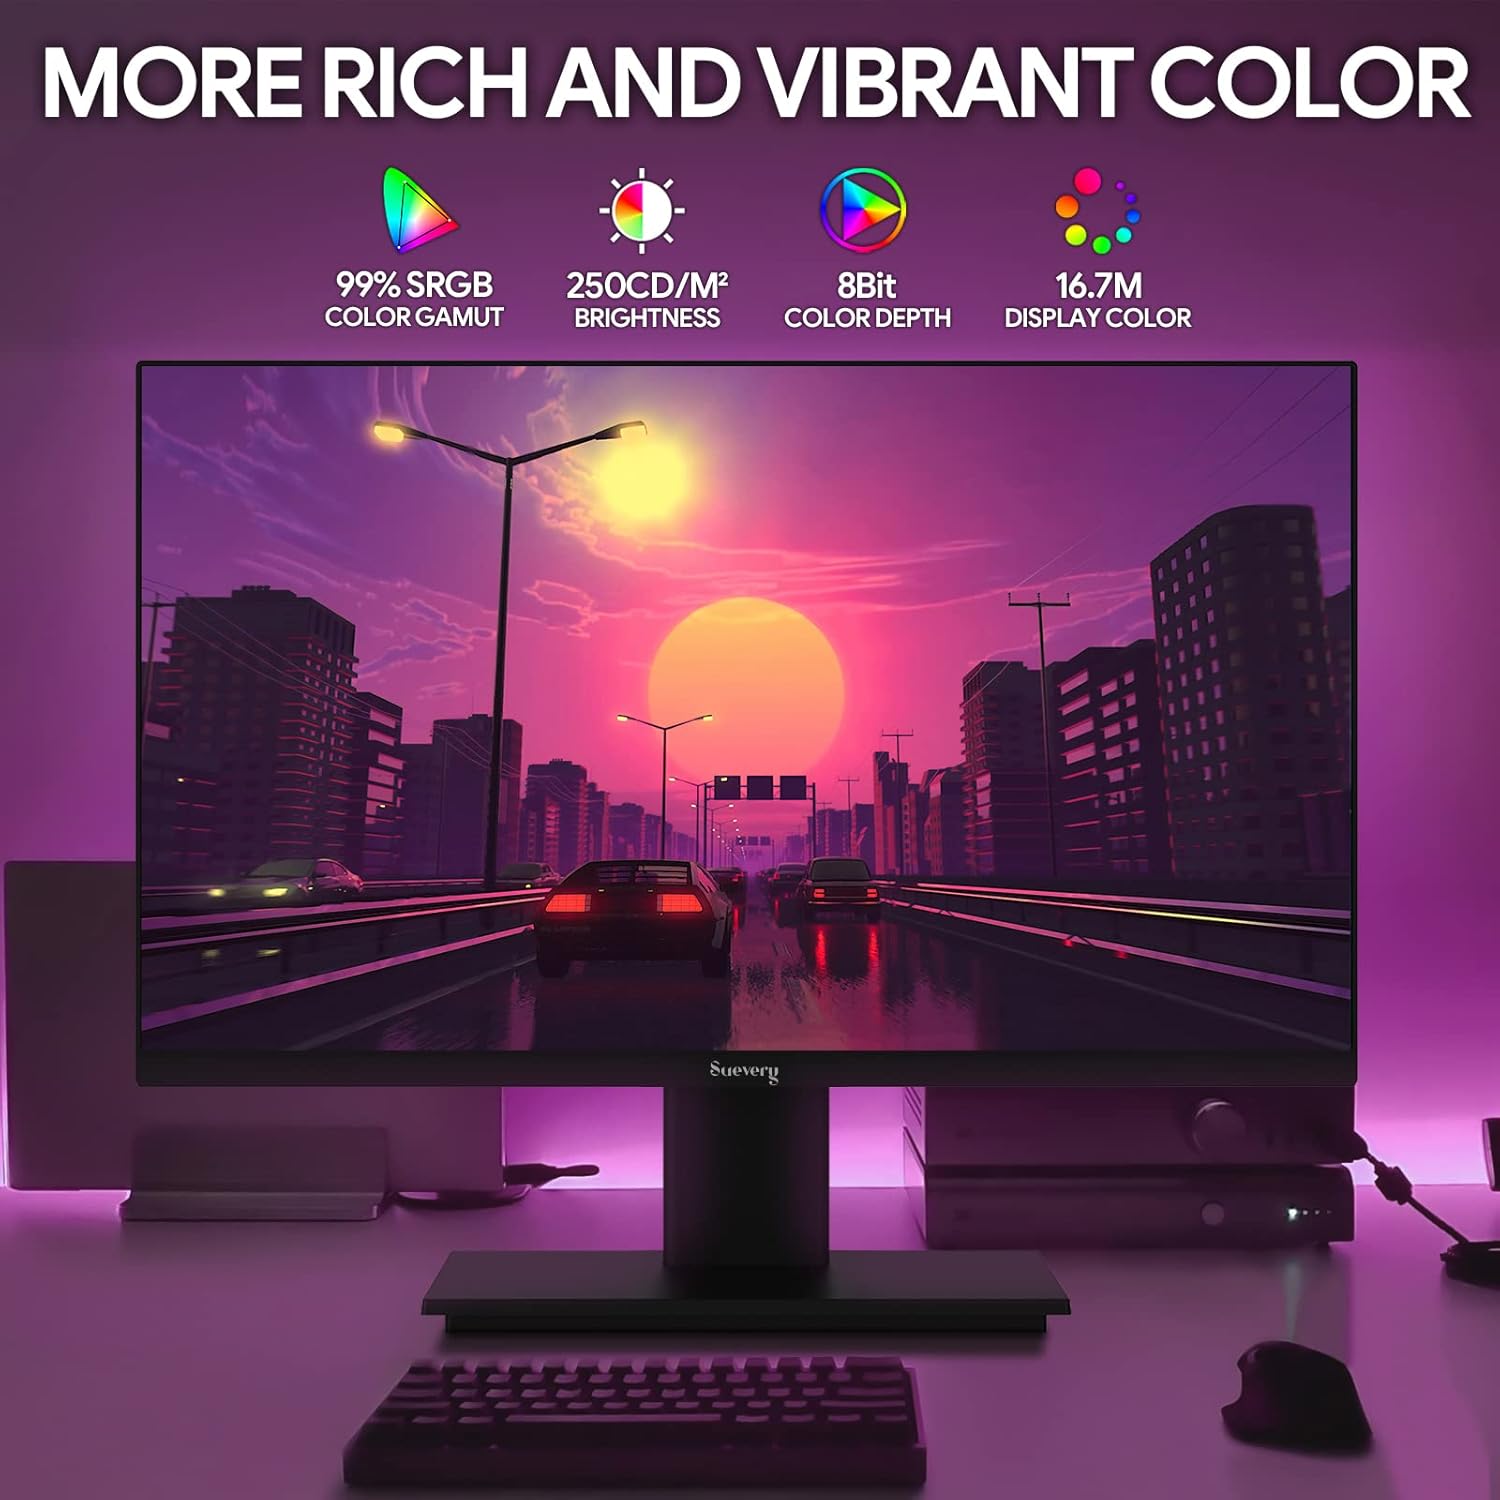
Image: The monitor's display capabilities, highlighting rich and vibrant color reproduction.
5.3 Эңкейүүнү тууралоо
The monitor allows for tilt adjustment from -3 to 18 degrees. Gently adjust the screen to your preferred viewбурч.

Image: Illustration of the monitor's adjustable tilt feature.
5.4 Аудио чыгаруу
Connect your headphones or external speakers to the 3.5mm audio out port for private listening or enhanced sound.

Image: User connecting headphones to the 3.5mm audio out port on the monitor.
6. Features Overview
6.1 High Refresh Rate and Fast Response Time
Experience smooth visuals with a 165Hz refresh rate and a 1ms GTG response time, reducing motion blur and ghosting in fast-paced content.

Image: Visual comparison demonstrating the smoothness of a 165Hz refresh rate versus 75Hz.

Image: Visual comparison highlighting the reduction of afterimage and ghosting with 1ms GTG response time.
6.2 Adaptive Sync Technology
AMD FreeSync support synchronizes the monitor's refresh rate with compatible graphics cards, eliminating screen tearing and stuttering for fluid gameplay.
Image: Demonstrates the smooth display experience provided by 165Hz and FreeSync technology.
6.3 IPS Panel and Full HD Resolution
The IPS panel offers wide 178-degree viewing angles and accurate color reproduction. The 1920 x 1080p Full HD resolution provides clear and detailed images.

Image: Illustrates the enhanced detail and realism of 1080p Full HD resolution compared to standard HD.
6.4 HDR Technology
HDR (High Dynamic Range) technology enhances contrast and color accuracy, bringing more lifelike images to your screen.

Image: Visual representation of how HDR technology improves image quality compared to SDR.
6.5 Кеңири шайкештик
Equipped with HDMI and DisplayPort, the monitor connects to various devices such as PCs, laptops, gaming consoles, and TV boxes.

Image: The monitor connected to multiple devices, demonstrating its broad compatibility.
7. Техникалык тейлөө
7.1 Мониторду тазалоо
- Тазалоодон мурун ар дайым мониторду сууруп коюңуз.
- Жумшак, түксүз кездемени жеңил колдонуңуз dampсуу же жумшак, абразивдүү эмес экран тазалагыч менен иштетиңиз.
- Тазалоочу каражатты түз экранга чачпаңыз.
- Avoid using harsh chemicals like alcohol, benzene, or thinners, as they can damage the screen surface.
7.2 Жалпы кам көрүү
- Мониторду күн нурунан жана жылуулук булактарынан алыс кармаңыз.
- Монитор же анын кабелдерине оор нерселерди коюудан алыс болуңуз.
- Мониторду экстремалдык температурага же нымдуулукка дуушар кылбаңыз.
8. Кыйынчылыктарды
Эгерде сиз мониторуңузда көйгөйлөргө туш болсоңуз, төмөнкү жалпы көйгөйлөрдү чечүү кадамдарын караңыз:
| Көйгөй | Мүмкүн себеп | Чечим |
|---|---|---|
| Экранда сүрөт жок | Электр кабели ажыратылган; Видео кабели ажыратылган; Туура эмес киргизүү булагы тандалды. | Check power and video cable connections. Ensure the correct input source (HDMI/DP) is selected via the OSD menu. |
| Сүрөт бүлбүлдөгөн же туруксуз | Video cable loose or damaged; Graphics card driver issue; Refresh rate mismatch. | Secure video cable. Update graphics card drivers. Adjust refresh rate in your computer's display settings. Enable FreeSync if applicable. |
| Аудио чыккан жерден үн чыкпайт | Headphones/speakers not connected; Volume too low; Incorrect audio output device selected on computer. | Ensure audio device is properly connected. Increase volume on monitor and computer. Select the monitor as the default audio output device in your computer's sound settings. |
| Монитор күйбөй жатат | Power cable disconnected; Power adapter faulty. | Verify power cable is securely connected to both the monitor and a working power outlet. Test the outlet with another device. |
9. Техникалык шарттар
| Өзгөчөлүк | Спецификация |
|---|---|
| Бренд | сувери |
| Модел | SV240ZA |
| Screen Size | 24 дюйм |
| Резолюция | FHD 1080p (1920 x 1080 пиксел) |
| Аспект катышы | 16:9 |
| Панел түрү | IPS (LCD) |
| Жаңыртуу ылдамдыгы | 165 Гц |
| Жооп убактысы | 1 миллисекунд (GTG) |
| Контраст катышы | 1000:1 |
| Жарыктык | 220 кд/м² |
| Viewбурч | 178 градус |
| Байланыш | 1 x HDMI, 1 x DisplayPort, 1 x USB (charging only), 1 x 3.5mm Audio Out |
| Adaptive Sync | AMD FreeSync |
| VESA тоосу | 75мм x 75мм |
| Тилтти тууралоо | -3 градустан 18 градуска чейин |
| Өлчөмдөрү (W x Y x D) | 54.6 cm x 32.3 cm x 9.7 cm (approximate, without stand) |

Image: Detailed dimensions of the suevery SV240ZA monitor.
10. Кепилдик жана колдоо
10.1 Кепилдик саясаты
The suevery SV240ZA monitor comes with a one-year free warranty. Returns and replacements are free within 30 days of purchase for quality issues.
10.2 Кардарларды колдоо
For any quality issues or support inquiries regarding your monitor, please contact suevery customer support. Refer to the contact information provided with your purchase documentation or visit the official suevery webжардам үчүн сайт.