1. Коопсуздук нускамалары
Please read all instructions carefully before operating the CREWORKS Auto Heat Press Machine. Failure to follow safety guidelines may result in injury or damage to the machine.
- Электр коопсуздугу: Машинанын жерге туташтырылган розеткага туура вольт менен туташтырылганын текшериңизtage (1400W). Do not operate with damaged cords or plugs.
- Ысык беттер: The heat platen reaches high temperatures (up to 250°C / 482°F). Avoid direct contact with the platen during operation. Use heat-resistant gloves if necessary.
- Вентиляция: Operate the machine in a well-ventilated area to dissipate heat and any fumes from materials.
- Туруктуулук: Машинаны туруктуу, тегиз жана ысыкка чыдамдуу бетке коюңуз.
- Балдар жана үй жаныбарлары: Иш учурунда балдарды жана үй жаныбарларын машинадан алыс кармаңыз.
- Авто өчүрүү: The machine features an auto shutoff after 30 minutes of inactivity for safety.
2. Продукт бүтүп калдыview
The CREWORKS 15x15 Inch Auto Heat Press Machine is designed for efficient and precise heat transfer applications on various materials.
2.1 Компоненттер
- Heat Platen: The upper heating element (15x15 inches / 38x38 cm).
- Lower Platen/Ironing Board: The base where materials are placed, featuring a pull-out design.
- Башкаруу кутусу: Digital LCD panel for temperature, time, and pressure settings.
- Басымды жөндөө баскычы: Located on top for adjusting pressure levels.
- туткасы: For operating the press mechanism.
- Tension Springs: Provide even pressure distribution.
- Slide Rails: Enable smooth pull-out of the lower platen.

Figure 2.1: ашыкview of the CREWORKS Auto Heat Press Machine with labeled components.
2.2 Негизги өзгөчөлүктөрү
- Automatic Press & Release: Machine automatically presses down and opens when the timer completes.
- Алдын ала коюлган режимдер: 3 preset temperature and timer modes for common materials.
- Ыңгайлаштырылган Орнотуулар: Temperature adjustable up to 250°C (482°F) and time up to 999 seconds.
- Жөнгө салынуучу басым: 5 pressure levels for various material thicknesses (up to 3 cm).
- Тез жана бирдей жылытуу: 1400W power with dual electric heating tubes for uniform heat distribution.
- Pull-Out Lower Platen: Enhances safety by keeping hands away from the heat platen during material placement.

Figure 2.2: Detailed specifications including power, platen area, temperature range, and available attachments.
3. Орнотуу колдонмосу
- Пакеттен чыгаруу: Бардык компоненттерди таңгактан кылдаттык менен алып салыңыз. Келечекте сактоо же ташуу үчүн таңгактарды сактаңыз.
- Жайгашкан жери: Position the heat press on a sturdy, flat, and heat-resistant surface. Ensure adequate clearance around the machine for safe operation and ventilation.
- Кубат туташуу: Электр шнурын жерге туташтырылган электр розеткасына сайыңыз.
- Алгачкы текшерүү: Before first use, inspect the machine for any visible damage or loose parts.
4. Иштөө нускамалары
4.1 Башкаруу панелинин үстүнөview
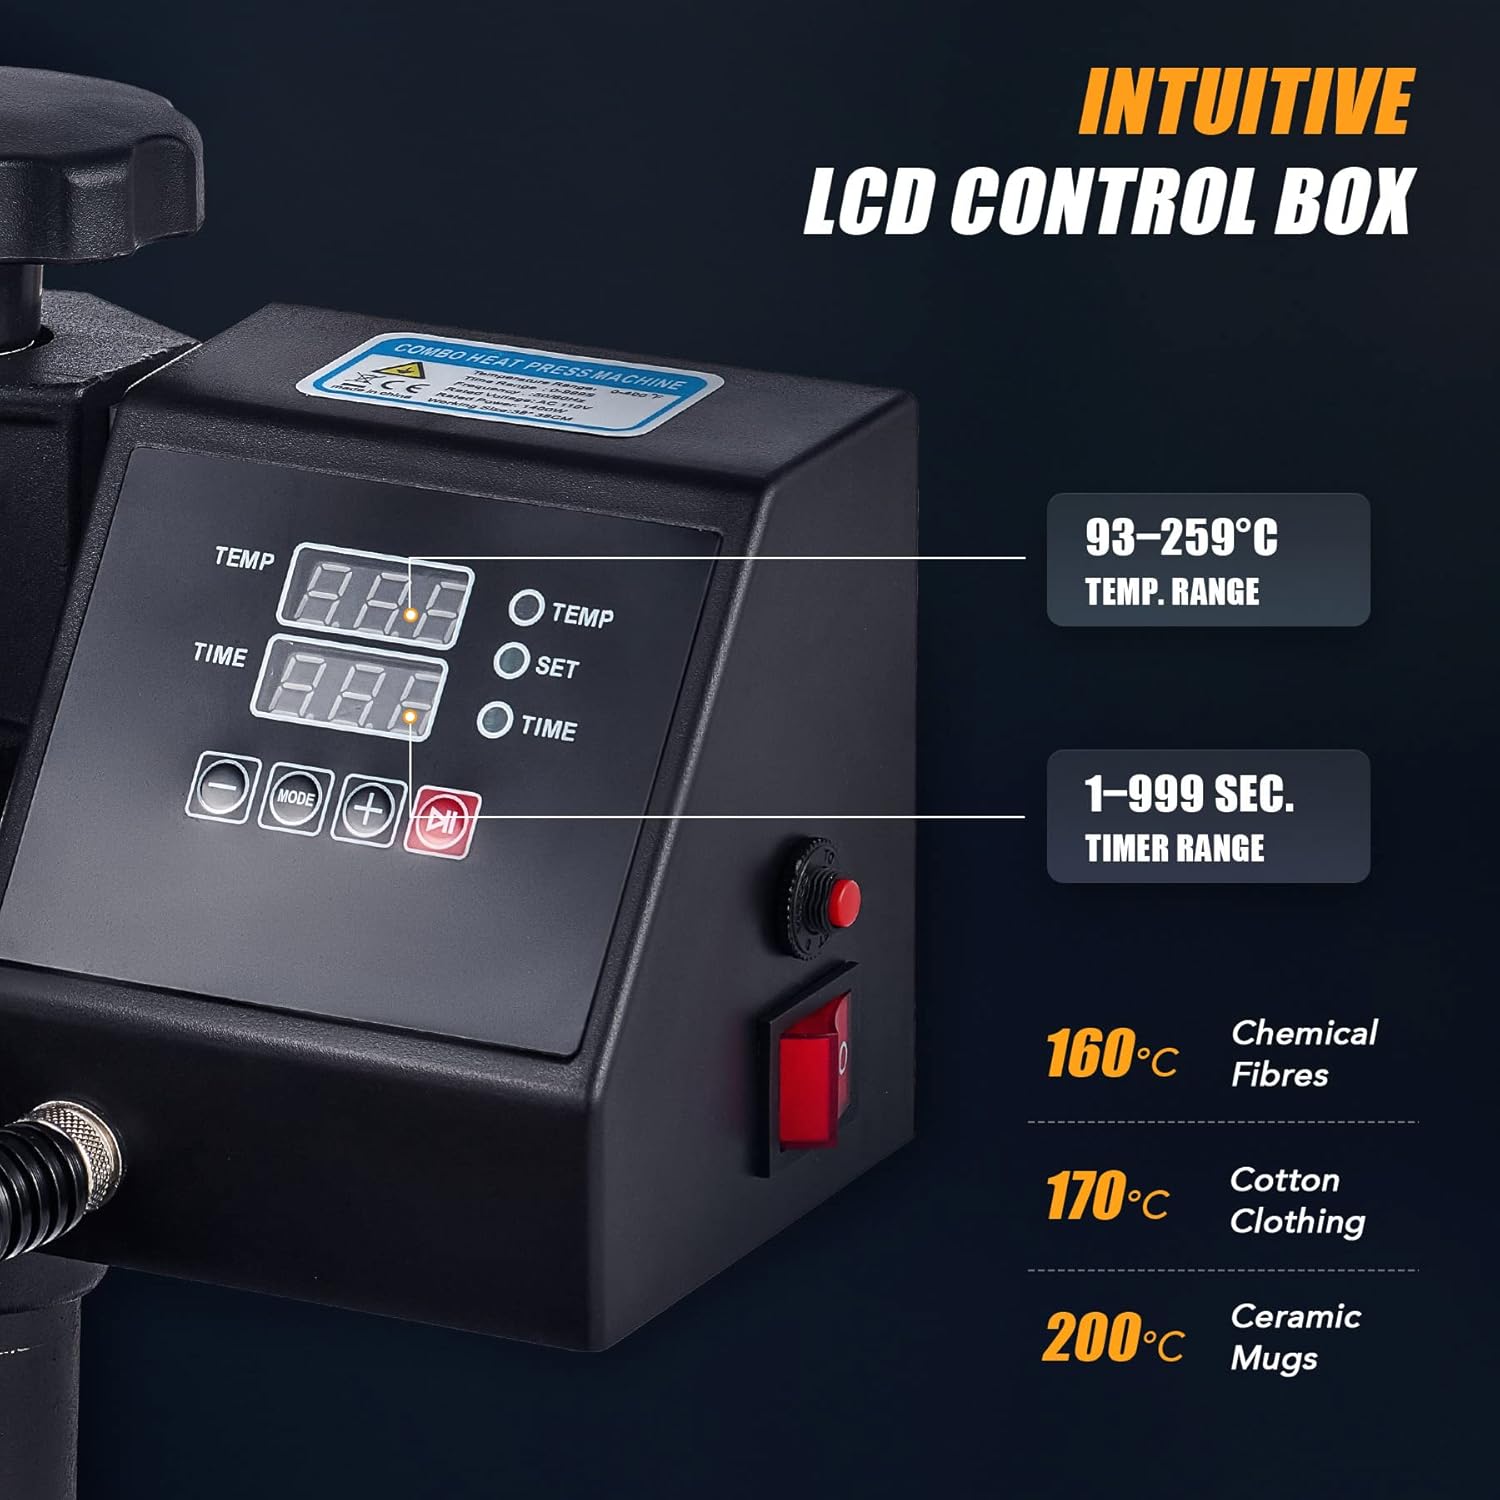
Figure 4.1: Close-up of the intuitive LCD control box with temperature, time, and pressure settings.
- Кубат баскычы: Turns the machine on/off. Flashes white when powered on.
- Температура баскычы: Toggles temperature setting mode. Long press to switch between Celsius and Fahrenheit.
- Убакыт баскычы: Toggles time setting mode.
- Pressure Button: Toggles pressure setting mode. Long press to switch between pounds and kilograms.
- Increase (+) / Decrease (-) Buttons: Adjust values for temperature, time, and pressure.
- Режим баскычы: Cycles through preset modes (P1, P2, P3, P4) and custom modes (C1, C2, C3, C4).
- Start Button (R): Initiates the pressing cycle. Turns green when ready.
4.2 Негизги операция
- Күйгүзүү: Press the Power button. The LCD screen will display current temperature, time, and pressure values.
- Adjust Screen Angle: The control panel can be adjusted for better viewing.
- Температураны коюу: Press the Temp button. The temperature value will flash. Use the Increase/Decrease buttons to set the desired temperature. Long press Temp to change units (°C/°F).
- Убакытты коюу: Press the Time button. The time value will flash. Use the Increase/Decrease buttons to set the desired time.
- Орнотуу басымы: Press the Pressure button. The pressure value will flash. Use the Increase/Decrease buttons to set the desired pressure. Short press adjusts by 20 lbs/10 kg, long press by 40 lbs/20 kg. Long press Pressure to change units (lbs/kg).
- Pre-Press Material: While the machine heats up, pull out the lower platen using the handle. Place your material (e.g., T-shirt) on the ironing board. Pre-press the material for a few seconds to remove moisture and wrinkles. Push the platen back in and press the Start button. The heat plate will automatically ascend after the pre-press.
- Place Design: Pull out the lower platen again. Carefully place your transfer design onto the material.
- Басууну баштаңыз: Push the lower platen back into position. Once the set temperature is reached (Start button turns green), press the Start button to begin the heat transfer process. The machine will automatically press down and begin a countdown.
- Auto Release: After the countdown, the heat plate will automatically ascend to its original position.
- Remove Material: Pull out the lower platen and carefully remove your finished material.
4.3 Алдын ала коюлган режимдер
The machine offers 4 preset modes for common heat transfer materials to streamline your workflow.
- Mode 1 (P1): For Pure and Chameleon HTV. (Example: 295°F, 170 lbs, 15s)
- Mode 2 (P2): For Glitter and Holographic HTV, DTF Transfer Film. (Example: 300°F, 170 lbs, 15s)
- Mode 3 (P3): For Printable HTV, Heat Transfer Paper. (Example: 320°F, 170 lbs, 20s)
- Mode 4 (P4): For Sublimation Paper. (Example: 390°F, 170 lbs, 40s)
To select a preset mode, press the Mode button repeatedly until the desired mode (P1-P4) is displayed.
4.4 Custom Modes
The machine also provides 4 customizable modes (C1-C4) for your specific heat settings. You can set and save your preferred temperature, time, and pressure for frequently used materials.
To set a custom mode:
- Select a custom mode (C1-C4) by pressing the Mode button.
- Adjust the Temperature, Time, and Pressure using their respective buttons and the Increase/Decrease buttons.
- The machine will automatically save these settings for the selected custom mode.
4.5 Auto Mode for Batch Production
For efficient batch production, the auto mode allows the machine to automatically press and release without manual intervention after the initial setup.
- Set your desired temperature, time, and pressure (either using a preset or custom mode).
- Place your material and design on the pulled-out lower platen.
- Push the lower platen back into the machine. The machine will automatically initiate the press cycle.
- Once the cycle is complete, the heat plate will automatically ascend.
- Pull out the lower platen, remove the finished item, and place the next item. The machine will be ready for the next press.
Video 4.1: HTVRONT Auto Heat Press 2-Digit Tutorial. This video demonstrates the control panel functions and basic operation, including setting temperature, time, and pressure, as well as using preset and auto modes.
Video 4.2: Make hoodie, t-shirt, cup, cap, plate. This video showcases various applications of a heat press machine, including different materials and accessories.
Video 4.3: CREWORKS 16x20 Inch Auto Open Heat Press Machine. This video demonstrates the auto-open feature of a CREWORKS heat press, showing how the platen automatically lifts after the press cycle.
Video 4.4: CoolSub 15*15 Slide Out Heat Press Machine. This video highlights the convenient slide-out platen design, which improves safety and ease of use during heat transfer.
5. Техникалык тейлөө
Тийиштүү техникалык тейлөө жылуулук пресс машинаңыздын узак мөөнөттүү иштешин жана оптималдуу иштешин камсыз кылат.
- Тазалоо: Regularly wipe down the heat platen with a soft, dry cloth when the machine is cool. For stubborn residue, use a specialized platen cleaner.
- Силикон Pad: Ensure the silicone pad on the lower platen is clean and free of debris. Replace if it becomes damaged or worn.
- Майлоо: Periodically apply a small amount of high-temperature grease to the slide rails for smooth operation.
- Сактагыч: Машинаны колдонбогондо кургак, чаңсыз жерде сактаңыз.
6. Кыйынчылыктарды
Эгерде сиз жылуулук прессиңизде көйгөйлөргө туш болсоңуз, төмөнкү кеңири таралган көйгөйлөрдү жана чечимдерди караңыз:
| Көйгөй | Мүмкүн себеп | Чечим |
|---|---|---|
| Машина иштебей жатат | Power cord unplugged, power switch off, circuit breaker tripped. | Check power connection, ensure switch is on, reset circuit breaker. |
| Жылуулуктун бирдей эмес өткөрүлүшү | Uneven pressure, damaged heat platen, incorrect temperature. | Adjust pressure knob, inspect heat platen for damage, verify temperature setting. |
| Design not adhering | Incorrect temperature/time, insufficient pressure, wrong material type. | Adjust temperature/time, increase pressure, ensure material is compatible with transfer type. |
| Material burning/scorching | Temperature too high, time too long, no protective sheet. | Lower temperature, reduce time, always use a Teflon sheet or parchment paper. |
7. Техникалык шарттар
- Модел: CREWORKS 15x15 Inch Auto Heat Press
- Platen Size: 15 x 15 дюйм (38 x 38 см)
- Күч: 1400 Вт
- Тtage: Стандарттык үй чарбасы томtage (check product label for specific voltage)
- Температура диапазону: 250°C (482°F) чейин
- Убакыт диапазону: 0-999 секунд
- Материал: Aluminum (heat platen)
- Коопсуздук өзгөчөлүктөрү: FCC Certified, Auto Shutoff after 30 minutes of inactivity.
8. Кепилдик жана колдоо
This product comes with a limited warranty. For specific warranty terms, conditions, and duration, please refer to the product packaging or contact CREWORKS customer support. For technical assistance or further inquiries, please visit the official CREWORKS webсайтка же кардарларды тейлөө бөлүмүнө кайрылыңыз.