
1. Киришүү
This manual provides comprehensive instructions for the installation, operation, and maintenance of the TYAN B7126T65V10E4HR Thunder SX TS65-B7126 Storage Server. Please read this manual thoroughly before operating the server to ensure proper functionality and to prevent damage.
2. Коопсуздук маалыматы
Жабдуулардын бузулушун жана жаракат алуусун алдын алуу үчүн төмөнкү коопсуздук чараларын сактаңыз:
- Кандайдыр бир орнотууну же техникалык тейлөөнү аткаруудан мурун ар дайым электр кубатын ажыратыңыз.
- Электр шоктун алдын алуу үчүн туура жерге туташтырууну камсыз кылыңыз.
- Operate the server in a well-ventilated environment to prevent overheating.
- Do not expose the server to moisture or extreme temperatures.
- Тейлөөнү же оңдоону квалификациялуу адистер гана аткарышы керек.
3. Пакеттин мазмуну
Пакетте бардык буюмдар бар экенин текшериңиз:
- TYAN B7126T65V10E4HR Thunder SX TS65-B7126 Storage Server Unit
- Электр шнур(лары)
- Accessory Kit (screws, cables, etc.)
- Quick Installation Guide (this manual serves as the detailed guide)
4. Продукт бүтүп калдыview
The TYAN Thunder SX TS65-B7126 is a high-performance storage server designed for demanding data center environments. It features extensive storage capabilities and flexible expansion options.
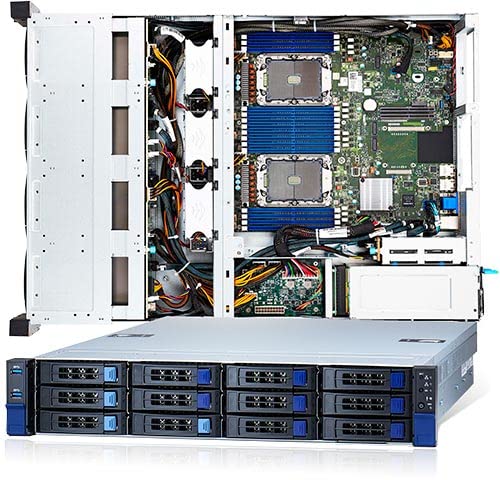
Сүрөт 4.1: Алдыңкы view of the TYAN B7126T65V10E4HR Thunder SX TS65-B7126 Storage Server, showing drive bays and front panel controls.
Негизги өзгөчөлүктөрү:
- Эстутум: 16 DIMM slots supporting DDR4 3200 memory.
- Алдыңкы сактоочу жай: 12 x 3.5" SATA hot-swap, tool-less drive bays, with optional support for 4 NVMe U.2 drives.
- Арткы сактоочу жай: 2 x 2.5" SATA hot-swap, tool-less drive bays.
- Networking: PCIe 3.0 x16 OCP v2.0 LAN mezzanine slot (Type 1).
- Ички сактагыч: 1 x NVMe/PCIe 3.0 x2 M.2 2280 slot.
5. Орнотуу
5.1 Стеллажды орнотуу
The server is designed for standard 19-inch rack mounting. Secure the server using appropriate rack rails and screws (typically included in the accessory kit) to ensure stability and proper airflow.
5.2 Дискти орнотуу
- 3.5" SATA/NVMe Drives: Open the drive bay latch, slide the drive into the bay until it clicks into place. For NVMe U.2 drives, ensure the correct backplane configuration is in place.
- 2.5" SATA Rear Drives: Locate the rear 2.5" drive bays. Slide the drives into the bays until secured.
- M.2 NVMe Drive: Install the M.2 drive into the dedicated M.2 2280 slot on the motherboard, securing it with the provided screw.
5.3 Эстутум орнотуу
Install DDR4 3200 DIMMs into the 16 available slots. Refer to the motherboard manual for specific memory population rules to optimize performance.
5.4 Кубат туташтыруу
Connect the power cord(s) to the server's power supply unit(s) and then to a grounded power outlet or PDU. Ensure all power connections are secure.
5.5 Баштапкы жүктөө
Press the power button on the front panel. Monitor the boot process and access the BIOS/UEFI setup as needed to configure boot devices, RAID arrays, and other system settings.
6. Иштөө нускамалары
6.1 Операциялық системаны орнотуу
Install your preferred operating system (e.g., Windows Server, Linux distribution) using a bootable USB drive or network installation. Ensure all necessary drivers are installed for optimal hardware performance.
6.2 Сактагычтын конфигурациясы
Configure your storage drives. For SATA drives, you may use the onboard RAID controller or a separate HBA. For NVMe drives, ensure the operating system has the appropriate drivers. Create logical volumes or file systems as required for your application.
6.3 Тармактын конфигурациясы
Configure the network interfaces, including the OCP v2.0 LAN mezzanine card, with appropriate IP addresses, subnet masks, and gateway settings for your network environment.
7. Техникалык тейлөө
7.1 Тазалоо
Regularly clean the server's exterior and ensure air vents are free from dust accumulation. Use compressed air to clear dust from internal components, ensuring power is disconnected first.
7.2 Микропрограмма жаңыртуулары
Мезгил-мезгили менен өндүрүүчүнүн текшерүү website for updated BIOS/UEFI, BMC, and RAID controller firmware. Apply updates as recommended to improve stability, performance, and security.
7.3 Drive Replacement
The server features hot-swap drive bays. For failed drives, identify the faulty unit, unmount it from the operating system (if applicable), and carefully remove it. Insert a new, compatible drive, ensuring it seats correctly.
8. Кыйынчылыктарды
8.1 Күч жок
- Check power cord connections to the server and power outlet.
- Verify the power supply unit (PSU) status indicators.
- Электр розеткасынын иштешин текшериңиз.
8.2 Система жүктөлбөй жатат
- Check memory modules are properly seated.
- Verify boot device order in BIOS/UEFI.
- Listen for POST (Power-On Self-Test) beep codes and consult the motherboard manual for their meaning.
8.3 Диск аныкталган жок
- Ensure the drive is fully seated in its bay.
- Check drive status LEDs.
- Verify cabling for non-hot-swap drives.
- Check BIOS/UEFI or RAID controller settings for drive detection.
9. Техникалык шарттар
| Өзгөчөлүк | Деталь |
|---|---|
| Модел | B7126T65V10E4HR Thunder SX TS65-B7126 |
| Өндүрүүчү | ТЯН |
| Memory Support | 16 DIMM slots, DDR4 3200 |
| Front Drive Bays | 12 x 3.5" SATA (hot-swap, tool-less) w/ opt. 4 NVMe U.2 |
| Rear Drive Bays | 2 x 2.5" SATA (hot-swap, tool-less) |
| Internal M.2 Slot | 1 x NVMe/PCIe 3.0 x2 M.2 2280 |
| LAN Mezzanine Slot | PCIe 3.0 x16 OCP v2.0 (Type 1) |
| ASIN | B0BLGZ15V10E4HR |
| Дата биринчи жеткиликтүү | 4-ноябрь, 2022-жыл |
10. Кепилдик жана колдоо
For warranty information and technical support, please refer to the official TYAN webсайтына кириңиз же ыйгарым укуктуу дилериңизге кайрылыңыз. Кепилдик талаптары үчүн сатып алганыңызды тастыктаган документти сактап коюңуз.
Онлайн ресурстар: Visit the TYAN official website for the latest drivers, firmware, and additional documentation.