1. Киришүү
Welcome to the instruction manual for the Supermicro X13SEM-TF motherboard. This document provides essential information for the proper installation, configuration, and maintenance of your motherboard. Please read this manual thoroughly before proceeding with any installation or operation.
The Supermicro X13SEM-TF is designed to support Intel Xeon SPR-SP CPUs with up to 56 cores and 350W TDP, featuring EBGPCH and 8-channel DDR5 memory support.
2. Продукт бүтүп калдыview
Below is an image of the Supermicro X13SEM-TF motherboard, highlighting its key components.
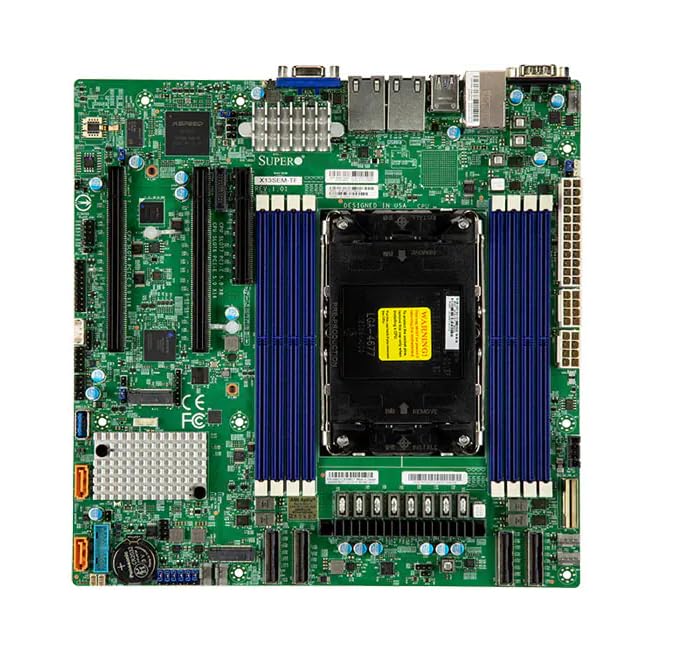
Image Description: This image displays the Supermicro X13SEM-TF motherboard. Key visible components include the large LGA 4677 CPU socket at the center, surrounded by eight DDR5 DIMM slots (blue). Various PCIe slots, SATA ports, USB headers, and power connectors are distributed across the green PCB. The rear I/O panel features USB ports, Ethernet ports, and a VGA port. Heatsinks are visible over the VRM and chipset areas.
3. Коопсуздук маалыматы
Always observe standard electrostatic discharge (ESD) precautions when handling the motherboard.
- Disconnect all power sources before installation or maintenance.
- Антистатикалык билек боонун тагыңыз.
- Avoid touching components directly unless necessary.
- Ensure proper ventilation within the system chassis.
- Refer to professional assistance if unsure about any procedure.
4. Орнотуу жана орнотуу
4.1. Пакеттин мазмуну
Пакетте бардык компоненттер бар экенин текшериңиз:
- Supermicro X13SEM-TF Motherboard
- I/O Shield (эгерде интеграцияланбаса)
- SATA кабелдери
- Колдонуучунун Колдонмосу (бул документ)
- Драйвер CD/USB (же нускамаларды жүктөө)
4.2. Motherboard орнотуу
- Шассиди даярдаңыз: Ensure the computer chassis is ready for motherboard installation. Install standoffs in the appropriate locations.
- I/O Shield орнотуу: If provided separately, install the I/O shield into the chassis opening.
- Mount Motherboard: Carefully place the motherboard into the chassis, aligning it with the standoffs and I/O shield. Secure it with screws.
- CPU орнотуу:
- CPU розеткасынын рычагын ачыңыз.
- Align the CPU (Intel Xeon SPR-SP) with the socket, matching the triangular markers.
- Процессорду розеткага акырын салыңыз. Аны мажбурлаба.
- CPUну бекитүү үчүн розетка рычагын жабыңыз.
- CPU Cooler орнотуу: Attach the compatible CPU cooler according to its manufacturer's instructions. Ensure proper thermal paste application.
- Орнотуу эстутум (RAM):
- Open the clips on the DDR5 DIMM slots.
- Align the memory modules with the slots, ensuring the notch matches.
- Press down firmly on both ends until the clips snap into place. Refer to the motherboard layout for optimal memory population.
- Туташуу кубаты:
- Connect the 24-pin ATX main power connector.
- Connect the 8-pin (or 4+4-pin) CPU power connector(s).
- Сактагыч түзмөктөрдү туташтыруу: Connect SATA data and power cables to your storage drives (HDDs/SSDs) and the motherboard's SATA ports.
- Алдыңкы панелдин колонкаларын туташтыруу: Connect the power switch, reset switch, HDD LED, power LED, and front panel USB/audio headers to their respective pins on the motherboard. Refer to the motherboard diagram for correct pin assignments.
- Кеңейтүү карталарын орнотуу: Insert any necessary PCIe expansion cards (e.g., graphics cards, network cards) into the appropriate PCIe slots and secure them.
5. Иштөө нускамалары
5.1. Баштапкы күйгүзүү
After completing all connections, connect the power supply to an electrical outlet and power on the system.
The system should boot to the BIOS/UEFI interface or an installed operating system.
5.2. BIOS/UEFI конфигурациясы
To enter the BIOS/UEFI setup, press the designated key (usually DEL or F2) ишке киргизүү учурунда.
Configure boot order, system time, and other necessary settings. Save changes before exiting.
5.3. Драйверди орнотуу
Install all necessary drivers for the motherboard chipset, network, audio, and any other integrated components. Drivers can be found on the Supermicro website or the provided driver media.
6. Техникалык тейлөө
Regular maintenance ensures optimal performance and longevity of your motherboard.
- Чаңды тазалоо: Маал-маалы менен кысылган аба менен энелик платадан жана анын компоненттеринен чаңды тазалап туруңуз. Системанын өчүрүлгөнүн жана розеткадан суурулганын текшериңиз.
- BIOS/UEFI жаңыртуулары: Supermicro текшерүү website for BIOS/UEFI updates. Update only if necessary and follow the provided instructions carefully.
- Драйвер жаңыртуулары: Keep drivers updated for optimal compatibility and performance.
- Физикалык текшерүү: Энелик платаны мезгил-мезгили менен бузулуу, бош туташуулар же томпок конденсаторлор бар-жогун текшерип туруңуз.
7. Кыйынчылыктарды
7.1. Күч жок
- Бардык электр байланыштарын текшериңиз (24-пин ATX, 8-пин CPU).
- кубат менен камсыздоо күйгүзүлгөнүн текшериңиз.
- Башка система же электр менен жабдууну сыноочу менен кубат менен камсыздоону текшериңиз.
- Алдыңкы панелдин кубат которгучу туташуусун текшериңиз.
7.2. Дисплей жок
- Монитор туташып, күйгүзүлгөнүн текшериңиз.
- Check if the graphics card (if dedicated) is properly seated and powered.
- RAM модулдарын кайра коюп көрүңүз.
- If using integrated graphics, ensure the CPU supports it and the display cable is connected to the motherboard's video output.
7.3. Системанын туруксуздугу / кыйроолор
- CPU жана GPU температурасын текшерүү.
- Verify RAM is correctly installed and compatible.
- Эстутум диагностикалык куралдарын иштетиңиз.
- Бардык драйверлер орнотулганын жана жаңыртылганын текшериңиз.
- Бош кабелдерди же компоненттерди текшериңиз.
8. Техникалык шарттар
| Өзгөчөлүк | Деталь |
|---|---|
| Модел | Supermicro X13SEM-TF (MBD-X13SEM-TF-B) |
| CPU колдоо | Intel Xeon SPR-SP, up to 56 cores, 350W TDP |
| CPU розетка | LGA 4677 |
| Чипсет | EBGPCH |
| Эс | 8-channel DDR5 DIMM slots |
| Өлчөмдөрү (LxWxH) | 16 x 12 x 5 дюйм |
| Салмагы | 2.86 фунт |
| Өндүрүүчү | SuperMicro |
| Дата биринчи жеткиликтүү | 20-январь, 2023-жыл |
9. Кепилдик жана колдоо
9.1. Кепилдик маалыматы
For detailed warranty information, please refer to the official Supermicro webсайтка же продуктуңузга кошулган кепилдик картасы.
9.2. Техникалык колдоо
If you encounter issues that cannot be resolved using this manual, please contact Supermicro technical support.
Visit the official Supermicro website for support resources, driver downloads, and contact information: www.supermicro.com/support


