
1. Киришүү
This manual provides essential information for the safe and efficient operation of your NEC NP-M271X Projector. Please read this manual thoroughly before using the projector and retain it for future reference. The NEC NP-M271X projector is designed to provide bright, detailed image projection with native XGA resolution, 3200 lumens brightness, and HDMI connectivity, suitable for various presentation and viewчөйрөлөр.
2. Коопсуздук маалыматы
Коопсуз иштөөнү камсыз кылуу жана зыян келтирбөө үчүн төмөнкү сактык чараларын аткарыңыз:
- Электр камсыздоо: Белгиленген электр менен жабдууну гана колдонуңузtage. Электр шнурунун бекем туташтырылганын жана бузулбаганын текшериңиз.
- Вентиляция: Вентиляция тешиктерин жаап албаңыз. Ашыкча ысып кетүүнүн алдын алуу үчүн проектордун айланасында туура аба агымы үчүн жетиштүү мейкиндикти камсыз кылыңыз.
- Жайгашкан жери: Place the projector on a stable, level surface. Avoid locations with high humidity, dust, or extreme temperatures.
- Объектив: l болгондо проектордун объективине тике карабаamp is on, as this can cause eye damage.
- Тазалоо: Тазалоодон мурун электр шнурын ажыратыңыз. Жумшак, кургак чүпүрөктү колдонуңуз. Суюктук же аэрозолдук тазалоочу каражаттардан качыңыз.
- Тейлөө: Проекторду өзүңүз тейлөөгө аракет кылбаңыз. Бардык тейлөө иштерин квалификациялуу тейлөө кызматкерлерине тапшырыңыз.
3. Продукт бүтүп калдыview
The NEC NP-M271X projector features a robust design with various input/output ports and user-friendly controls.
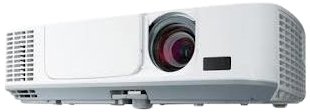
3.1-сүрөт: Фронт view of the NEC NP-M271X Projector, showing the lens and ventilation grilles.
3.1 алдыңкы панели
- Проекциялык линза: Сүрөттү экранга проекциялайт.
- Фокус шакеги: Сүрөттүн тактыгын тууралайт.
- Масштабдуу шакек: Сүрөттүн өлчөмүн тууралайт.
- IR алуучу: Алыстан башкаруу пультунан сигналдарды алат.
3.2 Арткы панель (туташуу)
Арткы панелде тышкы түзмөктөрдү туташтыруу үчүн ар кандай порттор бар.
- HDMI киргизүү: For connecting digital video/audio sources.
- VGA Input (Computer IN): For connecting computers via VGA cable.
- USB порт: USB түзмөктөрүн туташтыруу же микропрограмманы жаңыртуу үчүн.
- Аудио кириш/чыгыш: For connecting external audio sources or outputting audio.
- LAN порту: Тармакка туташуу жана башкаруу үчүн.
- Power Inlet: AC кубат шнурын туташтыруу үчүн.
3.3 Top Panel (Controls)
- Кубат баскычы: Проекторду күйгүзөт же өчүрөт.
- Киргизүү баскычтары: Киргизүү булагын тандайт.
- Меню баскычы: Экрандагы дисплей (OSD) менюсуна кирет.
- Чабыттоо баскычтары: Менюларды карап чыгуу жана жөндөөлөрдү тууралоо үчүн колдонулат.
- Негизги ташты оңдоо: Сүрөттүн бурмаланышын тууралайт.
4. Орнотуу
4.1 Проекторду жайгаштыруу
Position the projector on a stable surface or mount it securely. Ensure the projector is perpendicular to the screen for optimal image geometry. Adjust the projector's height using the adjustable feet if necessary.
4.2 Кубатты туташтыруу
- Connect the supplied AC power cord to the projector's power inlet.
- Электр шнурунун экинчи учун жерге туташтырылган электр розеткасына сайыңыз.
- The power indicator light will illuminate, typically in amber or red, indicating standby mode.
4.3 Киргизүү булактарын туташтыруу
Видео булагыңызды (мисалы, ноутбук, Blu-ray ойноткуч) тиешелүү кабель аркылуу проекторго туташтырыңыз.
- HDMI: Connect an HDMI cable from your source device to the projector's HDMI input.
- VGA: Connect a VGA cable from your computer to the projector's Computer IN port. If audio is required, connect a separate audio cable from your computer's audio output to the projector's Audio IN port.
- USB: For certain media playback or control functions, connect a USB device to the USB port.
5. Проекторду иштетүү
5.1 Күйгүзүү/өчүрүү
- Күйгүзүү: Press the Power button on the projector's control panel or remote control. The power indicator will turn green, and the lamp жарык кылат.
- Өчүрүү: Press the Power button again. A confirmation message may appear. Press Power again to confirm shutdown. The projector will enter cooling mode, and the power indicator will return to amber/red. Do not unplug the projector during cooling.
5.2 Basic Image Adjustment
- Фокус: Объективдеги фокус шакекти сүрөт курч болгонго чейин айлантыңыз.
- Чоңойтуу: Сүрөттүн өлчөмүн тууралоо үчүн линзадагы масштабдоо шакекчесин айландырыңыз.
- Негизги ташты оңдоо: If the image appears trapezoidal, use the Keystone buttons on the control panel or remote to correct the distortion.
5.3 Киргизүү булагын тандоо
Press the "Input" or specific input source buttons (e.g., "HDMI", "Computer") on the control panel or remote control to switch between connected devices.
5.4 Меню Навигациясы
Press the "Menu" button to access the On-Screen Display (OSD) menu. Use the navigation arrows to browse options and the "Enter" button to select. Press "Menu" or "Exit" to close the OSD.
6. Техникалык тейлөө
Үзгүлтүксүз техникалык тейлөө проектордун оптималдуу иштешин камсыздайт жана анын иштөө мөөнөтүн узартат.
6.1 Cleaning the Projector Lens
Gently wipe the lens with a soft, lint-free cloth specifically designed for optical lenses. Do not use abrasive cleaners or excessive force.
6.2 Аба чыпкасын тазалоо
The air filter prevents dust from entering the projector. Clean the filter regularly (e.g., every 100-200 hours of use) by removing it and using a vacuum cleaner or compressed air to remove accumulated dust. Refer to the projector's specific filter access instructions.
6.3 Лamp Алмаштыруу
Проектор лamp чектүү өмүрү бар. Качан лamp индикатор күйөт же сүрөттүн жарыктыгы бир топ төмөндөйт, lamp may need replacement. Always use genuine NEC replacement lamps. Consult a qualified technician for lamp replacement if you are unsure.
7. Кыйынчылыктарды
Проекторуңузда көйгөйлөргө туш болсоңуз, төмөнкү жалпы көйгөйлөрдү жана чечимдерди караңыз:
| Көйгөй | Мүмкүн себеп | Чечим |
|---|---|---|
| Сүрөт көрсөтүлгөн жок | Incorrect input source selected, loose cable connection, source device not outputting signal. | Verify input source, check cable connections, ensure source device is on and configured to output. |
| Сүрөт бүдөмүк | Линза фокустан чыгып кетти. | Проектор объективиндеги фокус шакегин тууралаңыз. |
| Сүрөт трапеция түрүндө | Проектор экранга перпендикуляр эмес. | Keystone коррекциясын колдонуңуз же проектордун ордун башка жерге коюңуз. |
| Проектор ысып, өчүп калат | Бөгөттөлгөн желдетүү, кир аба чыпкасы. | Ensure clear ventilation paths, clean the air filter. |
8. Техникалык шарттар
Key technical specifications for the NEC NP-M271X Projector:
| Өзгөчөлүк | Деталь |
|---|---|
| Бренд | NEC |
| Модель аты | NP M271X |
| Продукт түрү | LCD проектор |
| Native Resolution | 1024 x 768 (XGA) |
| Дисплейдин максималдуу чечилиши | 1600 x 1200 |
| Жарыктык | 2700 Lumens (Standard Mode) |
| Контраст катышы | 3000:1 |
| Байланыш технологиясы | HDMI, USB, VGA |
| Сүрөттүн максималдуу өлчөмү | 300 дюйм |
| Элемент Салмагы | 4 килограмм |
| Controller Type | Control Button |
| Ватtage | 248 ватт |
| Монтаж түрү | Столдун үстү |
| UPC / GTIN | 657768275883 |
9. Кепилдик жана колдоо
9.1 Кепилдик маалыматы
This NEC NP-M271X Projector (Renewed) comes with a 90 күн чектелген кепилдик. Кепилдик дооматтары үчүн сатып алганыңыздын далилин сактап коюңуз. Кепилдик нормалдуу колдонуудагы материалдардагы жана жасалгадагы кемчиликтерди камтыйт.
9.2 Кардарларды колдоо
For technical assistance, troubleshooting beyond this manual, or warranty service, please contact the seller or refer to the official NEC support channels. You may find additional resources and contact information on the NEC webсайт.