
1. Киришүү
This manual provides instructions for the installation, operation, and maintenance of your NETGEAR GS305P 5-Port PoE Gigabit Ethernet Unmanaged Switch. This device is designed to expand your network connectivity with both standard Gigabit Ethernet and Power over Ethernet (PoE+) capabilities, ideal for small office or home network environments.
2. Пакеттин мазмуну
Пакетиңизде төмөнкү заттар бар экенин текшериңиз:
- NETGEAR GS305P 5-Port PoE Gigabit Ethernet Unmanaged Switch (GS305Pv3)
- Кубаттуу адаптер
- Wallmount Kit
- Ыкчам орнотуу көрсөтмөсү

Image: The NETGEAR GS305P switch, power adapter, and power cord as typically found in the package.
3. Продукт бүтүп калдыview
The NETGEAR GS305P is an unmanaged switch featuring 5 Gigabit Ethernet ports, with 4 of these ports supporting PoE+ (Power over Ethernet Plus). It provides a total power budget of 63W for connected PoE devices. The switch is designed for plug-and-play operation, requiring no software installation or configuration.
Видео: Бүттүview of the NETGEAR 5-Port PoE Switch, demonstrating its features and ease of use.
Front Panel

Image: Front panel of the GS305P switch, highlighting the 5 Gigabit Ethernet ports and LED indicators for power, PoE Max, link/activity, and PoE fault.
- Power LED: Кубаттын абалын көрсөтөт.
- PoE Max LED: Illuminates when PoE power consumption is near maximum capacity.
- Байланыш/Активдүүлүк LEDдери (1-5 порттору): Green for 1000Mbps link, Yellow for 10/100Mbps link. Blinks to indicate activity.
- PoE абалынын LED индикаторлору (1-4 порттор): Green for PoE powered, Yellow for PoE fault.
- Ethernet порттору (1-5): RJ-45 ports for network connections. Ports 1-4 support PoE+.
4. Орнотуу жана орнотуу
The NETGEAR GS305P switch is designed for simple plug-and-play installation. No software configuration is required.
4.1 Которгучту туташтыруу
- Connect the power adapter to the switch's power input and then plug the power adapter into an electrical outlet. The Power LED on the switch will illuminate.
- Connect your router or modem to any of the 5 Gigabit Ethernet ports on the switch using an Ethernet cable.
- Connect your network devices (computers, printers, network storage) to the remaining Gigabit Ethernet ports. For PoE-powered devices (e.g., IP cameras, wireless access points), connect them to ports 1-4.

Image: A diagram illustrating the plug-and-play nature of the unmanaged switch, connecting various devices like WiFi Access Points, IP Cameras, Computers, and NAS.
4.2 Монтаждоо параметрлери
The GS305P switch can be placed on a desktop or mounted on a wall. A wallmount kit is included for secure installation.
- Иш тактада жайгаштыруу: Ensure the switch is placed on a flat, stable surface with adequate ventilation.
- Дубалга орнотуу: Use the provided wallmount kit to secure the switch to a wall. Refer to the quick installation guide for detailed steps on wall mounting.
5. Которгучту иштетүү
Once connected, the switch operates automatically. The LEDs provide visual feedback on the network status.
- Күйгүзүү: The Power LED will be green when the switch is receiving power.
- Network Activity: The Link/Activity LEDs will light up when a device is connected and blink to indicate data transmission.
- PoE күчү: For PoE-powered devices, the PoE Status LED will be green when power is being supplied. If a PoE fault occurs, the LED will turn yellow.
- Тынч операция: The fanless design ensures quiet operation, making it suitable for noise-sensitive environments.
6. Техникалык тейлөө
To ensure optimal performance and longevity of your switch, follow these maintenance guidelines:
- Тазалоо: Которгучтун сыртын тазалоо үчүн жумшак, кургак чүпүрөктү колдонуңуз. Суюктук же аэрозолдук тазалоочу каражаттарды колдонбоңуз.
- Вентиляция: Ашыкча ысып кетүүнүн алдын алуу үчүн желдетүү тешиктери жабылбагандыгын текшериңиз.
- Курчап турган чөйрө: Operate the switch within its specified temperature and humidity ranges. Avoid direct sunlight or extreme temperatures.
- Кабелдик башкаруу: Портторго күч келбөө жана аба агымын жакшыртуу үчүн тармак кабелдерин иреттүү кармаңыз.
7. Кыйынчылыктарды
If you encounter issues with your NETGEAR GS305P switch, refer to the following common troubleshooting steps:
- Кубат жок: Ensure the power adapter is securely connected to the switch and a working electrical outlet. Check the Power LED.
- Шилтеме жок/Аракет: Verify that Ethernet cables are properly connected to both the switch and the connected device. Try a different cable or port. Check the Link/Activity LED.
- PoE түзмөгү күйбөй жатат: Ensure the device is PoE-compatible and connected to one of the PoE+ ports (1-4). Check the PoE Status LED for the port; a yellow light indicates a fault. Verify the total power budget (63W) is not exceeded by all connected PoE devices.
- Жай тармак ылдамдыгы: Ensure all connected devices and cables support Gigabit Ethernet for optimal performance. Check for excessive network traffic.
8. Техникалык шарттар
Key technical specifications for the NETGEAR GS305P switch:
| Өзгөчөлүк | Description |
|---|---|
| Модел | GS305P (GS305Pv3) |
| Порттардын саны | 5 гигабит Ethernet порттору |
| PoE+ порттору | 4 (1-4 порттору) |
| Жалпы PoE кубаттуулугу бюджети | 63 Вт |
| Маалыматтарды өткөрүү ылдамдыгы | 1000 Мбит/с (Гигабит) |
| Которуу түрү | Башкарылбайт |
| Иштин материалы | Металл |
| Өлчөмдөрү (L x W x Y) | 9.5" x 6.7" x 3.4" (approximate, from product data) |
| Тtage | 240 Volts (Power adapter input) |
| Иштөө чөйрөсү | Designed for indoor use in U.S. & CA. |
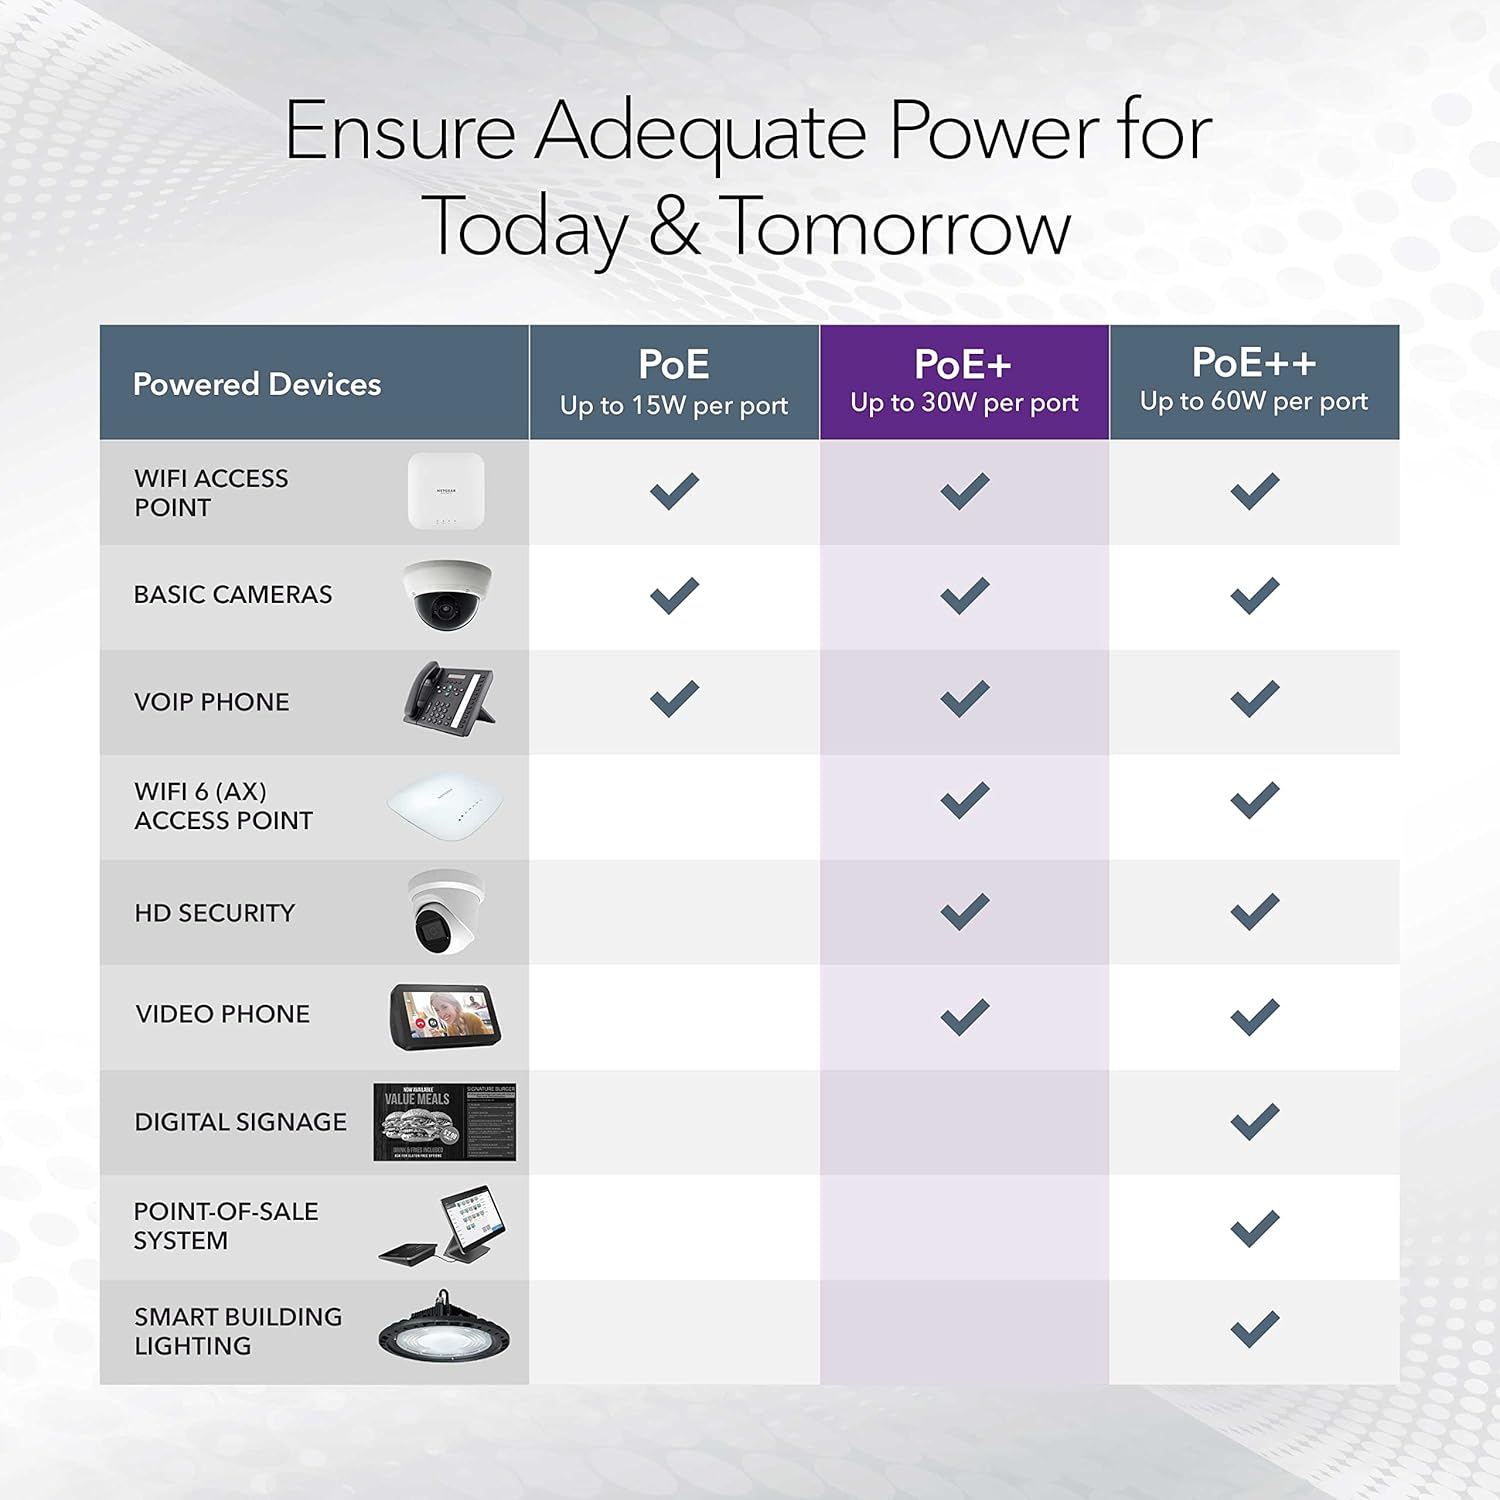
Image: A table illustrating the power capabilities of PoE, PoE+, and PoE++ for different powered devices.
9. Кепилдик жана колдоо
9.1 Кепилдик маалыматы
The NETGEAR GS305P switch comes with an industry-leading 3 жылдык чектелген аппараттык кепилдик. Please retain your proof of purchase for warranty claims. For full warranty terms and conditions, refer to the official NETGEAR webсайтка же продуктуңузга кошулган документтерге.
9.2 Техникалык колдоо
For technical assistance, product registration, or to access additional resources, visit the official NETGEAR support website. You can find FAQs, firmware updates, and community forums there.
NETGEAR колдоо Webсайт: www.netgear.com/support