
Introduction
This manual provides detailed instructions for the installation, operation, and maintenance of your Aqualin Garden Irrigation Timer Controller. This device is designed to automate your garden watering, ensuring efficient and precise irrigation for your plants.

Figure 1: Aqualin Garden Irrigation Timer Controller, showing the main dial and connections.
Продукт бүттүview жана компоненттер
The Aqualin Irrigation Timer Controller is a robust device designed for outdoor use. It features a user-friendly dial for setting irrigation schedules and standard connections for easy integration into your existing watering system.
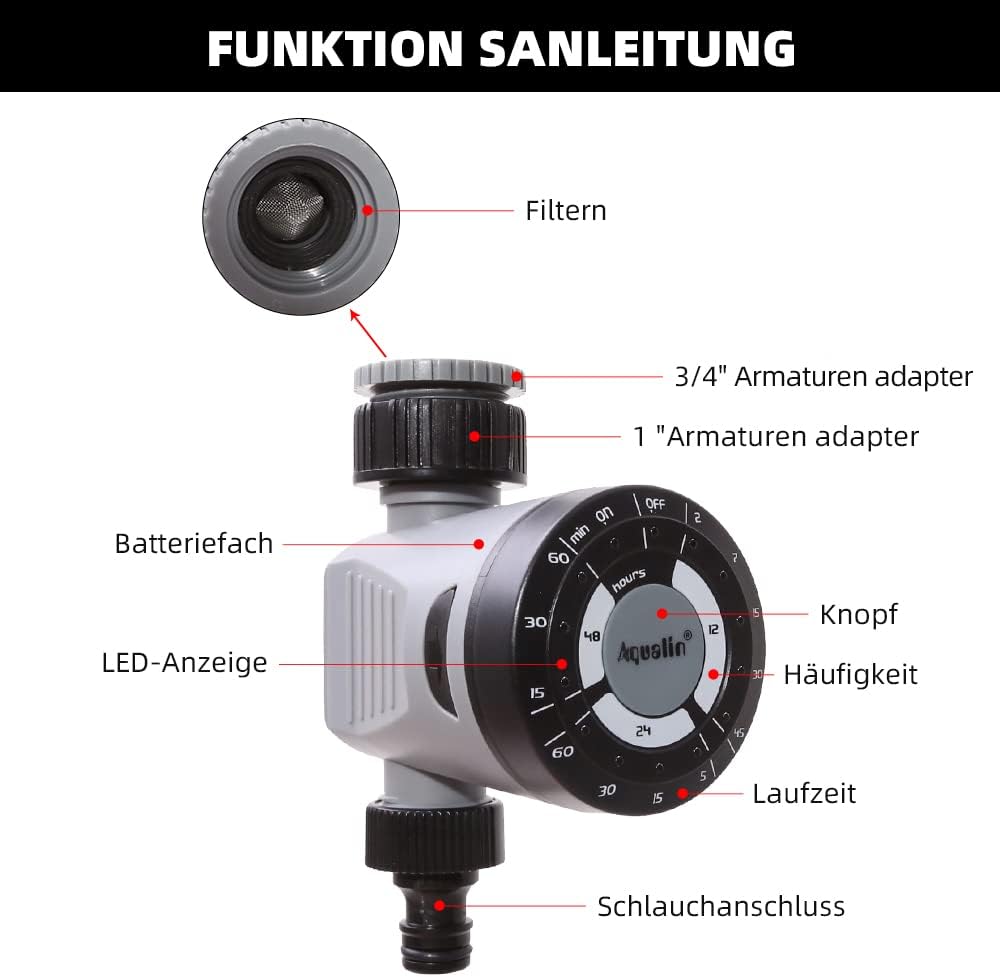
Figure 2: Diagram illustrating the main components of the Aqualin Irrigation Timer, including the filter, 3/4" and 1" faucet adapters, battery compartment, LED indicator, control knob, frequency settings, duration settings, and hose connection.
Негизги компоненттерге төмөнкүлөр кирет:
- Control терүү: Used to set watering frequency and duration.
- Кирүүчү туташуу: For connecting to a standard garden faucet (includes adapters for 3/4" and 1" sizes).
- Розетка туташуу: For connecting to a garden hose or irrigation system.
- Батарея бөлүмү: Houses the power source for the timer.
- LED көрсөткүчү: Статус боюнча пикир берет.

Figure 3: The Aqualin Irrigation Timer shown with its included 3/4" and 1" faucet adapters, ready for installation.
Орнотуу жана орнотуу
Батарея орнотуу
The timer requires 2 AAA batteries for operation. Follow these steps to install the batteries:
- Press the two buttons located on the sides of the timer to open the battery compartment.
- Батарея отсегинин капкагын кылдаттык менен алып салыңыз.
- Insert 2 x LR03/AAA 1.5V Alkaline batteries, ensuring correct polarity (+/-).
- Replace the battery compartment cover and ensure it clicks securely into place.
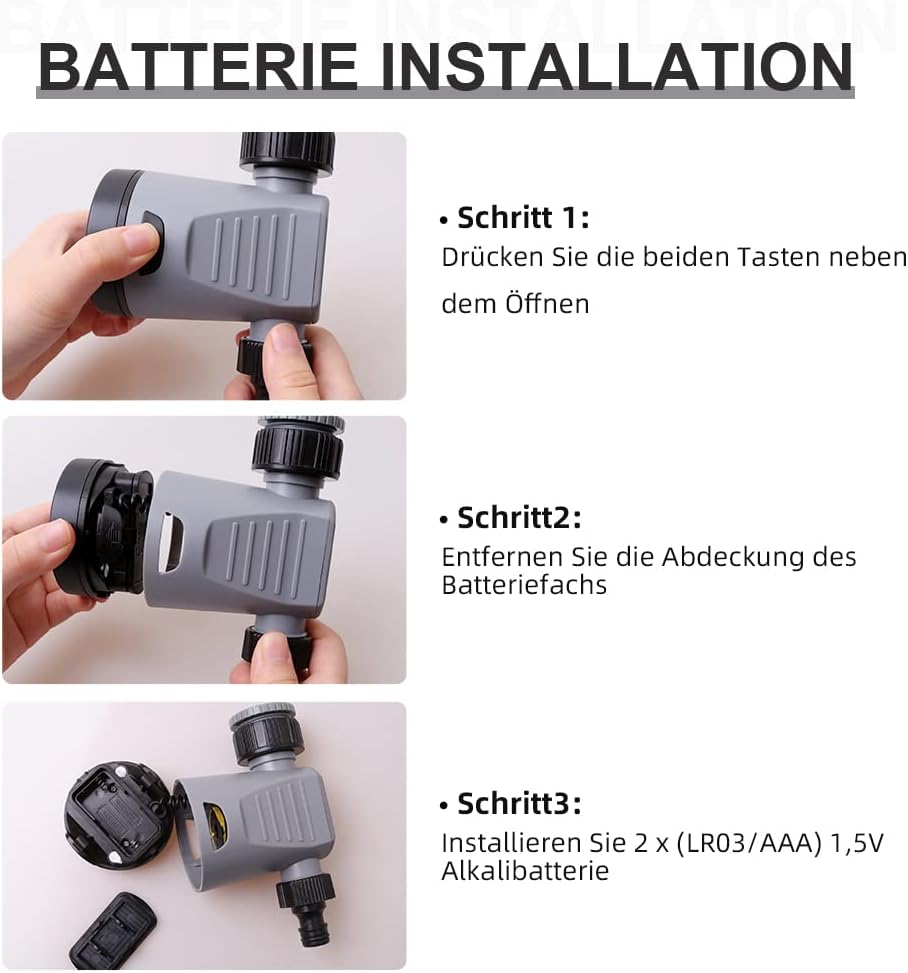
Figure 4: Step-by-step guide for installing batteries into the Aqualin Irrigation Timer. This shows pressing side buttons, removing the cover, and inserting AAA batteries.
Таймерди туташтыруу
- Ensure the timer is in the "OFF" position before connecting.
- Screw the timer's inlet connection onto your outdoor faucet. Use the appropriate adapter (3/4" or 1") if necessary to ensure a snug, leak-free fit.
- Connect your garden hose or irrigation system to the timer's outlet connection.
- Slowly turn on your faucet to full pressure. The timer is designed to operate under standard water pressure (1-8 bar).
Иштөө нускамалары
The Aqualin Irrigation Timer offers flexible programming options for automated watering and a manual override function.
Setting Automatic Irrigation Cycles
The timer allows you to set three different irrigation cycles based on frequency and duration:
- Жыштыгы: Select from options such as every 12 hours, every 24 hours, or every 48 hours.
- Узактыгы: Choose watering durations from 2 minutes up to 60 minutes, depending on the selected frequency. For exampле:
- Every 12 hours: 2, 7, 15, 30, 45 minutes
- Every 24 hours: 5, 15, 30, 60 minutes
- Every 48 hours: 15, 30, 60 minutes
To set a cycle, rotate the main dial to align the desired frequency and duration settings. The timer will automatically begin the programmed schedule.
Кол менен сугаруу
To water immediately or outside of the programmed schedule, you can use the manual function:
- Rotate the dial to the "ON" position to start watering manually.
- Rotate the dial to the "OFF" position to stop manual watering.
Using the manual "ON/OFF" function will temporarily override any active automatic program.
Delay Function (Controlled Irrigation)
In situations such as heavy rainfall or when you need to temporarily pause the irrigation program, you can use the delay function. This function allows you to delay the next scheduled watering cycle.
- The delay function range is from 1 to 23 hours, increasing in 1-hour increments.
- Consult the dial markings for specific delay settings.

Figure 5: The Aqualin Irrigation Timer effectively watering a garden, demonstrating its practical application.
Техникалык тейлөө
To ensure the longevity and optimal performance of your Aqualin Irrigation Timer, follow these maintenance guidelines:
- Тазалоо: Таймердин сыртын мезгил-мезгили менен жарнама менен тазалап туруңузamp кездеме. Абразивдүү тазалагычтарды колдонбоңуз же аппаратты сууга салбаңыз.
- Фильтрди тейлөө: The inlet connection contains a filter to prevent debris from entering the timer. Regularly inspect and clean this filter to ensure unrestricted water flow.
- Батареяны алмаштыруу: Replace batteries when the LED indicator shows low power or if the timer stops functioning as expected. Always use fresh alkaline batteries.
- Кыштоо: Before the first frost, disconnect the timer from the faucet and hose. Drain any remaining water from the unit and store it indoors in a dry, protected area to prevent freezing damage.
Проблемаларды чечүү
| Көйгөй | Мүмкүн себеп | Чечим |
|---|---|---|
| Timer not watering / No water flow. |
|
|
| Timer not turning off. |
|
|
| Байланыштардан суу агып жатат. |
|
|
Техникалык шарттар
| Өзгөчөлүк | Деталь |
|---|---|
| Бренд | Aqualin |
| Модель номери | 21113 |
| Материалдын түрү | Kunststoff (пластикалык) |
| Power Source | 2 x AAA батарейкалары (талап кылынат) |
| Элемент Салмагы | 0.21 килограмм |
| Пакеттин өлчөмдөрү | 11.8 x 11.6 x 6.9 см |
| Орнотуулардын саны | 4 (referring to frequency/duration combinations) |
| Түс | Кара же Ак |

Figure 6: Visual representation of key product specifications for the Aqualin Irrigation Timer, including brand, weight, pressure, power, frequency, and runtime.
Кепилдик жана колдоо
Aqualin is committed to customer satisfaction. If you encounter any issues or have questions regarding your irrigation timer, our after-sales team is available to assist you.
- Our support team aims to respond to your requests within 12 hours.
- Кепилдиктин чоо-жайын жана байланыш маалыматын алуу үчүн сатып алуу документтерин караңыз.
For further assistance, please visit the official Aqualin webсайтка же сатуучуга түздөн-түз сатып алуу платформаңыз аркылуу кайрылыңыз.