
Della 1D4-TL+D1224
DELLA 35K BTU Dual Zone Mini Split Air Conditioner Heat Pump (Model 1D4-TL+D1224) Instruction Manual
Model: 1D4-TL+D1224 | Brand: Della
1. Киришүү
This manual provides comprehensive instructions for the installation, operation, and maintenance of your DELLA 35K BTU Dual Zone Mini Split Air Conditioner Heat Pump. This unit offers energy-efficient cooling and heating for up to 2050 sq. ft., featuring 19 SEER2, Wi-Fi, and Alexa compatibility. Please read this manual thoroughly before installation and operation to ensure proper use and safety.
2. Коопсуздук маалыматы
Маанилүү коопсуздук көрсөтмөлөрү:
- Бул система кесиптик орнотууну талап кылат. Бул DIY мини бөлүнгөн AC эмес.
- Ensure all power sources are turned off before connecting any wires or performing maintenance.
- Line-set vacuuming is required during installation. Any alteration of line-set length requires adjusting freon levels.
- Always use appropriate tools and follow local electrical and building codes.
- Түзмөктү өз алдынча оңдоого же тейлөөгө аракет кылбаңыз. Квалификациялуу тейлөө кызматкерлерине кайрылыңыз.
3. Пакеттин мазмуну
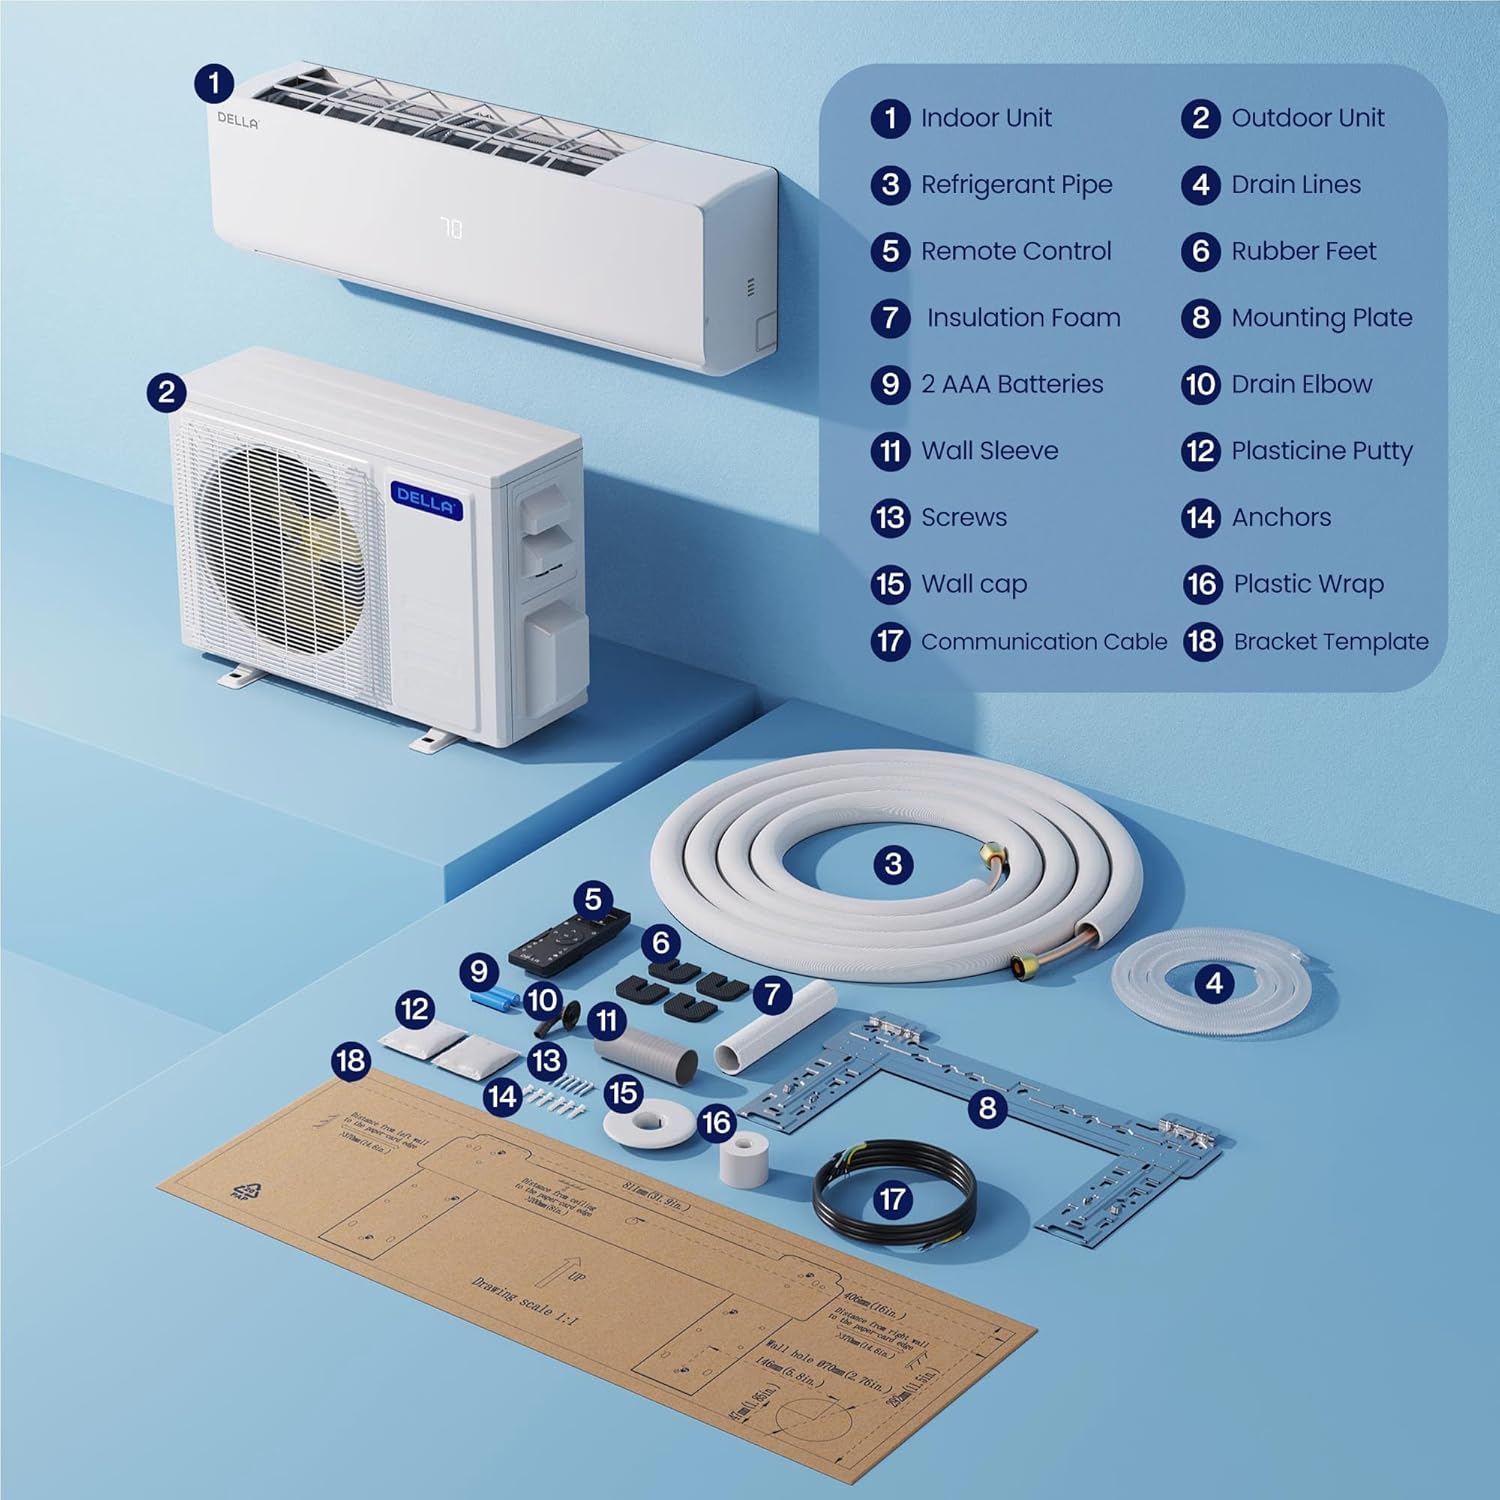
Your DELLA Dual Zone Mini Split Air Conditioner package includes the following components:
- 1 x Outdoor Condenser Unit (35,000 BTU)
- 2 x Indoor Air Handlers (12,000 BTU and 24,000 BTU)
- 2 x Remote Controls (one for each indoor unit)
- 2 x 16ft Copper Pipes (1/4"+1/2" and 1/4"+3/8")
- 2 x Installation Kits
- Drain Pipe (78.7" length)
- Байланыш кабели
- Монтаждоо плитасы
- Резина буттары
- Изоляция көбүгү
- Wall Sleeve
- Пластилин шпатлевы
- Бурамалар жана анкерлер
- Кронштейн шаблону

4. Орнотуу жана орнотуу
Professional installation is mandatory for this system. It is not designed for DIY installation.
- Монтаждоо ордун даярдоо: Use the provided template to mark locations for the lineset wall hole and the mini split bracket.
- Install Indoor Unit Bracket: Securely attach the mini split bracket to the wall using the provided screws. Use a leveler to ensure correct alignment.
- Route Lineset and Electricals: Route the lineset, drain hose, and electrical wiring through the wall opening.
- Ички блокту орнотуу: Securely mount the indoor mini split unit onto the bracket.
- Organize Linesets: Tape the drain hose and linesets together for a neat and organized installation. Use zip ties to secure electrical wires around the taped linesets and drain hose.
- Position Outdoor Condenser: Place the outdoor condenser unit in its designated location.
- Connect Linesets: Connect the unit lineset to the condenser lineset and tighten firmly. If available, use a digital torque wrench to ensure proper tightening.
- Электр байланыштары: Ensure all power sources are turned off. Remove the electrical compartment cover. Connect the numbered wires from the indoor unit to the corresponding numbered terminals on the outdoor condenser's electrical block. Connect the ground wire (green to green). Connect the power cables (black to 'N', red to 'L') to the condenser.
- Системаны чаң соргуч менен тазалоо: Ensure you have appropriate vacuum equipment. Connect the hose from the outdoor condenser unit to the gauge, and the hose from the vacuum to the gauge. Open valves on the gauge and turn the vacuum on. Monitor the micron reading closely and close valves once it reaches 350. Turn off the vacuum pump.
- Activate Refrigerant Flow: Restore power to the outlet. Turn the mini split unit on and set it to the lowest cold setting. Allow a few minutes for the outdoor condenser fan to start. Use a service wrench to gradually open the high side (top valve). Monitor the gauge as numbers will drop into the negative range. After opening the high side valve, quickly open the low side (bottom valve). The gauge readings will increase, which is expected.
5. Иштөө нускамалары
Your DELLA Mini Split system offers various modes and features for optimal comfort and energy efficiency.
5.1 Алыстан башкаруу функциялары
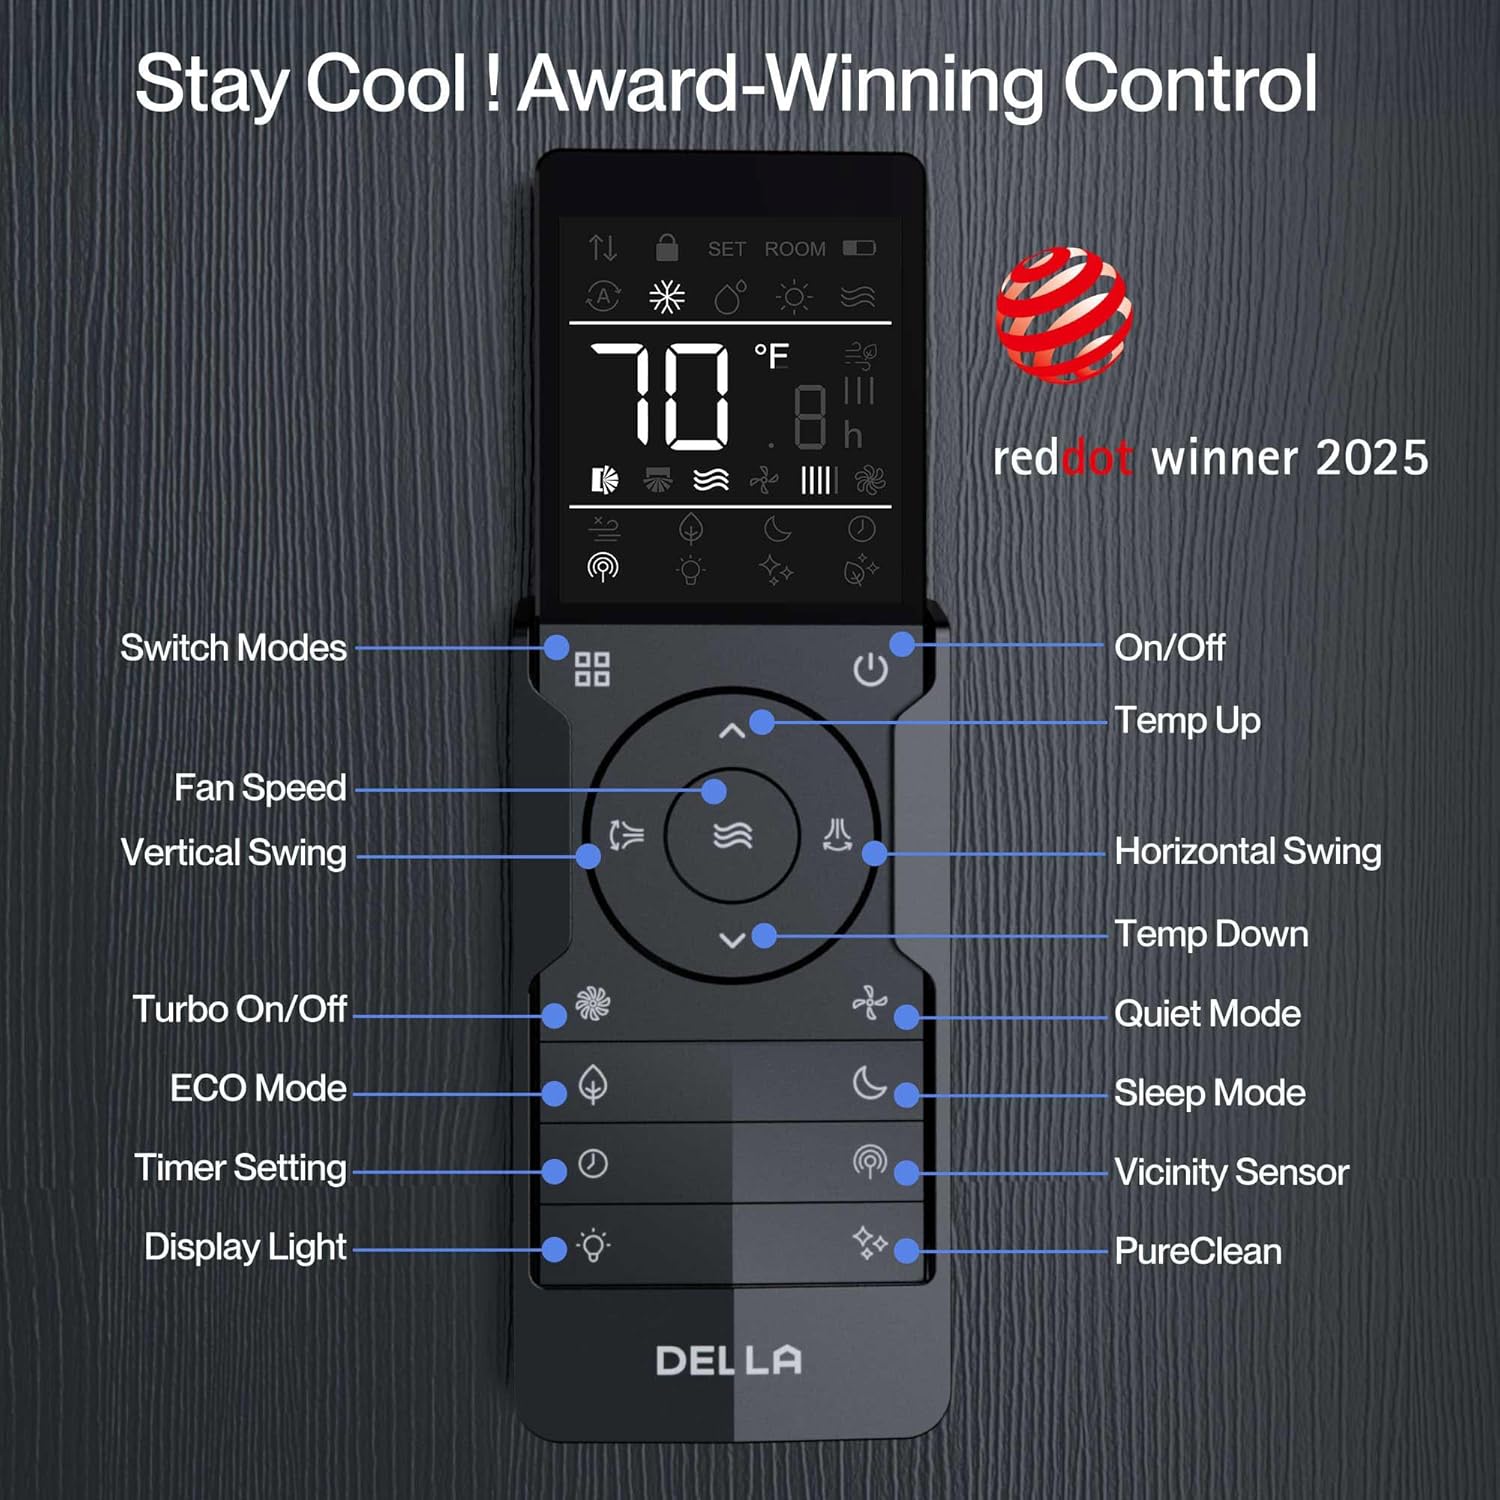
The included remote controls allow you to manage your indoor units individually. Key functions include:
- Күйгүзүү/өчүрүү: Аппаратты күйгүзүңүз же өчүрүңүз.
- Режим тандоо: Choose between Heating, Cooling, Dry (dehumidifying), Fan Only, and Auto modes.
- Температураны жөндөө: Set your desired temperature (60-90°F range).
- желдеткич ылдамдыгы: Adjust fan speed (multiple settings available).
- 4D аба агымы: Control vertical and horizontal swing for even air distribution.
- Таймер функциясы: Аппаратты күйгүзүү же өчүрүү үчүн атайын убакыттарды коюңуз.
- Уйку режими: Ыңгайлуу уктоо үчүн температураны жана желдеткич ылдамдыгын оптималдаштырат.
- ЭКО энергияны үнөмдөө режими: Энергияны керектөөнү азайтат.
- Турбо функциясы: Тез муздатуу же жылытуу менен камсыз кылат.
- I Feel режими: Adjusts temperature based on the remote's location for personalized comfort.
5.2 Smart Control with Della+ App (Wi-Fi & Alexa)
Control your DELLA Mini Split unit remotely using the free Della+ app, compatible with Wi-Fi and Alexa. This allows for advanced scheduling, mode selection, and geo-location features.
- Алыстан кирүү: Control your unit from anywhere with an internet connection.
- Пландаштыруу: Set custom schedules for your unit to turn on/off or change modes.
- Geo-Location Function: Automatically adjust AC settings based on your proximity to your home.
- Үн менен башкаруу: Integrate with Alexa for hands-free temperature adjustments.

6. Техникалык тейлөө
Regular maintenance ensures optimal performance and longevity of your DELLA Mini Split unit.
- Фильтрди тазалоо: Regularly clean or replace air filters in the indoor units to maintain airflow and efficiency.
- Тышкы блокту тазалоо: Keep the outdoor condenser unit free from debris, leaves, and obstructions to ensure proper heat exchange.
- Дренаждык линияны текшерүү: Periodically check the drain line for blockages to prevent water leakage.
- Кесиптик текшерүү: Schedule annual professional inspections to check refrigerant levels, electrical connections, and overall system health.
7. Кыйынчылыктарды
If you encounter issues with your DELLA Mini Split unit, refer to the following common troubleshooting tips:
- Түзмөк күйбөй жатат: Кубат булагын, автоматтык өчүргүчтү текшерип, алыстан башкаруу пультунун батареяларынын иштеп жатканын текшериңиз.
- Жетишсиз муздатуу/жылытуу: Verify temperature settings, clean air filters, and ensure no obstructions around indoor/outdoor units.
- адаттан тыш үндөр: Minor operational noises are normal. Excessive or unusual noises may indicate a problem; contact professional service.
- Ката коддору: If an error code appears on the display (e.g., "EU code" as mentioned by some users), consult the full user manual or contact customer support for specific diagnostic steps.
- Wi-Fi/Alexa Connectivity Issues: Ensure your Wi-Fi network is stable and the Della+ app is updated. Re-pair the device if necessary.
8. Техникалык шарттар
| Өзгөчөлүк | Деталь |
|---|---|
| Модель номери | 1D4-TL+D1224 |
| BTU кубаттуулугу | 35,000 BTU/h (Dual Zone: 12,000 BTU + 24,000 BTU) |
| SEER2 рейтинги | 19 SEER2 |
| Тtage | 208-230V |
| Камтуу аймагы | Up to 2050 Sq. Ft. (550 Sq. Ft. for 12K unit, 1500 Sq. Ft. for 24K unit) |
| Иштөө температурасы (жылытуу) | -13°C (-25°F) чейин төмөндөйт |
| Муздаткыч түрү | R454B (environmentally friendly) |
| Ызы-чуу деңгээли (ички) | 36 dBa (ultra silent) |
| Өзгөчөлүктөр | 4D Airflow, I Feel Mode, 24-hour Timer, Sleep Mode, ECO Mode, Multiple Fan Speeds, Turbo Function, Dehumidifier, Remote Controlled, Alexa & Wi-Fi Compatible |
| Максималдуу сактагычтын өлчөмү | 35A |
| Продукциянын өлчөмдөрү | 8.07" Т x 31.92" Т x 11.49" Б (Ички блок) |
| Элемент Салмагы | 224 фунт (жалпы система) |
| Сертификаттар | ETL Listed, AHRI Certified |


9. Кепилдик жана колдоо
DELLA offers unmatched support and warranty coverage for your peace of mind.
- Чектелген Өмүр бою Кепилдик: Enjoy best-in-class warranty coverage with no additional costs.
- Кардарларды колдоо: 24/7 live chat support is available. Phone support is available from 6 AM to 4 PM PST.

Ask a question about this manual
Ask about setup, troubleshooting, compatibility, parts, safety, or missing instructions. Manuals+ will review the question and use this page’s manual context to help answer it.