1. Киришүү
This manual provides detailed instructions for the installation, operation, and maintenance of your darkFlash Aquarius Mesh Computer Case. Please read this manual thoroughly before beginning installation to ensure proper setup and safe use of your new computer chassis.
2. Коопсуздук маалыматы
Ар дайым төмөнкү коопсуздук чараларын сактаңыз:
- Disconnect all power sources before installing or removing any components.
- Компоненттерге электростатикалык разряддын (ESD) бузулушун алдын алуу үчүн антистатикалык билек боону тагыңыз.
- Физикалык зыянды болтурбоо үчүн компоненттерди кылдаттык менен иштетиңиз.
- Майда тетиктерди жана шаймандарды балдардан алыс кармаңыз.
- Ensure proper ventilation around the computer case.
3. Пакеттин мазмуну
Пакетиңизде бардык буюмдар бар экенин текшериңиз:
- darkFlash Aquarius Mesh Computer Case
- Кошумча кутуча (бурамалар, бекиткичтер, кабель байлагычтар ж.б.)
- Колдонуучунун Колдонмосу (бул документ)
4. Орнотуу жана орнотуу
Follow these steps for proper component installation.
4.1. Ишти даярдоо
Before installing components, remove the side panels. The Aquarius Mesh case typically features a tempered glass side panel and a solid metal panel.
- Locate the thumbscrews on the rear of the case securing the side panels.
- Unscrew the thumbscrews and carefully slide the panels backward, then lift them off.

1-сүрөт: алдыңкы жана каптал view of the darkFlash Aquarius Mesh case. Note the mesh front panel and tempered glass side panel.

2-сүрөт: Арткы view of the darkFlash Aquarius Mesh case, showing expansion slots and rear fan mount.
4.2. Motherboard орнотуу
The Aquarius Mesh supports ATX, Micro-ATX, and Mini-ITX motherboards.
- I/O калканын корпустун арткы жагындагы оюкка орнотуңуз.
- Align your motherboard with the pre-installed standoffs. Ensure the I/O ports align with the I/O shield.
- Аксессуар кутучасынан тиешелүү бурамалар менен энелик тактаны бекитиңиз.
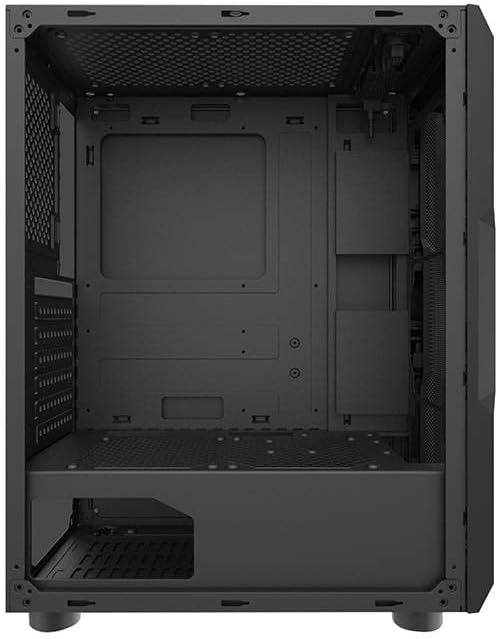
3-сүрөт: Интерьер view of the darkFlash Aquarius Mesh case, highlighting the motherboard tray and cable routing options.
4.3. Электр менен камсыздоо блогун (PSU) орнотуу
The PSU mounts at the bottom rear of the case.
- Slide the PSU into its designated compartment from the rear of the case.
- Align the screw holes and secure the PSU with screws.
4.4. Сактоочу дискти орнотуу
The case provides mounting options for 3.5-inch HDDs and 2.5-inch SSDs.
- 3.5" HDD: Locate the drive cage usually beneath the PSU shroud or behind the motherboard tray. Slide the HDD into the bay and secure it with screws.
- 2.5" SSD: Mount SSDs to dedicated brackets behind the motherboard tray or on the PSU shroud. Secure with screws.

Сүрөт 4: Арткы интерьер view of the darkFlash Aquarius Mesh case, showing the motherboard cutout and potential SSD mounting points.
4.5. Expansion Card Installation (e.g., GPU)
- Корпустун артындагы керектүү кеңейтүү уячасынын капкактарын алып салыңыз.
- Insert the expansion card into the appropriate PCIe slot on the motherboard.
- Secure the card with the provided screws or retention clips.
4.6. Кабелдик башкаруу
Кабельдерди уюштуруу үчүн энелик плата лотоктун артындагы кабелдик маршруттук кескичтерди жана байлоо пункттарын колдонуңуз. Бул аба агымын жана эстетиканы жакшыртат.
4.7. Reassembling the Case
Once all components are installed and cables are managed:
- Carefully reattach the side panels, ensuring they slide into place correctly.
- Secure the side panels with the thumbscrews.
5. Иштөө нускамалары
After assembly, connect your peripherals and power cable.
- Connect your monitor, keyboard, mouse, and other peripherals to the motherboard's I/O ports.
- Электр кабелин PSUга жана розеткага туташтырыңыз.
- Press the power button located on the top panel of the case to start your computer.

5-сүрөт: Жогорку view of the darkFlash Aquarius Mesh case, showing the front I/O panel with power button, reset button, USB ports, and audio jacks.
6. Техникалык тейлөө
Компьютериңиздин компоненттеринин оптималдуу иштешин жана узак мөөнөттүү иштешин камсыз кылуу үчүн үзгүлтүксүз техникалык тейлөө жүргүзүү керек.
- Чаң чыпкалары: The Aquarius Mesh case features removable dust filters (e.g., on the front, top, and bottom). Regularly remove and clean these filters with water and mild soap, or by vacuuming, to maintain good airflow. Ensure they are completely dry before reinstallation.
- Ички тазалоо: Periodically open the case and use compressed air to remove dust buildup from fans, heatsinks, and other components.
- Тышкы тазалоо: Сырткы беттерин жумшак менен сүртүңүз, гamp кездеме. Катуу химиялык заттардан алыс болуңуз.
7. Кыйынчылыктарды
Эгерде сизде көйгөйлөр пайда болсо, төмөнкү кеңири таралган чечимдерди карап көрүңүз:
- Кубат жок:
- PSU которгучу 'ON' абалында экенин текшериңиз.
- Энелик платага жана анын компоненттерине туташкан бардык кубат туташууларын текшериңиз.
- Verify the power cable is securely plugged into the wall outlet and PSU.
- Айланбаган күйөрмандар:
- Check fan connections to the motherboard or fan controller.
- Ensure fans are not obstructed by cables or dust.
- Алдыңкы панелдин киргизүү/чыгаруу иштебей жатат:
- Verify that the front panel connectors (USB, audio, power/reset switches) are correctly connected to the motherboard headers. Refer to your motherboard manual for header locations.
8. Техникалык шарттар
| Өзгөчөлүк | Деталь |
|---|---|
| Бренд | darkFlash |
| Модель номери | Aquarius Mesh |
| Иштин түрү | Орто мунара |
| Материал | Эритме болот |
| Түс | Кара |
| Муздатуу ыкмасы | Аба |
| Сунушталган колдонуу | Компьютер |
| Катуу дисктин форм-фактору | 3.5 дюйм |
9. Кепилдик жана колдоо
For warranty information or technical support, please refer to the official darkFlash webсайтка же кардарларды тейлөөгө кайрылыңыз. Кепилдик дооматтар үчүн сатып алганыңыздын далилин сактаңыз.
Кошумча жардам алуу үчүн, сиз иш сапары менен болот darkFlash official webсайт.