
Brifit b1850db1-f513-4344-b364-c231e9e7bc32
Brifit Mini Digital Indoor Thermometer Hygrometer User Manual
Model: b1850db1-f513-4344-b364-c231e9e7bc32
1. Киришүү
This manual provides instructions for the Brifit Mini Digital Indoor Thermometer Hygrometer. This device is designed to accurately monitor indoor temperature and humidity, helping you maintain a comfortable and healthy environment. It also features a clock display and a comfort indicator.

Сүрөт 1.1: Алдыңкы view of the Brifit Mini Digital Indoor Thermometer Hygrometer, displaying time, temperature, humidity, and a comfort indicator.
2. Продукциянын өзгөчөлүктөрү
- Жогорку тактыктагы сенсорлор: Accurately monitors temperature and humidity changes with a temperature range of -10°C to +60°C (14°F to 140°F) and humidity range of 10% RH to 99% RH.
- Көп функциялуу дисплей: Shows temperature, humidity, date, and time. Supports 12-hour or 24-hour time format.
- Комфорт индикатору: Features a unique smiley indicator to display environmental comfort levels (Dry, Comfortable, Wet).
- Таза LCD экраны: Equipped with a 3.2-inch LCD for easy readability of digital values.
- Бир нече жайгаштыруу параметрлери: Can be placed on a table using its stand, mounted on a wall with adhesive tape, or hung using integrated holes.
- Компакт жана көчмө: Lightweight design allows for easy placement in various indoor environments.

Image 2.1: The device shown in a home environment, highlighting its functions: Thermometer, Time, Hygrometer, Date, Comfort Indicator, °C/°F Selector, 12/24H Switch, and CR2032 Battery.
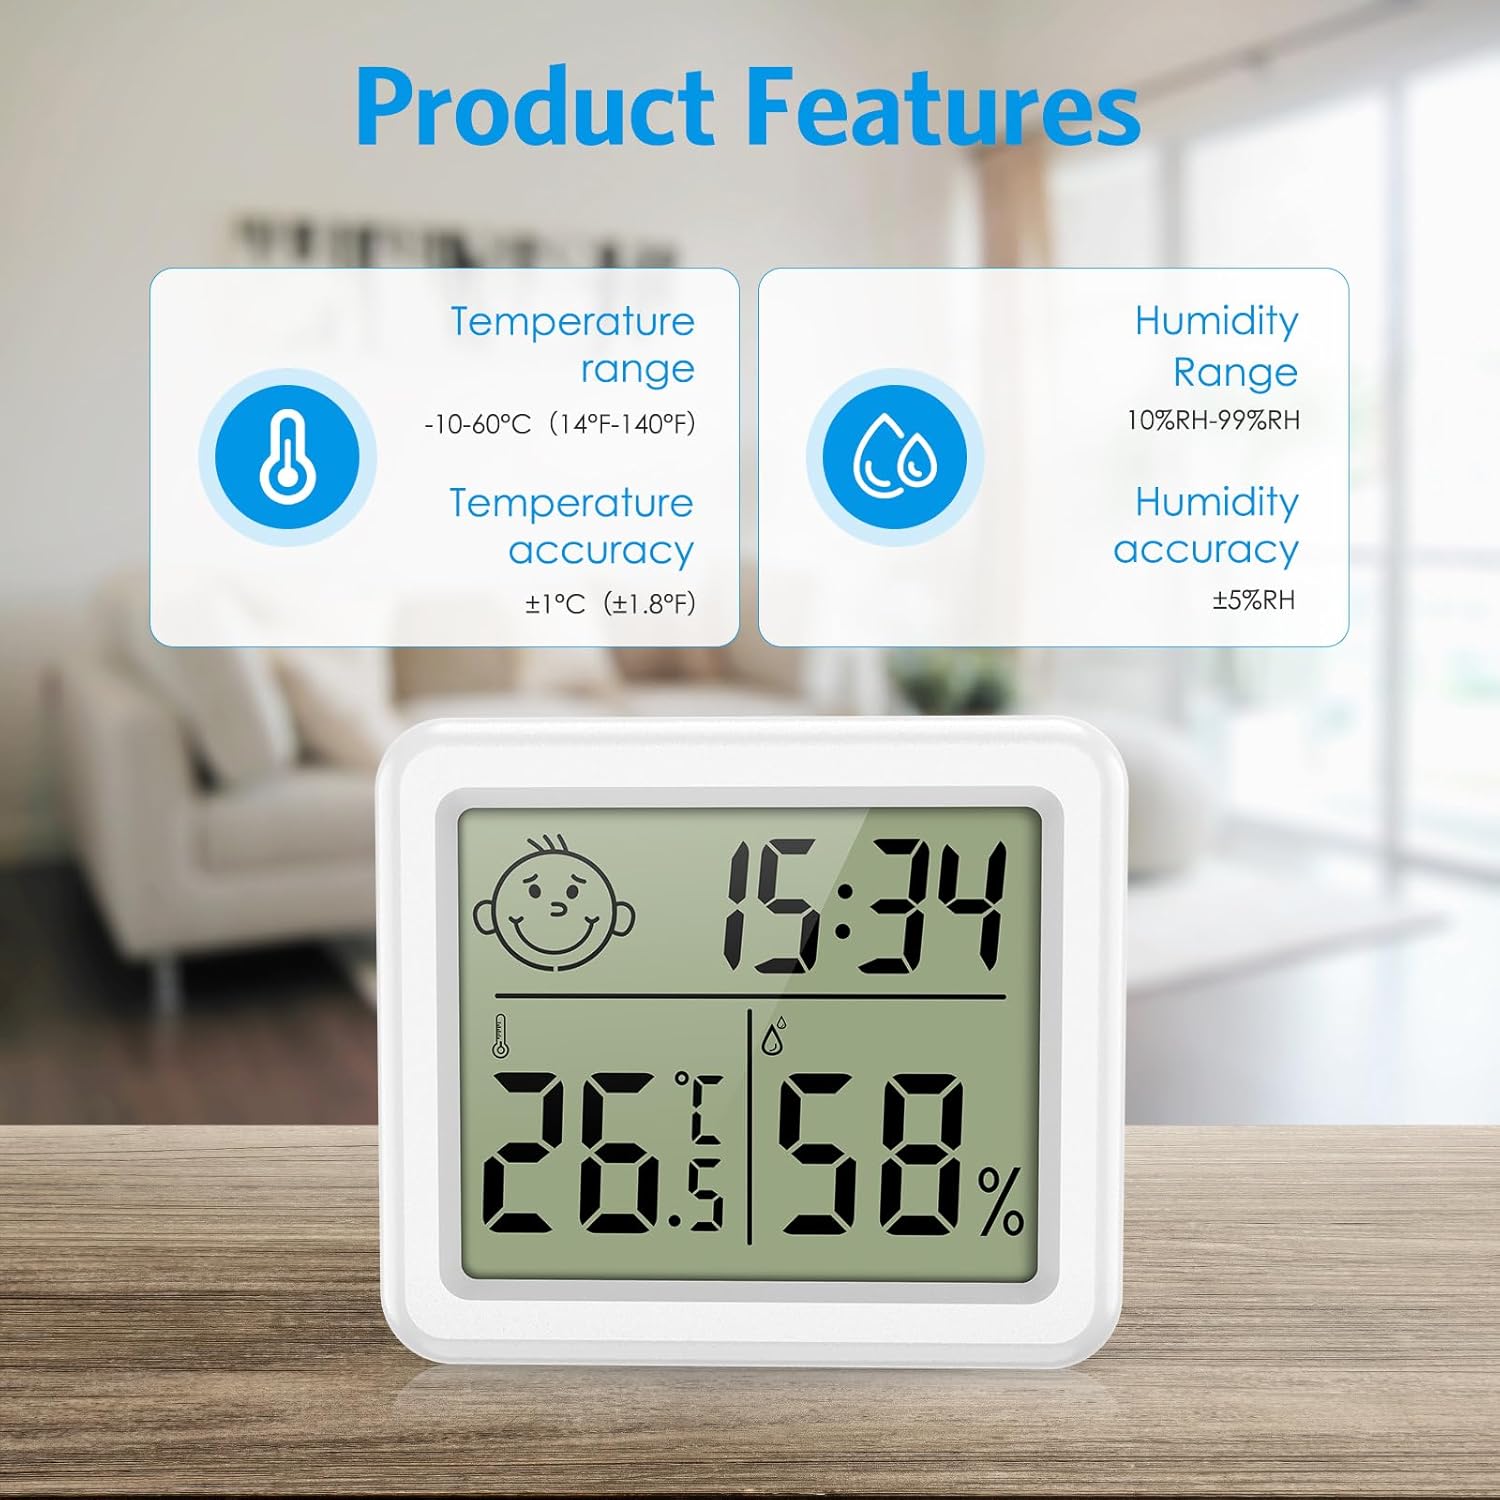
Сүрөт 2.2: Детальдуу view of product features, including temperature range (-10-60°C / 14-140°F) with ±1°C accuracy, and humidity range (10%RH-99%RH) with ±5%RH accuracy.
3. Пакеттин мазмуну
Сураныч, пакетте төмөнкү нерселерди текшериңиз:
- Brifit Mini Digital Indoor Thermometer Hygrometer (1 unit)
- CR2032 Батареясы (алдын ала орнотулган же өзүнчө камтылган)
- Колдонуучунун Колдонмосу (бул документ)
4. Орнотуу
4.1 Батареяны орнотуу
- Аппараттын артындагы батарея бөлүкчөсүн табыңыз.
- Open the battery cover by rotating it counter-clockwise or sliding it open, depending on the design.
- Insert one CR2032 battery, ensuring the positive (+) side faces upwards.
- Close the battery cover securely. The device should power on automatically.
4.2 Алгачкы жайгаштыруу
The device offers multiple placement options:
- Стол үстү: Extend the integrated stand on the back of the device to place it on any flat surface.
- Дубалга орнотуу: Use the hanging hole on the back to mount it on a nail or screw, or use double-sided adhesive tape (not included) for a flat surface.

Image 4.1: Illustration of various placement methods: hanging on the wall, standing on a table, and using wall stickers.
5. Иштөө нускамалары
5.1 Күйгүзүү/өчүрүү
The device powers on automatically upon battery installation. There is no manual power off button; remove the battery to power off.
5.2 Температура бирдигин тандоо (°C/°F)
Press the "°C/°F" button located on the back of the device to switch between Celsius and Fahrenheit temperature units.
5.3 Убакытты жана датаны орнотуу
- Press and hold the "MODE" button on the back of the device for approximately 3 seconds to enter time setting mode. The hour digit will flash.
- Press the "ADJ" button to adjust the hour.
- Press "MODE" again to move to minute setting. Press "ADJ" to adjust minutes.
- Continue pressing "MODE" to cycle through year, month, and day settings, adjusting each with the "ADJ" button.
- After setting the date, press "MODE" one more time to exit the setting mode.
5.4 12/24 Hour Format Switch
While in normal display mode (not setting mode), press the "ADJ" button to toggle between 12-hour and 24-hour time formats.
5.5 Ыңгайлуулук деңгээлинин көрсөткүчү
The device displays a smiley icon to indicate the comfort level based on humidity:
- Кургак: 39% төмөн нымдуулук
- Комфорт: 40% жана 70% ортосундагы нымдуулук
- нымдуу: 70% жогору нымдуулук
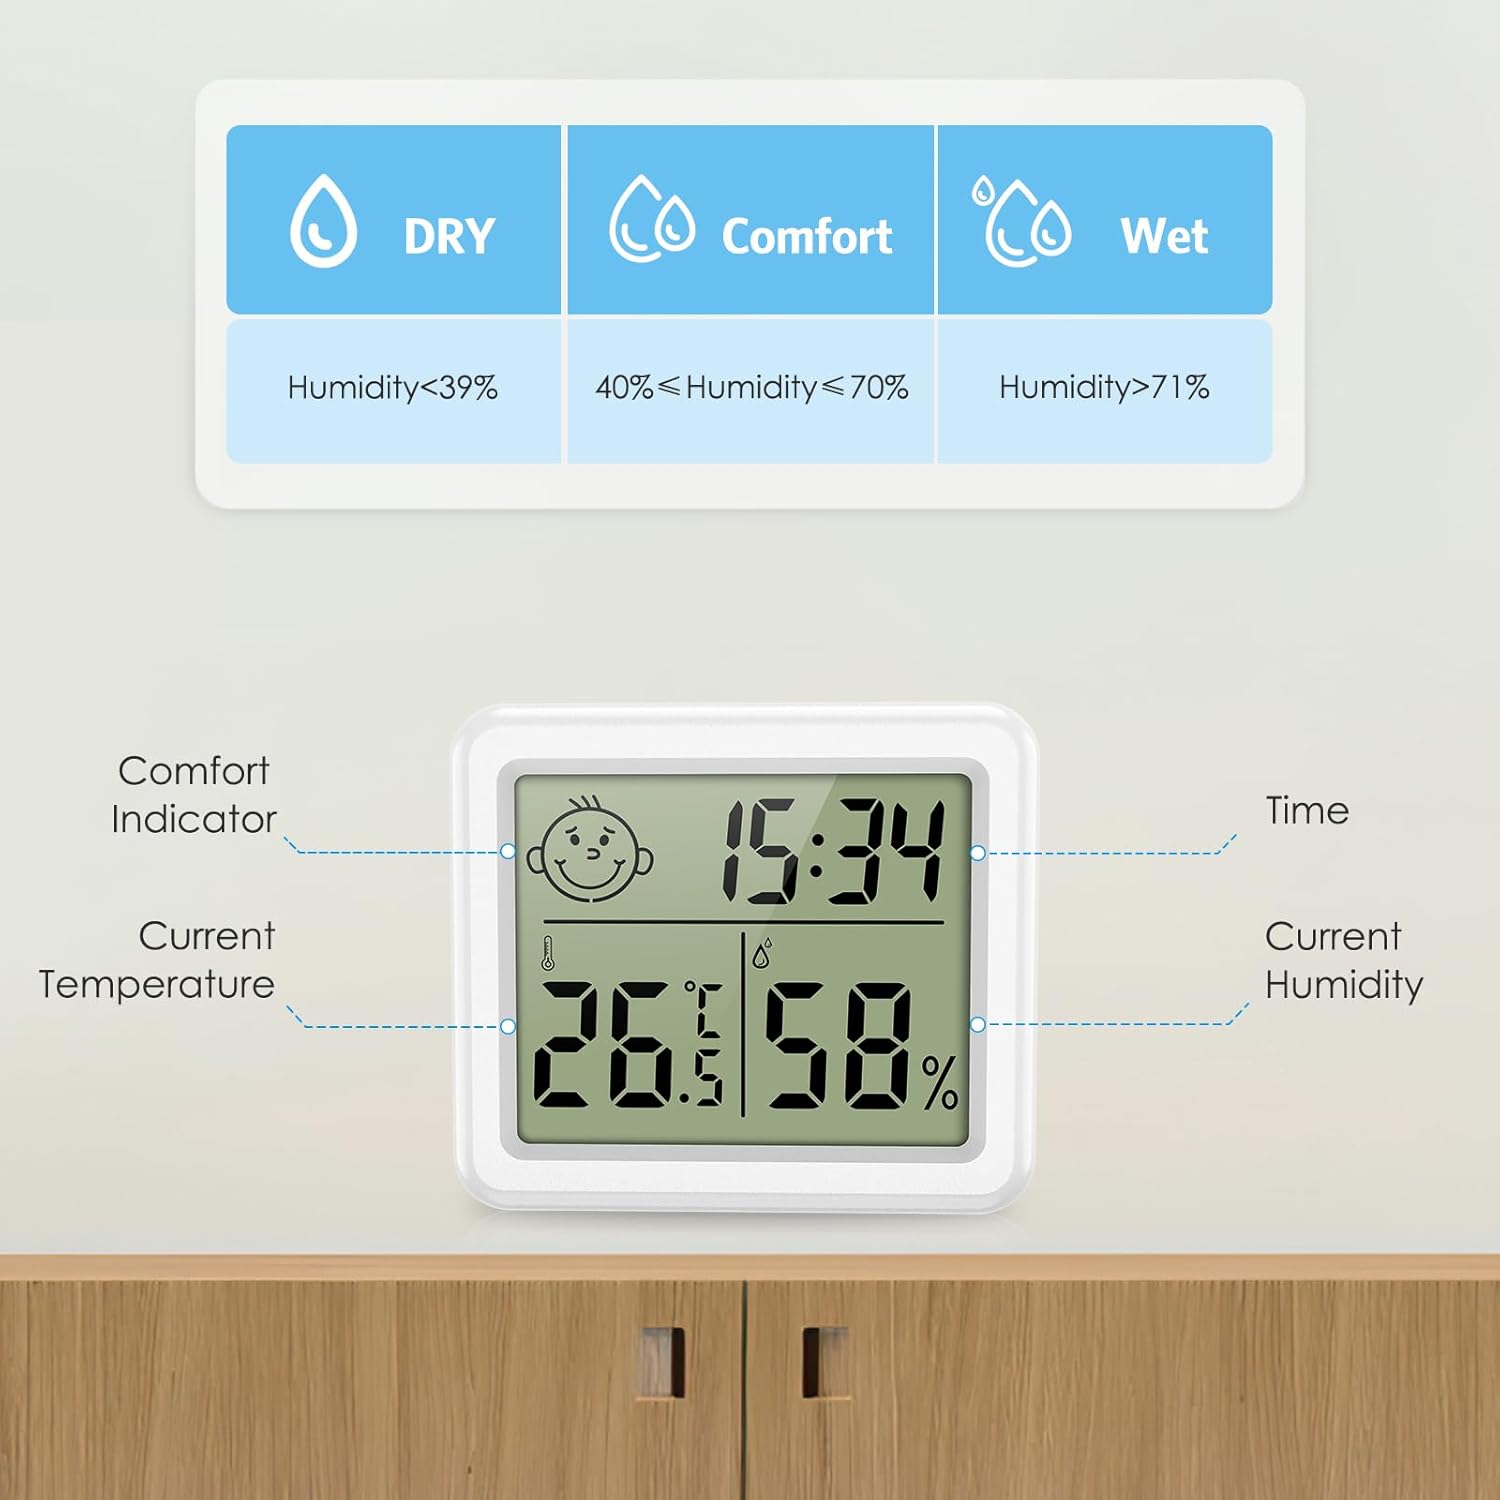
Image 5.1: Explanation of the comfort indicator, showing Dry, Comfort, and Wet conditions based on humidity percentages.
6. Техникалык тейлөө
6.1 Батареяны алмаштыруу
When the display becomes dim or unresponsive, it is time to replace the CR2032 battery. Follow the battery installation steps in Section 4.1.
6.2 Тазалоо
Аппаратты жумшак, кургак чүпүрөк менен сүртүңүз. Абразивдүү тазалагычтарды колдонбоңуз же аппаратты сууга салбаңыз.
6.3 Сактоо
If storing the device for an extended period, remove the battery to prevent leakage and damage.
7. Кыйынчылыктарды
| Көйгөй | Мүмкүн себеп | Чечим |
|---|---|---|
| Дисплей жок же дисплейдин күңүрттүгү жок. | Батарея өлүп калган же туура эмес орнотулган. | Replace the CR2032 battery or ensure it is installed correctly with the positive (+) side facing up. |
| Температура/нымдуулуктун көрсөткүчтөрү так эмес. | Device placed near heat/cold sources or in direct sunlight/drafts. | Relocate the device to a central area away from extreme temperature or humidity fluctuations. Allow 30 minutes for readings to stabilize. |
| Time/Date not setting correctly. | Incorrect button sequence or not holding "MODE" long enough. | Refer to Section 5.3 for detailed time and date setting instructions. Ensure "MODE" is held for 3 seconds to enter setting mode. |
8. Техникалык шарттар
| Өзгөчөлүк | Деталь |
|---|---|
| Модель номери | b1850db1-f513-4344-b364-c231e9e7bc32 |
| Температура диапазону | -10°Cден +60°Cге чейин (14°F менен 140°F) |
| Температуранын тактыгы | ±1.0°C (±1.8°F) |
| нымдуулук колому | 10% RH 99% RH |
| Нымдуулуктун тактыгы | ±5% RH |
| Дисплей түрү | Санарип LCD |
| Screen Size | 3.2 дюйм |
| Power Source | 1 x CR2032 Батарея |
| Жооп убактысы | 10 секунд |
| Өлчөмдөр | Approx. 80mm (W) x 70mm (H) x 10mm (D) / 3.15in (W) x 2.75in (H) x 0.4in (D) |
| Салмагы | 60 грамм |

Image 8.1: Size comparison of the device, showing its compact dimensions (3.15 inches width, 2.75 inches height, 0.4 inches depth).
9. Кепилдик жана колдоо
9.1 Кепилдик маалыматы
Brifit products typically come with a standard manufacturer's warranty. Please refer to the product packaging or the seller's information for specific warranty terms and duration. Keep your purchase receipt as proof of purchase for warranty claims.
9.2 Кардарларды колдоо
For any questions, technical assistance, or warranty claims, please contact Brifit customer support through the retailer where you purchased the product or visit the official Brifit webбайланыш маалыматы үчүн сайт.
Ask a question about this manual
Ask about setup, troubleshooting, compatibility, parts, safety, or missing instructions. Manuals+ will review the question and use this page’s manual context to help answer it.