1. Киришүү
This manual provides essential information for the installation, operation, and maintenance of your new Generic replacement wired LCD touch panel controller. This controller is designed for seamless compatibility with various Haier central air-conditioning indoor units, specifically models 0150401331, 0150401331C, 0150401331D, 0150401331H, and YR-E17. The unit is pre-programmed and requires no additional software setup, functioning upon correct physical installation and power connection.
2. Пакеттин мазмуну
Please inspect the package contents carefully upon receipt. The standard package includes:
- 1 x Wired LCD Touch Panel Controller
- Монтаждоо бурамалар (саны ар кандай болушу мүмкүн)
- Wiring Connectors (quantity may vary)
- Basic Installation Guide (as depicted below)
Эскертүү: Batteries are not required for this wired controller. Additional tools for installation (e.g., screwdriver, wire stripper) are not included.

Image: Contents of the package, showing the manual cover, mounting screws, and wiring connectors.
3. Орнотуу
Installation of the wired controller requires basic electrical knowledge. If you are unsure, please consult a qualified technician. Ensure the main power to the air-conditioning unit is turned OFF before proceeding with installation.
3.1 Контроллерди орнотуу
- Select a suitable location on an interior wall, away from direct sunlight, heat sources, or drafts, and at a comfortable height for operation.
- Контроллерди этияттык менен ачыңызasing. The back plate typically separates from the front panel. Refer to the "PRESS TO OPEN" indicator on the back of the unit.
- Route the necessary wiring from the air-conditioning unit to the chosen mounting location.
- Secure the back plate of the controller to the wall using the provided mounting screws. Ensure it is level and firmly attached.
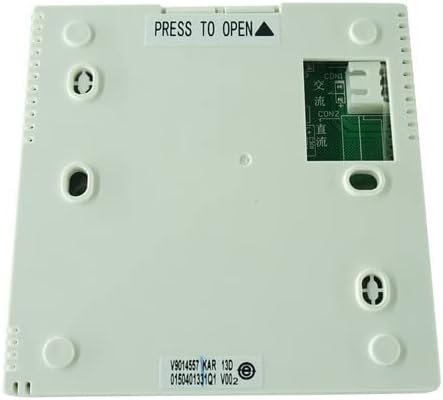
Сүрөт: Арткы view of the controller, indicating mounting points and wiring connection terminals.
3.2 Зымдарды туташтыруу
Connect the wires from the air-conditioning indoor unit to the corresponding terminals on the controller's back plate. The terminals are typically labeled (e.g., CON1, CON2). Refer to the wiring diagram provided with your specific Haier air-conditioning unit for precise connections. Ensure all connections are secure and properly insulated.
- CON1: Connect to [Specific wire from AC unit, consult AC manual].
- CON2: Connect to [Specific wire from AC unit, consult AC manual].
Абайлаңыз: Incorrect wiring can damage the controller or the air-conditioning unit. Always follow the wiring instructions specific to your Haier unit model.
3.3 Final Assembly and Power-On
- Once wiring is complete, carefully attach the front panel of the controller to the secured back plate. Ensure it clicks into place firmly.
- Restore power to the air-conditioning unit at the main circuit breaker.
- The controller's LCD screen should illuminate, indicating successful power-on.
4. Операция
This wired controller features an intuitive LCD touch panel for managing your air-conditioning unit. The exact display and button layout may vary slightly, but core functions remain consistent.
4.1 Негизги функциялар
- Күйгүзүү/өчүрүү: тийиңиз Күч icon or button to turn the unit on or off.
- Температураны жөндөө: колдонуу Өйдө/төмөн жебелер or +/- symbols on the touch screen to set your desired temperature.
- Режим тандоо: тийиңиз Mode button to cycle through available operating modes: Cool, Heat (if applicable), Fan, Dry, Auto.
- желдеткич ылдамдыгы: басыңыз Fan Speed желдеткичтин интенсивдүүлүгүн жөндөө үчүн баскычты басыңыз (мисалы, Төмөн, Орточо, Жогорку, Авто).
- Таймер функциясы: If available, touch the Таймер button to set a schedule for the unit to turn on or off automatically. Follow on-screen prompts for setting times.
4.2 ЖК дисплей маалымат
The LCD screen typically displays the following information:
- Учурдагы бөлмө температурасы
- Температураны коюу
- Иштөө режиминин сөлөкөтү
- Желдетүүчү ылдамдык көрсөткүчү
- Timer Status (if active)
- Error Codes (if any issues arise)
5. Техникалык тейлөө
Туура техникалык тейлөө контроллериңиздин узак мөөнөттүү иштешин жана оптималдуу иштешин камсыз кылат.
- Тазалоо: Gently wipe the LCD touch panel and controller surface with a soft, dry, or slightly damp cloth. Do not use abrasive cleaners, solvents, or excessive moisture, as these can damage the screen or internal components.
- Таасирден качуу: Protect the controller from physical shocks or impacts, which can damage the screen or internal circuitry.
- Экологиялык шарттар: Контроллердин өтө жогорку температурага, жогорку нымдуулукка же түз чачыраган сууга дуушар болбогонун текшериңиз.
6. Кыйынчылыктарды
Эгерде сиз контроллеруңуз менен көйгөйлөргө туш болсоңуз, төмөнкү жалпы көйгөйлөрдү чечүү кадамдарын караңыз:
| Көйгөй | Мүмкүн себеп | Чечим |
|---|---|---|
| Контроллердин дисплейи бош. | No power supply; loose wiring connection. | Check main power to AC unit. Verify wiring connections at CON1/CON2 are secure. |
| Air conditioner not responding to commands. | Incorrect wiring; communication error; AC unit issue. | Re-check wiring against AC unit manual. Power cycle the AC unit. If problem persists, consult a technician. |
| Сенсордук экран жооп бербей же туура эмес иштеп жатат. | Dirt/debris on screen; internal fault. | Clean the screen gently. Power cycle the AC unit. If issue continues, contact support. |
For persistent issues or error codes not listed, please refer to your Haier air-conditioning unit's specific manual or contact a qualified service professional.
7. Техникалык шарттар
- Бренд: Жалпы
- Моделдин шайкештиги: Haier 0150401331, 0150401331C, 0150401331D, 0150401331H, YR-E17
- Контроллердин түрү: Wired, LCD Touch Panel
- Өзгөчө өзгөчөлүгү: Эч кандай кошумча программалоо талап кылынат
- Колдоого алынган түзмөктөрдүн максималдуу саны: 1 (Controls one indoor unit)
- Өндүрүүчү: Hotsmtbang
- ASIN: B0BYN6VQJ5
- Биринчи жеткиликтүү болгон күнү: 16-март, 2023-жыл
8. Кепилдик жана колдоо
Specific warranty information for this Generic replacement controller is not provided in the product details. For warranty claims, technical support, or further assistance, please contact the seller directly through your purchase platform. Keep your purchase receipt or order number handy for faster service.


