
1. Продукт бүтүп калдыview
This Ewon Trimmer Head is designed as a replacement part for various Greenworks string trimmer models. It provides a reliable solution for maintaining your lawn and garden equipment, ensuring efficient trimming performance. The package includes the trimmer head, multiple thread adapters, and a length of nylon line to facilitate installation and immediate use.

Figure 1.1: Ewon Trimmer Head and Accessories
This image displays the complete package contents, including the black trimmer head, various metal nuts and studs for different thread types, and a coil of orange nylon trimmer line.
2. Шайкештик
This trimmer head is compatible with a range of Greenworks string trimmer models. Please verify your specific model number before installation to ensure proper fit and function.
Compatible Greenworks Models:
- GT160
- GT161
- 2123802 Pro 80V
- 2123602VT Pro 80V
- 2123002VT Pro 80V
- 2121002 Pro 60V
- 2122802T Pro 60V
- 2121002VTBT Pro 60V
- 2123405 2 x 24V
- 2100202 40V
- 2100402 40V
- 2128002 40V
- 2120502AZ 40V
- 2120602AZ 40V
- 21142
Important: Always check your machine model before purchasing жана алмаштыруучу тетиктерди орнотуу.
3. Пакеттин мазмуну
Пакетти ачканда, төмөнкү компоненттердин бардыгы бар экенине ынаныңыз:
- 1 x Триммер башы
- 7 x Thread Adapters (various sizes and thread types, including nuts and studs)
- 1 x Nylon Trimmer Line (pre-cut length)

Figure 3.1: Included Thread Adapters and Nylon Line
This image illustrates the different types of nuts and studs provided to ensure compatibility with various trimmer shaft threads. It also shows the included nylon trimmer line.
4. Орнотуу жана орнотуу
Proper installation is crucial for the safe and effective operation of your trimmer head. Always refer to your Greenworks trimmer's original manual for specific instructions on removing the old head and attaching new accessories. The following steps provide general guidance for assembling the Ewon Trimmer Head and attaching it to your compatible Greenworks trimmer.
4.1. Disassembly of Old Trimmer Head (if applicable)
- Биринчи коопсуздук: Ensure your trimmer is turned off, unplugged (electric models), or the spark plug wire is disconnected (gas models) before beginning any work.
- Locate the locking mechanism or pin on your trimmer's shaft that holds the current trimmer head in place.
- Engage the locking mechanism and unscrew the old trimmer head. Note the direction of rotation (some may be left-hand thread).
- Remove any washers, nuts, or adapters that were part of the old setup. Keep them organized in case they are needed for reference.
4.2. Assembling the Ewon Trimmer Head Components
The Ewon Trimmer Head comes with several internal components that need to be correctly assembled before attaching to the trimmer shaft. Refer to the exploded view diagram below for component identification.
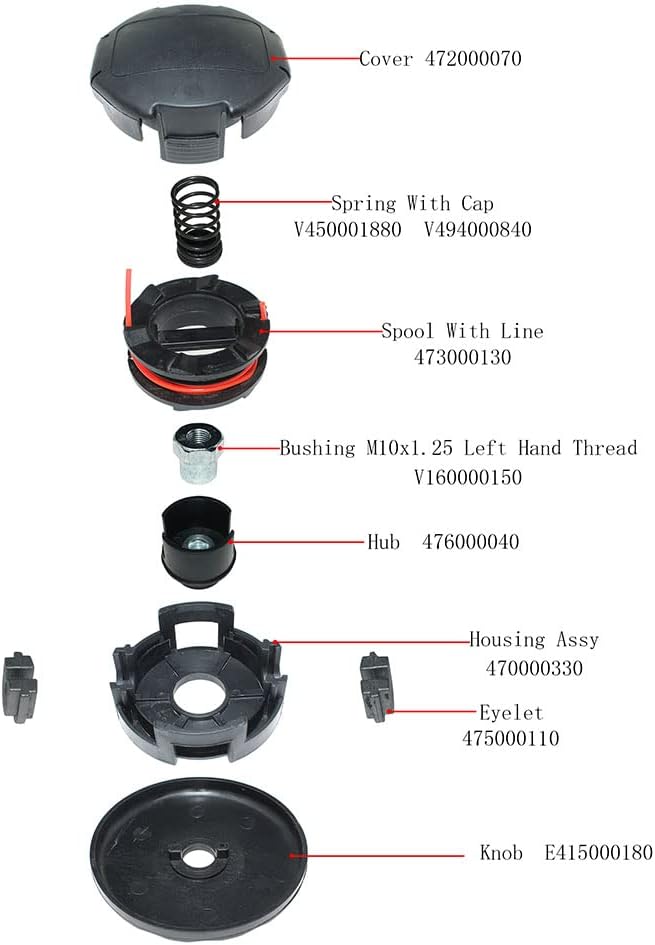
4.1-сүрөт: жарылган View of Trimmer Head Components
This diagram shows the individual parts of the trimmer head and their typical assembly order. Note the specific part numbers for reference.
- камсыз кылуу Турак жай Assy (47000330) is clean and free of debris.
- салыңыз Көздөр (475000110) into the designated slots on the Housing Assy.
- кой Хаб (476000040) into the center of the Housing Assy.
- Ылайыктуусун тандаңыз Бушинг (e.g., M10x1.25 Left Hand Thread V160000150) that matches your trimmer's shaft thread. Insert it into the Hub.
- кой Spool With Line (473000130) onto the Hub, ensuring the line feeds through the eyelets.
- жайгаштырыңыз Spring With Cap (V45001880 V494000840) on top of the spool.
- тегиздөө Cover (472000070) with the Housing Assy and snap it into place, or screw it on if threaded.
- Акыр-аягы, тиркелет баскыч (E415000180) to the bottom of the assembly.
Кеңеш: Take photos of your existing trimmer head's assembly before disassembling it. This can be a helpful reference during the installation of the new Ewon head, especially when selecting the correct thread adapter.
4.3. Attaching the Trimmer Head to the Trimmer Shaft
- Identify the thread type of your trimmer's shaft. Compare it with the provided thread adapters (nuts and studs).
- Select the adapter that securely threads onto your trimmer's shaft. The package includes various left-hand and right-hand threaded nuts and double studs (e.g., M10x1.25, 3/8"-24, M8x1.25, M7x1.0).
- Thread the selected adapter onto the trimmer shaft.
- Align the assembled Ewon Trimmer Head with the adapter on the shaft.
- Carefully screw the trimmer head onto the adapter until it is securely fastened. Ensure it is tight but do not overtighten.
- Once installed, gently pull on the trimmer line to ensure it feeds smoothly through the eyelets.
5. Operating Instructions (Line Reloading)
The Ewon Trimmer Head is designed for easy line reloading. Over time, the trimmer line will wear down and need replacement. This section outlines the general procedure for reloading the nylon trimmer line.
5.1. Preparing for Line Reloading
- Коопсуздук чарасы: Always ensure the trimmer is powered off and disconnected from its power source (battery removed, cord unplugged, or spark plug wire disconnected) before handling the trimmer head.
- If there is any remaining line, pull it out from the eyelets.
5.2. Reloading the Trimmer Line
- Remove the cover and spool from the trimmer head assembly (refer to Figure 4.1).
- Take the new nylon trimmer line. The included line is orange, but you can use any compatible trimmer line.
- Locate the small holes or slots on the spool where the line is inserted.
- Insert one end of the line into a hole and begin winding the line neatly and tightly around the spool in the direction indicated by an arrow on the spool (if present). Ensure the line is wound evenly to prevent tangles.
- Leave approximately 6-8 inches of line extending from each side of the spool.
- Once the line is wound, feed the ends of the line through the eyelets on the trimmer head housing.
- Place the spool back into the trimmer head housing, ensuring the spring is correctly positioned.
- Reattach the cover and knob securely.
- Gently pull on the line ends to ensure they are properly seated and can feed freely.
Эскертүү: Some users may find it helpful to use pliers to hold the spindle while winding the string for a tighter reload.
6. Техникалык тейлөө
Regular maintenance of your trimmer head will extend its lifespan and ensure optimal performance.
- Тазалоо: After each use, clean the trimmer head to remove grass clippings, dirt, and debris. This prevents buildup that can impede line feeding or cause imbalance.
- Зыянды текшерүү: Periodically inspect the trimmer head for cracks, wear, or damage to the housing, eyelets, or spool. Replace the head if significant damage is observed.
- Сызыктын абалы: Ensure the trimmer line is not brittle or excessively worn. Replace the line as needed.
- Адаптерди текшерүү: Before each use, ensure the trimmer head is securely attached to the trimmer shaft and the correct adapter is used and tightened.
7. Кыйынчылыктарды
This section addresses common issues you might encounter with your Ewon Trimmer Head.
| Көйгөй | Мүмкүн себеп | Чечим |
|---|---|---|
| Trimmer head does not fit or attach securely. | Incorrect thread adapter used; Trimmer model not compatible. |
|
| Trimmer line does not feed properly or gets tangled. | Line improperly wound on spool; Debris inside head; Worn eyelets. |
|
| Trimmer head feels unbalanced or vibrates excessively. | Unevenly wound line; Damaged head; Debris buildup. |
|
8. Техникалык шарттар
| Атрибут | Деталь |
|---|---|
| Продукциянын өлчөмдөрү | 4.92 x 3.15 x 4.92 дюйм |
| Элемент Салмагы | 1.25 фунт |
| Өндүрүүчү | Эвон |
| ASIN | B0BZHS269H |
| Шайкеш моделдер (жарым-жартылай тизме) | GT160, GT161, 2123802 Pro, 2123602VT Pro, etc. |
9. Кепилдик жана колдоо
The Ewon Trimmer Head comes with a warranty to ensure your satisfaction.
- Кепилдик мөөнөтү: The warranty date is 6 months from the date of purchase.
- Кардарларды колдоо: If you have any questions or encounter issues with the product, please contact the seller. Inquiries will be answered within 24 hours.