1. Киришүү
This manual provides detailed instructions for the setup, operation, maintenance, and troubleshooting of your Volcora 80mm Thermal Receipt Printer. This printer is designed for Point-of-Sale (POS) applications, offering fast and efficient thermal printing with an auto-cutter. It supports USB and Ethernet connectivity and is compatible with Android, Windows, and Linux operating systems.
2. Коопсуздук маалыматы
- Ensure the printer is connected to a grounded power outlet.
- Принтерди сууга же ашыкча нымдуулукка дуушар кылбаңыз.
- Принтерди күн тийген жерге же жылуулук булактарынын жанына коюудан алыс болуңуз.
- Use only the power adapter provided with the printer.
- Принтерди балдардан алыс кармаңыз.
- Принтерди өзүңүз чечүүгө же оңдоого аракет кылбаңыз. Жардам алуу үчүн кардарларды колдоо бөлүмүнө кайрылыңыз.
3. Пакеттин мазмуну
Пакетте бардык буюмдар бар экенин текшериңиз:
- Volcora 80mm Thermal Receipt Printer
- Электр кабели
- USB кабели
- Сыноо кагазынын рулону
- Орнотуу CD

Figure 3.1: Package Contents. The image displays the Volcora Thermal Receipt Printer along with its accessories: a power cord, a USB cable, a roll of test paper, and an installation CD.
4. Продукт бүтүп калдыview
4.1. Порттор жана баскычтар
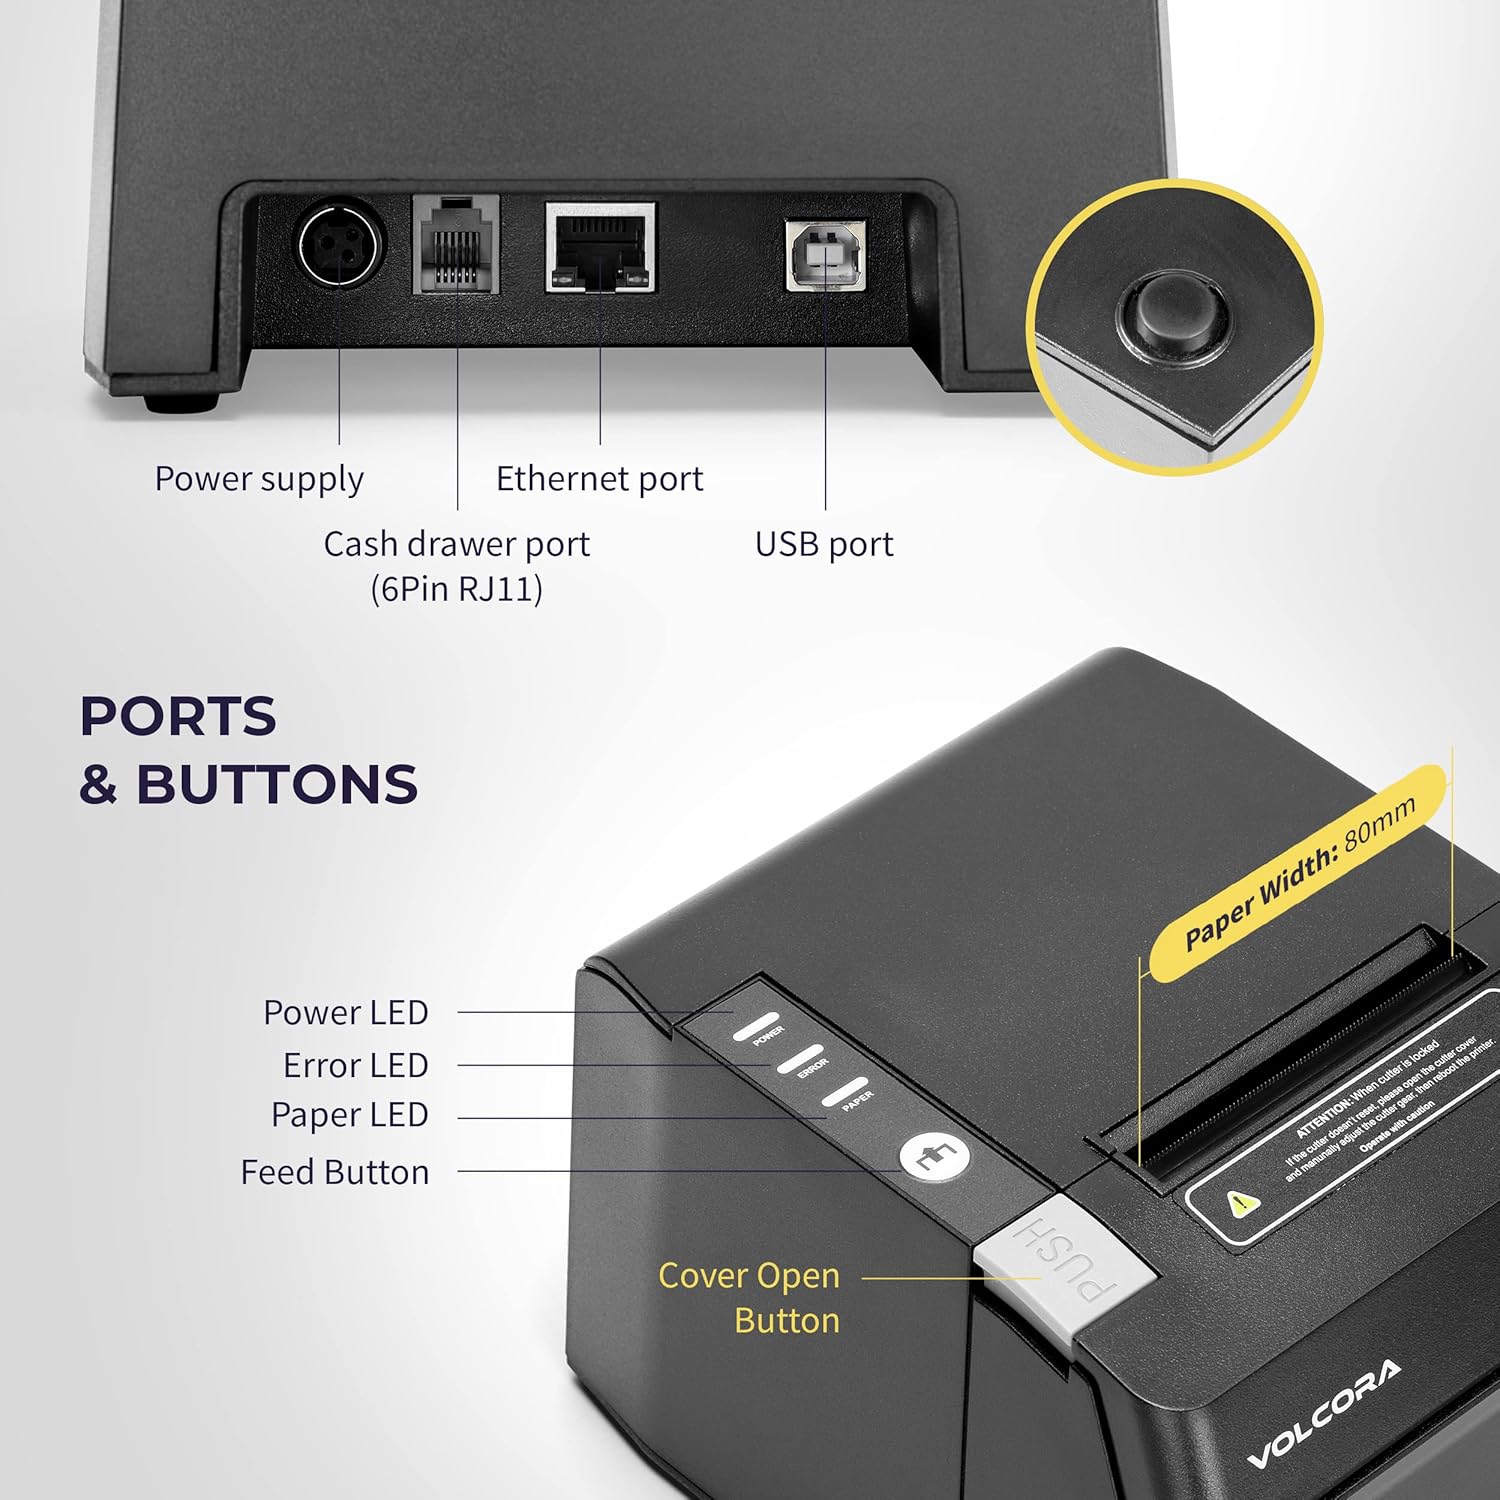
Figure 4.1: Printer Ports and Buttons. This image illustrates the rear ports including Power Supply, Ethernet Port, Cash Drawer Port (6Pin RJ11), and USB Port. It also shows the front panel with Power LED, Error LED, Paper LED, Feed Button, and Cover Open Button.
- Кубат менен камсыздоо порту: Кубат адаптерине туташат.
- Ethernet порту: For network connectivity (LAN).
- Cash Drawer Port (6Pin RJ11): Connects to a cash drawer.
- USB порт: Компьютерге түз туташуу үчүн.
- Power LED: Кубаттын абалын көрсөтөт.
- Ката LED: Indicates printer errors.
- Paper LED: Indicates paper status (e.g., low paper).
- Түрмөк баскычы: Manually feeds paper.
- Капка ачуу баскычы: Releases the printer cover to access the paper roll.

4.2-сүрөт: Көптөгөн views of the Volcora Thermal Receipt Printer, showing its compact design and various connection points.
5. Орнотуу
5.1. Unboxing and Connecting
- Принтерди кутудан чыгарып, бардык таңгактоочу материалдарды алып салыңыз.
- Кубат адаптерин принтерге, андан кийин розеткага туташтырыңыз.
- Connect the printer to your Windows PC using the provided USB cable.
Video 5.1: Getting Started with Volcora Thermal Receipt Printer. This video demonstrates the unboxing, connecting the printer to power and a Windows PC via USB, and performing a self-test.
5.2. Кагаз түрмөгүн орнотуу
- Press the Cover Open Button to open the printer cover.
- Insert the thermal paper roll with the printing side facing up.
- Кесүүчүнүн жанынан кичинекей кагазды тартып чыгарыңыз.
- Принтердин капкагын ордуна чыкылдаган үн чыкканча бекем жабыңыз.
5.3. Driver Installation (Windows)
- Download the latest driver for Windows from the Volcora support webсайт: volcora.com/support.
- Жүктөлгөндү ачыңыз file жана драйвер орнотуучуну иштетиңиз.
- Follow the on-screen prompts, agreeing to the license and selecting your printer model (e.g., 500108).
- Ensure the printer is connected via USB during installation.
- After successful installation, the printer should be recognized in your computer's "Printers & scanners" settings.

Figure 5.2: Easy Installation Steps. This diagram outlines the four main steps: Download drivers, Install drivers, Connect the printer, and Test print.
5.4. Network Configuration (Ethernet)
If you are using the Ethernet connection, you may need to configure the printer's IP address to match your network's subnet. This can be done using the Setting Tool software.
- First, identify your PC's IP address and subnet mask.
- Perform a printer self-test (see Section 6.2) to get the printer's current IP address.
- If the printer's IP is not in the same subnet as your PC, you will need to adjust either the PC's IP or the printer's IP.
- Open the Setting Tool software (available from volcora.com/support).
- Select the printer model and choose 'NET' for the port type.
- Enter the printer's current IP address and click 'Get Param' to retrieve its network settings.
- Modify the IP address, subnet mask, and gateway to align with your network configuration.
- Click 'Set' to apply the new settings to the printer.
- Perform another self-test to confirm the IP address has been updated.
Video 5.2: How to Modify LAN IP Address of Volcora Receipt Printer. This video guides you through identifying current IP addresses, changing PC host IP, and using the Setting Tool to configure the printer's IP address for Ethernet connectivity.
5.5. Жайгаштыруу параметрлери

Figure 5.3: Multiple Use & Placement. The printer can be wall-mounted for kitchen use or placed on a counter for receipt printing.
6. Иштөө нускамалары
6.1. Негизги басып чыгаруу
Once the printer is connected and drivers are installed, you can print receipts from your POS software or any application that supports printing. The printer features a 203 dpi resolution for clear prints and an auto-cutter for efficient receipt handling.

Figure 6.1: Efficient Printing. This image highlights the printer's fast print speed, low noise operation, and clear 203 dpi output, showing a receipt with a QR code and a barcode.
The printer supports various barcode types including UPC-A, UPC-E, EAN13, EAN8, CODE39, ITF25, CODABAR, CODE93, CODE128, QRCODE, PDF417, and Data matrix.
6.2. Printer Self-Test
A self-test prints the printer's configuration, including its IP address (if connected via Ethernet), and confirms basic functionality.
- Принтер өчүрүлгөнүн текшериңиз.
- Press and hold the "Feed" button.
- While holding the "Feed" button, power on the printer.
- Continue holding the "Feed" button for approximately 5 seconds until the self-test page begins to print.
6.3. Шайкештик
The Volcora Thermal Receipt Printer is compatible with various POS systems and operating environments. It supports ESC/POS commands.

Figure 6.2: Printer Compatibility. This chart lists compatible POS systems such as Loyverse, SumUp, Gloria Food, FoodZaps, TabShop POS, POSAPP.vn POS, Olsera POS, and KaHero POS. It also lists systems that are not compatible, including Square, Toast, Ubereats, Grubhub, Doordash, Postmates, Clover, and Shopify.
Шайкеш операциялык системалар: Android, Windows, Linux. (Note: A software development kit (SDK) is required for custom application development on Ethernet-supported systems, including Windows, Linux, and MAC.)
Төмөнкүлөр менен шайкеш келбейт: Delivery platforms or POS applications such as Ubereats, Grubhub, Doordash, Postmates, Square, Clover, or Shopify. Does not offer Bluetooth or WiFi printing options.

Figure 6.3: Detailed Compatibility Table. This table shows compatibility for USB and Serial connections across various operating systems (Windows, Mac OS, Linux, Android, iOS) and notes about SDK and ESC/POS commands.
7. Техникалык тейлөө
7.1. Тазалоо
- Regularly clean the printer's exterior with a soft, damp кездеме.
- To clean the thermal print head, use an alcohol swab. Ensure the printer is off and cool before cleaning.
- Кагаз жолундагы бардык кагаз чаңын же калдыктарын алып салыңыз.
8. Кыйынчылыктарды
8.1. Жалпы маселелер жана чечүү жолдору
| Көйгөй | Мүмкүн себеп | Чечим |
|---|---|---|
| Принтер жооп бербей жатат | Power issue, loose cable, driver not installed. | Check power connection. Ensure USB/Ethernet cable is securely connected. Verify driver installation (Section 5.3). |
| Blank pages or faint print | Thermal paper loaded incorrectly, print head dirty. | Reload paper with the thermal side facing up. Clean the thermal print head (Section 7.1). |
| Кагаз тыгылышы | Incorrect paper loading, foreign object. | Open the cover, remove jammed paper, and ensure proper loading. Remove any obstructions. |
| Ethernet connection issues | Incorrect IP address configuration. | Perform a self-test to check the printer's IP. Use the Setting Tool to configure the IP address to match your network (Section 5.4). |
| Printer not compatible with POS software | Software not supported. | Refer to the compatibility list (Section 6.3). Contact your POS software provider for compatibility information. |
For further assistance, refer to the Volcora support center or contact customer service.
9. Техникалык шарттар
| Өзгөчөлүк | Деталь |
|---|---|
| Бренд | Volcora |
| Модель номери | 500108 |
| Басма технологиясы | Термикалык |
| Басып чыгаруу ылдамдыгы | 220мм/сек чейин |
| Print Resolution | 203 dpi |
| Paper Width | 80mm (3 1/8") |
| Print Width | 72мм |
| Интерфейс | USB, Ethernet (LAN), Cash Drawer (RJ11) |
| Auto Cutter Life | 1.5 миллион кыскартуу |
| Киргизүү күчү | AC 110V/240V, 50-60Hz |
| Чыгуу күчү | DC 24V/2A |
| Продукциянын өлчөмдөрү | 7"D x 6"W x 4.5"H (approx. 16 x 4 x 16 inches as per some specs) |
| Элемент Салмагы | 3.76 фунт |
| Колдоого алынган штрихкоддор | UPC-A, UPC-E, EAN13, EAN8, CODE39, ITF25, CODABAR, CODE93, CODE128, QRCODE, PDF417, Data matrix |
| Принтердин буйругу | ESC/POS |
10. Кепилдик
This Volcora Thermal Receipt Printer comes with a Чектелген Кепилдик. Please refer to the warranty card included in your package or visit the Volcora support webтолук шарттары жана шарттары үчүн сайт.
11. Кардарларды колдоо кызматы
For additional assistance, troubleshooting, or to download drivers and tools, please use the following resources:
- Volcora Help Portal: https://help.volcora.com
- Download Support Center: https://volcora.com/support
- Кардарларды колдоо Email: support@volcora.com
Our U.S. based customer support team is available to assist with any integration issues.