
HOMEPILOT 10501003
HOMEPILOT Roller Shutter Belt Winder Timer 10501003 Instruction Manual
Модель: 10501003
1. Киришүү
This manual provides detailed instructions for the installation, setup, and operation of your HOMEPILOT Roller Shutter Belt Winder Timer, model 10501003. This device is designed to automate the opening and closing of roller shutters, blinds, or awnings, enhancing comfort and convenience in your home. It is particularly suitable for existing installations, utilizing the space of a standard belt winder housing.
2. Коопсуздук нускамалары
Please read these safety instructions carefully before installation and operation. Failure to follow these instructions may result in electric shock, fire, or serious injury.
- Электр коопсуздугу: Always disconnect the main power supply before performing any installation or maintenance work. Work on electrical installations should only be carried out by qualified personnel.
- Колдонуу максаты: This device is intended for controlling roller shutter motors. Do not use it for purposes other than those described in this manual.
- Курчап турган чөйрө: Do not expose the device to moisture, extreme temperatures, or direct sunlight. Ensure the installation location is dry and protected.
- Балдар: Keep packaging materials and the device out of reach of children.
- Зыян: Do not operate the device if it shows visible signs of damage. Contact customer support for assistance.
3. Пакеттин мазмуну
Пакетте бардык буюмдар бар экенин текшериңиз:
- HOMEPILOT Roller Shutter Belt Winder Timer (Modi Zeitschaltuhr)
- Көрсөтмө (бул документ)
4. Продукт бүтүп калдыview
The HOMEPILOT Belt Winder Timer is designed for integration into existing belt winder housings, providing an intelligent control solution for your roller shutters. Below is an overview of the device's components and dimensions.
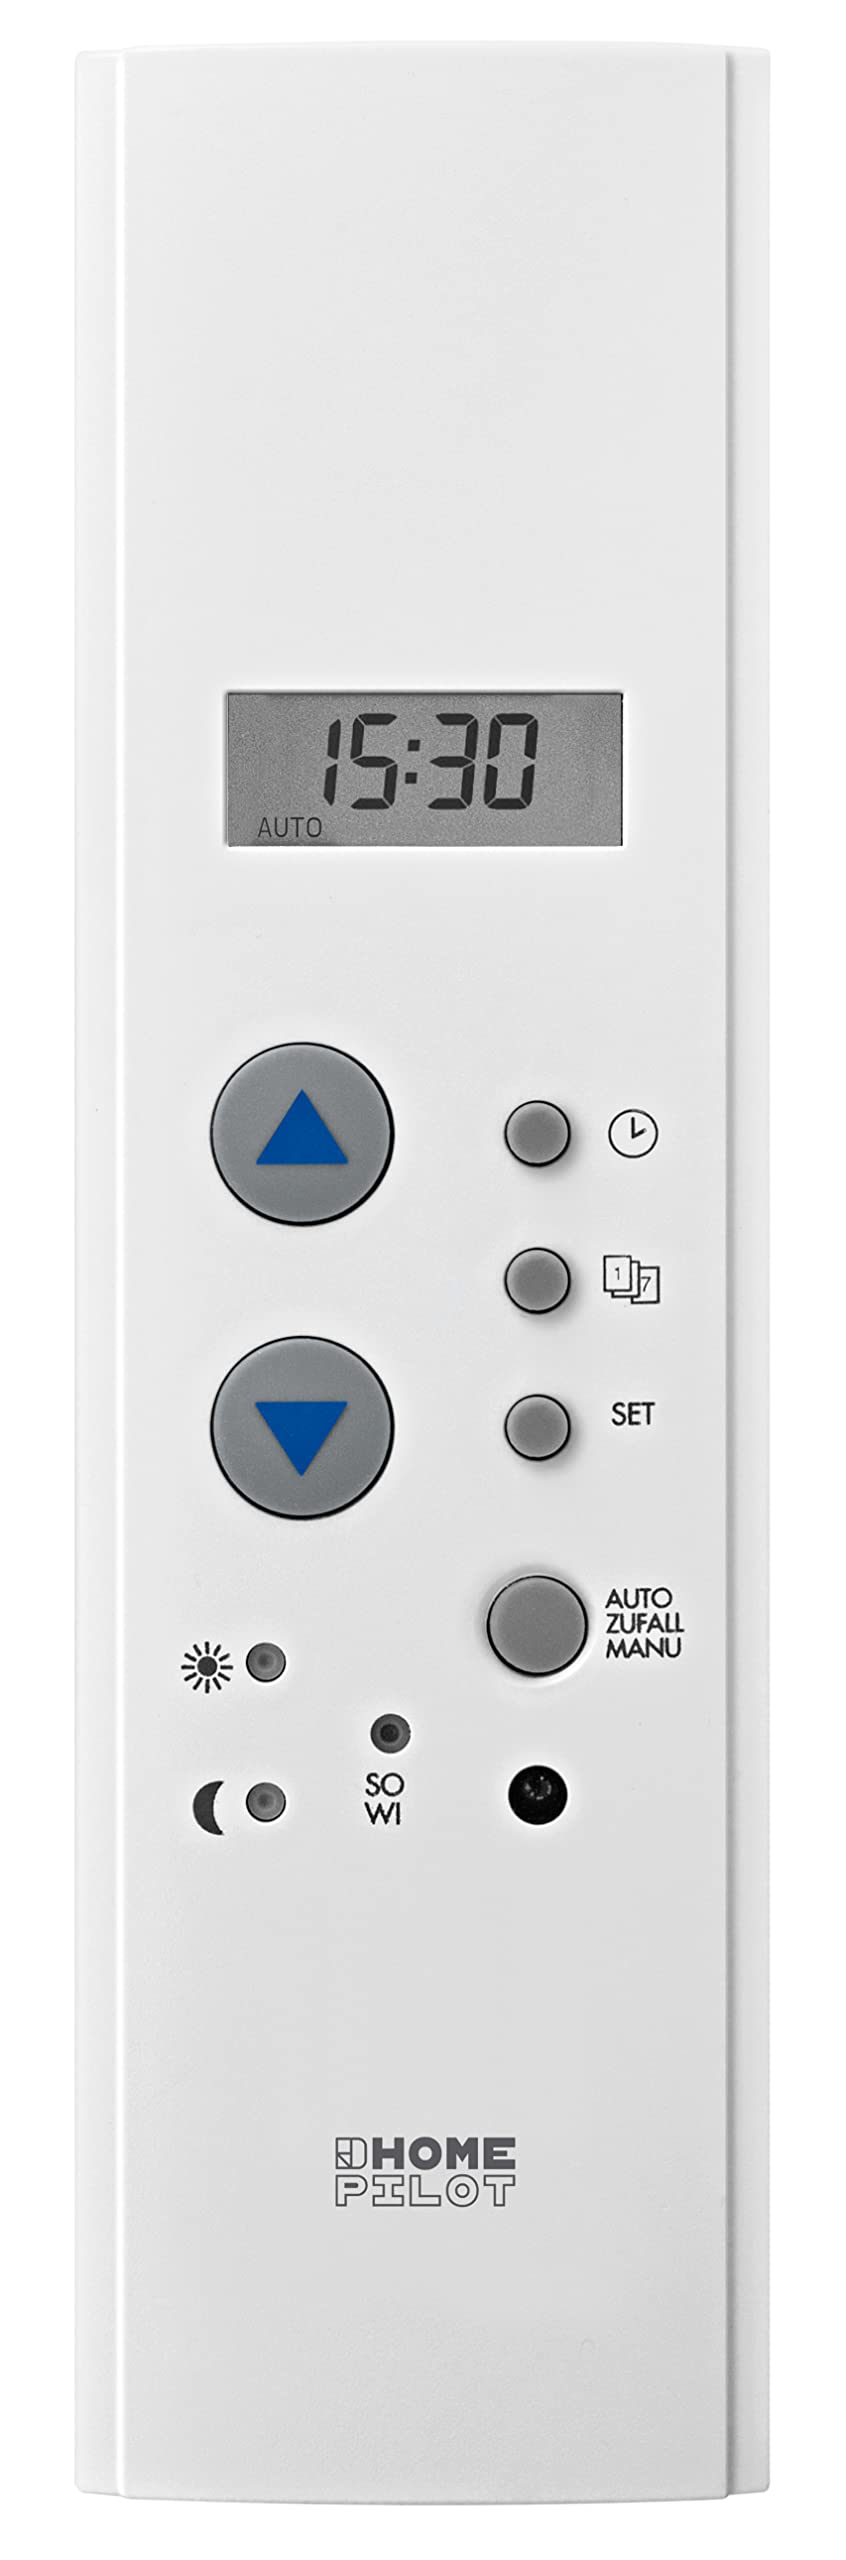
Сүрөт 4.1: Алдыңкы view of the HOMEPILOT Roller Shutter Belt Winder Timer. Shows the digital display, up/down buttons, SET button, and mode indicators.

4.2-сүрөт: Каптал view of the timer, illustrating its compact design for flush mounting.

Figure 4.3: Technical drawing showing the precise dimensions (in mm) of the device, crucial for installation into existing belt winder housings.
4.1. Башкаруу жана дисплей
- Дисплей: Shows current time, operating mode, and programming settings.
- Өйдө/ылдый баскычтары: Used for manual control of the roller shutter and for navigating/adjusting settings during programming.
- SET баскычы: Enters programming mode and confirms selections.
- Режим көрсөткүчтөрү: Icons for automatic mode, manual mode, random function, and sun sensor (if connected).
5. Орнотуу
The HOMEPILOT Belt Winder Timer is designed for easy integration into existing belt winder housings. A roller shutter motor is required for operation. This timer controls the connected motor.
5.1. Пререквизиттер
- An existing roller shutter system with a motor.
- Basic electrical knowledge and tools.
- Маанилүү: Ensure the main power supply to the roller shutter circuit is disconnected before starting installation.
5.2. Орнотуу кадамдары
- Кубатты өчүрүү: Turn off the circuit breaker for the roller shutter system at your main electrical panel. Verify that the power is off using a voltage сыноочу.
- Remove Old Winder (if applicable): Carefully remove the existing manual belt winder from its housing.
- Зымдарды даярдоо: Identify the wires for your roller shutter motor (usually Live, Neutral, Up, Down, and Ground). The timer requires a 230V power supply.
- Зымдарды туташтыруу: Connect the motor wires to the corresponding terminals on the HOMEPILOT timer. Refer to the wiring diagram (if available in a more detailed manual or on the device itself). Ensure secure connections.

5.1-сүрөт: Арткы view of the timer, showing the green terminal block for electrical connections.
- Таймерди орнотуу: Insert the HOMEPILOT timer into the existing belt winder housing. The design is made to fit perfectly into the opening. Secure it using screws if provided.
- Күчтү калыбына келтирүү: Once the installation is complete and all connections are secure, restore power to the circuit.
- Баштапкы сыноо: Briefly test the manual up/down functions to ensure the motor responds correctly.
Note: For detailed wiring diagrams, please consult the full technical documentation or a qualified electrician.
6. Баштапкы орнотуу жана конфигурация
After installation and power-up, the device will require initial setup, including setting the current time and date.
6.1. Убакыт жана дата орнотуу
- Орнотуу режимине кириңиз: басып, кармап туруңуз SET убакыт дисплейи күйүп-өчө баштаганга чейин баскычын болжол менен 3 секунд басып туруңуз.
- Убакытты тууралоо: колдонуу Up жана Төмөн Учурдагы саатты орнотуу үчүн баскычтарды басыңыз. SET ырастоо жана мүнөттөргө жылдыруу үчүн. Мүнөттөр боюнча кайталаңыз.
- Set Day of Week: After setting the time, the day of the week will flash. Use the Up жана Төмөн buttons to select the correct day (e.g., 1 for Monday, 7 for Sunday). Press SET ырастоо үчүн.
- Орнотуудан чыгуу: The device will automatically exit setup mode after a few seconds of inactivity, or you can press SET repeatedly until the display returns to normal operation.
6.2. Setting End Positions (Calibration)
For optimal operation, the timer needs to learn the upper and lower end positions of your roller shutter. This process is typically done via the connected roller shutter motor's own calibration function or through a specific sequence on the timer.
- Consult your roller shutter motor's manual for specific instructions on setting end positions.
- If the timer has a dedicated calibration mode, it will usually involve pressing and holding the Up жана Төмөн buttons simultaneously for a period, then manually driving the shutter to its limits.
7. Иштөө нускамалары
The HOMEPILOT timer offers both manual control and automated programming options.
7.1. Кол менен иштөө
- басыңыз Up button briefly to open the roller shutter.
- басыңыз Төмөн button briefly to close the roller shutter.
- Press either button again during movement to stop the shutter at its current position.
7.2. Programming Automatic Schedules
The timer allows for daily and weekly programs to automatically open and close your roller shutters.
- Программа режимине кириңиз: басыңыз SET button repeatedly until the program icon (e.g., a clock or schedule symbol) appears and flashes.
- Select Program Slot: Колдонуу Up/Төмөн to select a program slot (e.g., P1, P2). Press SET.
- Set Opening Time: The hour for opening will flash. Use Up/Төмөн to set the desired hour, then SET мүнөткө.
- Set Closing Time: Repeat the process for the closing time.
- Күндөрдү тандоо: Choose the days of the week for this program to be active (e.g., Mon-Fri, Sat-Sun, or all days). Use Up/Төмөн to cycle through options, SET ырастоо үчүн.
- Сактоо жана чыгуу: Басууну улантыңыз SET to save the program and exit program mode.
Refer to the device's display icons for specific program indicators.
7.3. Random Function
The integrated random function can delay programmed operating times by a random interval to simulate presence, enhancing security when you are away.
- To activate/deactivate the random function, locate the "AUTO ZUFALL" or "RANDOM" button/setting on your device.
- Press the corresponding button or navigate through the settings menu to toggle this feature on or off. An indicator light or symbol on the display will confirm its status.
7.4. Solar Sensor Integration (Optional)
If combined with a compatible solar sensor (sold separately), the timer can control sun protection based on brightness levels.
- Connect the solar sensor according to its own instructions and the timer's wiring diagram.
- Activate the solar function through the timer's settings menu. This typically involves setting brightness thresholds for automatic lowering/raising of the shutter.
8. Техникалык тейлөө
The HOMEPILOT Belt Winder Timer requires minimal maintenance.
- Тазалоо: Аппаратты жумшак, кургак чүпүрөк менен сүртүңүз. Абразивдүү тазалагычтарды же эриткичтерди колдонбоңуз.
- Power Outage: The device has approximately 8 hours of power reserve for data retention during power outages. After longer outages, you may need to reset the time.
9. Кыйынчылыктарды
If you encounter issues with your HOMEPILOT timer, refer to the following common problems and solutions:
| Көйгөй | Мүмкүн себеп | Чечим |
|---|---|---|
| Device display is blank. | Электр энергиясы жок. | Автоматтык өчүргүчтү жана зымдарды байланыштарды текшериңиз. |
| Ролик жапкыч кыймылдабайт. | Motor not connected, motor fault, or end positions not set. | Verify motor wiring. Check motor functionality. Perform end position calibration (Section 6.2). |
| Automatic program not running. | Device in manual mode, program not activated, or incorrect time/date. | Ensure the device is in automatic mode. Check program settings and correct time/date. |
| Убакыт бийликтен кийин туура эмесtage. | Power reserve depleted. | Reset the time and date (Section 6.1). |
If the problem persists, please contact HOMEPILOT customer support.
10. Техникалык шарттар
| Өзгөчөлүк | Спецификация |
|---|---|
| Модел | 10501003 |
| Бренд | HOMEPILOT |
| Иштөө режими | КҮЙГҮЗҮҮ ӨЧҮРҮҮ |
| Operating Voltage | 230 вольт |
| Күч | 1920 Ватт |
| Коргоо классы | II |
| IP рейтинги | IP30 |
| Күтүү режиминдеги керектөө | <0.5 Вт |
| Тышкы киргизүүлөр | 2 |
| Connection Cross-Section | макс. 1.5мм² |
| Switching Capacity | max. 8 A resistive, max. 4 A inductive load |
| Power Reserve (Data Retention) | болжол менен 8 саат |
| Иштөө температурасы | +0°Cден +40°Cге чейин |
| Front Panel Dimensions (H x W) | 210 x 60 мм |
| Түзмөктүн тереңдиги | болжол менен 56.4 мм |
| Материал | Пластик |
| Салмагы | 390 грамм |
| Башкаруу ыкмасы | Application (HomePilot), Standalone |
| Шайкеш түзмөктөр | Roller shutter motor, solar sensor |
| Smart Home шайкештиги | Акылдуу үйгө шайкеш келет |
| Түс | Ак |
| Шайкештик | CE |
| Өндүрүүчү | DELTA DORE RADEMACHER GmbH |
| Продукт түрү аты | Programmable Belt Winder Timer |
| Камтылган компоненттер | Modi Timer |
11. Кепилдик жана колдоо
For warranty information and technical support, please refer to the documentation provided with your purchase or visit the official HOMEPILOT webсайт. Кепилдик дооматтар үчүн сатып алганыңыздын далилин сактаңыз.
Өндүрүүчү: DELTA DORE RADEMACHER GmbH
Тектеш документтер - 10501003
 |
HOMEPILOT Ролик жапкыч мотору классикалык орнотуу жана пайдалануу боюнча колдонмо HOMEPILOT Ролик жапкыч мотору үчүн классикалык сериясы (s10, m10, m20) үчүн комплекстүү окуу куралы, орнотууну, электрдик туташууну, коопсуздукту жана иштетүүнү камтыйт. Техникалык мүнөздөмөлөрдү жана көйгөйлөрдү аныктоону камтыйт. |
 |
HOMEPILOT Smart Programmable Timer Premium 10502001 User Manual Comprehensive installation and operating manual for the HOMEPILOT Smart Programmable Timer Premium (Model 10502001). Learn how to install, configure, and operate your smart roller shutter and blind controller. |
 |
HOMEPILOT addZ-Stick Quick User Guide Quick setup guide for the HOMEPILOT addZ-Stick for Gateway premium. Includes installation steps and customer service contact information. |
 |
Manuale di Istruzioni: Avvolgitore RolloTron a incasso smart per tapparelle classic Consulta il manuale di istruzioni per l'installazione e l'uso dell'avvolgitore RolloTron a incasso smart per tapparelle classic (modelli 10142345, 10142360, 10141545) di HOMEPILOT. Include guide alla configurazione, sicurezza e specifiche tecniche. |
 |
Homepilot Smart Plug Instruction Manual (11301001) Comprehensive instruction manual for the Homepilot Smart Plug (Item no. 11301001). Includes safety guidelines, installation steps, operating instructions, and technical specifications. |
 |
HOMEPILOT Rollladenmotor classic: Betriebsanleitung und Montageanleitung Umfassende Betriebsanleitung und Montageanleitung für den HOMEPILOT Rollladenmotor classic (Serien s10, m10, m20). Enthält Sicherheitshinweise, Installationsschritte, Funktionsbeschreibungen и Technische Daten. |
Ask a question about this manual
Ask about setup, troubleshooting, compatibility, parts, safety, or missing instructions. Manuals+ will review the question and use this page’s manual context to help answer it.