1. Киришүү
The HGLRC Draknight 2 Inch Frame Kit is engineered for high-performance FPV racing drones, offering a lightweight yet durable foundation for your build. Constructed from a combination of 3K carbon fiber and aluminum, this frame ensures optimal flight characteristics with high efficiency and low noise. This manual will guide you through the assembly, setup, and essential maintenance to maximize your drone's potential.

Figure 1.1: Fully assembled HGLRC Draknight 2 Inch FPV Racing Drone Frame Kit, showcasing анын компакттуу жана бекем конструкциясы.
2. Продукциянын өзгөчөлүктөрү
- High-Performance Design: Features a lightweight and durable aluminum top piece combined with 3K carbon fiber material for high-efficiency and low-noise flight.
- Туруктуулугу жана туруктуулугу: Built from premium materials for superior stability and longevity in various flight conditions.
- Ар тараптуу колдонуу мүмкүнчүлүгү: Compact design suitable for racing, aerial footage capture, and exploring new terrains.
- One-piece frame design: Provides a cool appearance and structural integrity.
- CNC aluminum parts: Greatly enhance protection and are strong and resistant to explosion.
- Multi-size battery compartment design: Offers flexibility for various battery sizes.

Figure 2.1: Key features of the Draknight frame, highlighting its robust construction and thoughtful design elements.
3. Кутуда эмне бар
Your HGLRC Draknight 2 Inch Frame Kit includes the following components:
- 1 x 2-Inch Frame Set
- 1 x 2-Inch Frame Matching Print Set
- 1 x 2-Inch Frame Matching Screw Bag Set
- 1 x Frame Manual (this document)
4. Техникалык шарттар
Detailed specifications for the Draknight 2 Inch Frame:
| Атрибут | Нарк |
|---|---|
| Продукт аты | Draknight 2-inch frame |
| Продукт түрү | Ultra-light toothpick FPV frame |
| Материал | 3K Carbon Fiber, Aluminum |
| Frame Type | 2 inch frame |
| Wheelbase | 91 мм |
| Өлчөмдөрү (L x W x Y) | 74mm x 84mm x 28mm (approximate assembled) |
| Integrated Bottom Plate | 2мм |
| Internal Minimum Height | 12мм |
| Flight Control Mounting Hole | 25.5x25.5мм |
| Supported Camera Size | 14x14mm (for thumb camera) |
| Motor Mounting Hole | 3xm1.4 |
| Frame Weight | 17г |

Figure 4.1: Detailed product parameters and dimensions of the Draknight 2-inch frame.
5. Монтаждоо жана орнотуу
Follow these steps carefully to assemble your HGLRC Draknight 2 Inch Frame Kit. Refer to the diagrams for visual guidance.
5.1 Exploded View and Component Identification

5.1-сүрөт: жарылган view of the Draknight frame components, including carbon fiber parts, CNC aluminum, screws, and TPU parts.
5.2 Орнотуу кадамдары
- Step 1: Attach Bottom Plate and CNC Aluminum Parts. Use M2*4mm screws to fix the frame bottom plate and the CNC left and right aluminum parts. Ensure proper alignment before tightening.
- Step 2: Secure Fixed Air Intake. Install the M2*4mm fixed air intake component.
- Step 3: Install Receiver Fixing Parts and Image Transmission Antenna Printing Parts. Attach the receiver fixing parts and image transmission antenna printing parts using the CNC aluminum buckle.
- Step 4: Insert Smooth Aluminum Column and Fix with Screw. Insert the M2*3.5*8mm smooth aluminum column into the tail section and secure it with an M2*4mm screw.

Figure 5.2: Step 1 of assembly, showing M2*4mm screws securing the bottom plate and CNC aluminum parts.

Figure 5.3: Step 2 of assembly, illustrating the attachment of the M2*4mm fixed air intake.
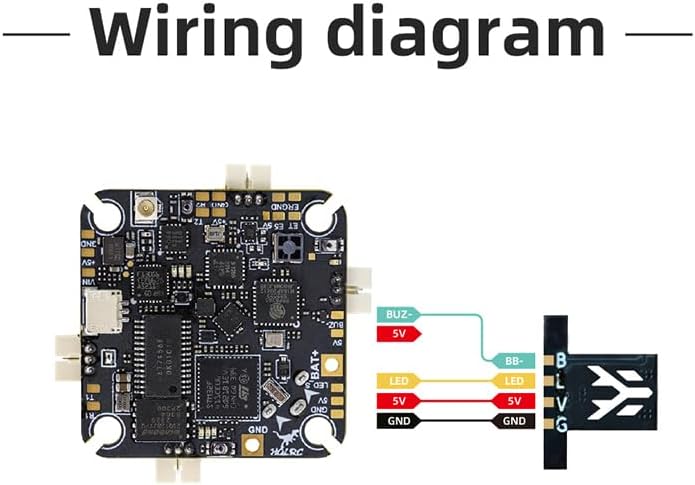
Figure 5.4: Step 3 of assembly, showing the installation of receiver and antenna components.
5.3 Wiring Diagram (Exampле)
While this manual focuses on the frame, proper wiring of your flight controller and other components is crucial. Below is an example wiring diagram for a typical flight controller setup. Always refer to the specific documentation for your flight controller and components.
5.5-сүрөт: Мисample wiring diagram for a flight controller, illustrating common connections.
6. Орнотуу жана конфигурациялоо
Once the frame is assembled, you will need to install and configure your electronic components (flight controller, ESCs, motors, FPV camera, VTX, receiver, etc.).
- Flight Controller Mounting: Utilize the 25.5x25.5mm mounting holes for your flight controller. Ensure proper vibration dampening if necessary.
- Мотор орнотуу: Mount your motors using the 3xm1.4 mounting holes.
- Камераны орнотуу: The frame supports 14x14mm cameras. Secure your FPV camera in the designated slot.
- Компоненттин жайгашуусу: Strategically place your ESCs, VTX, and receiver within the frame's internal space, considering weight distribution and airflow.
- Микропрограмманын конфигурациясы: After hardware installation, connect your flight controller to a computer and configure its firmware (e.g., Betaflight, Emuflight) according to your specific components and desired flight characteristics.
7. Иштетүү боюнча нускамалар
This frame provides the structural foundation for your FPV drone. Safe and responsible operation of the complete drone system is paramount.
- Always perform pre-flight checks, including propeller security, battery charge, and radio link integrity.
- Operate your drone in open areas, away from people, animals, and obstacles.
- Дрондорду иштетүүгө байланыштуу бардык жергиликтүү эрежелерди жана мыйзамдарды сактаңыз.
- Start with gentle flights to familiarize yourself with the drone's handling before attempting aggressive maneuvers.
8. Техникалык тейлөө
Regular maintenance will extend the lifespan of your Draknight frame and ensure continued performance.
- Зыянды текшерүү: After each crash or hard landing, thoroughly inspect the carbon fiber and aluminum parts for cracks, bends, or stress marks.
- Бурамаларды текшерүү: Periodically check all screws for tightness. Vibrations during flight can loosen fasteners.
- Clean the Frame: Remove dirt, dust, and debris from the frame, especially around motor mounts and electronic components. Use a soft brush or compressed air.
- Бузулган тетиктерди алмаштыруу: If any part of the frame is significantly damaged, replace it immediately to prevent further issues during flight.
9. Кыйынчылыктарды
This section addresses common issues related to the frame itself.
- Бош компоненттер: If components feel loose after assembly, re-check all screw connections and ensure they are tightened appropriately. Avoid over-tightening, which can strip threads.
- Вибрациялар: Excessive vibrations can sometimes be traced to a bent or cracked frame arm. Inspect arms carefully. Ensure motors are securely mounted and propellers are balanced and undamaged.
- Difficulty Fitting Components: Double-check that you are using the correct components for the specified mounting holes (e.g., 25.5x25.5mm for flight controller, 14x14mm for camera).
10. Колдоо
For any questions or assistance regarding your HGLRC Draknight Frame Kit, please feel free to contact HGLRC customer service. We are committed to providing support and will assist you within 24 hours.
You can typically find contact information on the official HGLRC webсайты же продуктуну сатып алган сатуучу аркылуу.